Introduction
Welcome to your fifth lesson! In our previous session, you learned how to use magic commands to write and execute code in multiple languages within a single Databricks notebook. This skill is foundational for developing sophisticated data pipelines.
Now that you can write the code, the next critical step is to manage it professionally. This lesson directly addresses the learning outcome: Use Databricks Repos to integrate with Git-based version control.
Your background as a data engineer means you're already familiar with the importance of version control for collaboration, reproducibility, and implementing CI/CD pipelines. Databricks Repos (formerly Git folders) provides a native integration with Git providers like GitHub, GitLab, and Azure DevOps, allowing you to apply these same software engineering best practices to your Databricks projects. We'll walk through the entire process, from configuration to a typical development workflow.
The "Why": Professional Development with Databricks Repos
Before diving into the "how," let's look at the standard workflow that Repos enables. Integrating Git is not just about backing up your code; it's about structuring your entire development lifecycle.
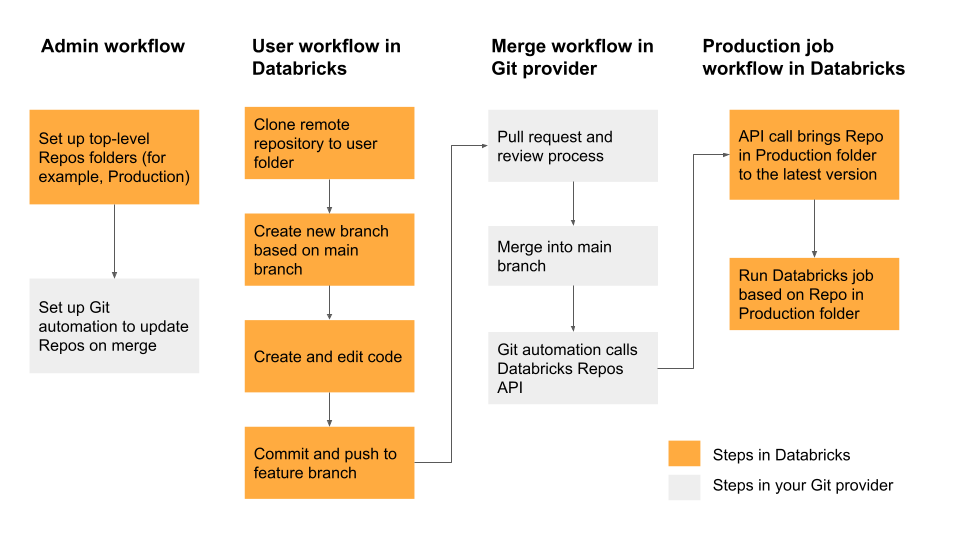
As you can see, the process mirrors the standard practices you're likely using in your current role:
- Isolate Development: Developers work in separate branches to avoid conflicts.
- Review and Merge: Changes are reviewed via pull requests in the Git provider.
- Automate Deployment: Merges to the main branch can trigger automated processes to update production jobs.
Step 1: Connecting Databricks to Your Git Provider
The first step is to configure your Databricks workspace to authenticate with your Git provider (we'll use GitHub for our examples). There are two primary methods for this.
Method 1: Link your Git account (OAuth-based)
This method is often simpler for interactive use. It involves authorizing Databricks as an application in your GitHub account.
The following video provides a clear, step-by-step demonstration of this process.
4. Databricks Repos Explained 🚀 | Git Integration, Hands-On Demo & Pro Tips
This video from The Data Master, titled 'Databricks Repos Explained', shows how to create a GitHub repository and link your Databricks workspace using the standard OAuth-based integration.
Watch from the beginning (00:26) to 04:21 to see how to create a new repo in GitHub and clone it into Databricks. Then, watch from 06:23 to 11:14 to understand the crucial configuration step of linking your GitHub account and granting permissions.
Method 2: Use a Personal Access Token (PAT)
This is a very common method, especially for programmatic access and CI/CD pipelines. You generate a token in your Git provider and add it to your Databricks user settings. Your experience with platforms like AWS and GCP likely involved similar token-based authentication for service accounts.
The official Databricks channel has a concise tutorial on this method.
Tutorial - Getting Started with Databricks Repos | Databricks Academy
Watch this official Databricks tutorial, 'Getting Started with Databricks Repos', to see how to generate a Personal Access Token (PAT) in GitHub and configure it in your workspace.
Watch from the beginning (00:00) to 02:12. Pay close attention to the steps for generating the token in GitHub and saving it within the 'Git Integration' section of your Databricks User Settings.
Both methods achieve the same goal. For this course, either is fine. The PAT method is good to be familiar with as it's frequently used in automated scripts and CI/CD tools.
Step 2: The Core Git Workflow in Databricks
Once configured, you can perform all the essential Git operations directly from the Databricks UI. Let's walk through a typical cycle.
Cloning a Repository
You initiate the process by cloning a remote repository into your Databricks workspace. This creates a "Repo" which is essentially a folder whose contents are synchronized with Git.
- In your workspace, navigate to Repos.
- Click Add Repo.
- Paste the URL of your Git repository and click Create.
Your repository's files will now be visible in your Databricks workspace.
Making Changes, Committing, and Pushing
This is where you'll spend most of your time. You can edit notebooks, add new files, or delete old ones. The Databricks UI provides a visual way to track these changes.
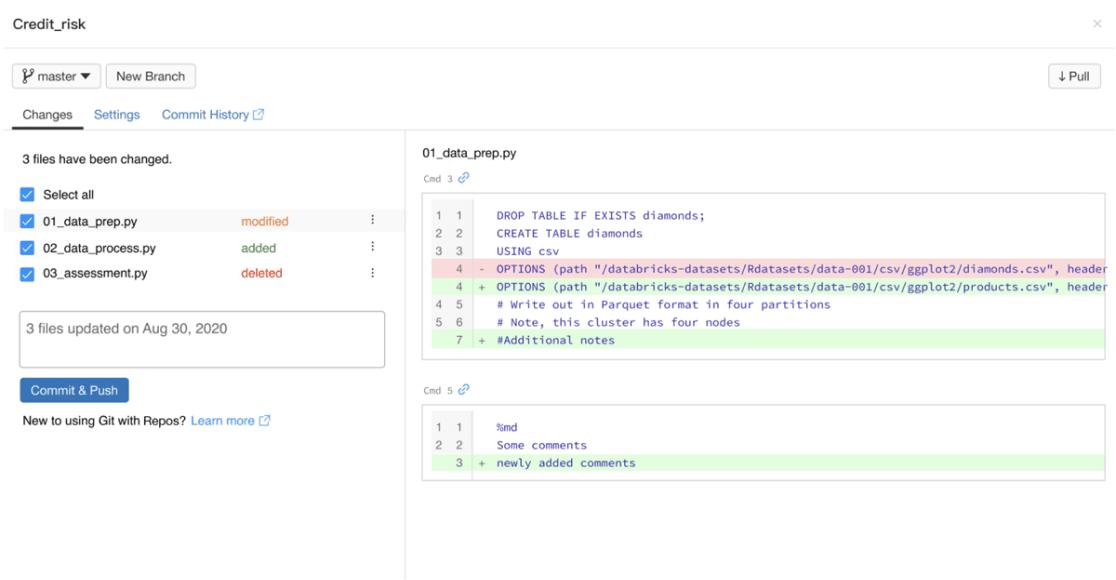
The workflow is as follows:
- Open a notebook within your cloned repo and make some changes.
- Click the Git branch button at the top-left of the notebook (e.g.,
main). This opens the Git dialog. - Review your changes in the diff view.
- Write a descriptive commit message in the text box.
- Click Commit & Push.
This video demonstrates this process clearly.
4. Databricks Repos Explained 🚀 | Git Integration, Hands-On Demo & Pro Tips
Let's return to 'Databricks Repos Explained' to see the commit, push, and pull cycle in action.
Watch from 11:14 to 14:35. The first part (to 12:21) shows a successful commit and push of new files. The second part shows how to modify an existing file and push the changes.
Pulling Changes
To keep your local Databricks Repo in sync with the remote repository (e.g., after a teammate merges their work), you need to pull.
- Open the Git dialog.
- Click the Pull button.
This will fetch the latest changes from the remote branch and apply them to your workspace. The following video segment demonstrates pulling changes that were made directly on GitHub.
4. Databricks Repos Explained 🚀 | Git Integration, Hands-On Demo & Pro Tips
This final clip from 'Databricks Repos Explained' demonstrates the pull operation, completing the bidirectional sync workflow.
Watch from 14:35 to 17:26. This section shows a change being made in the GitHub web interface and then demonstrates how to use the 'Pull' functionality in Databricks to sync that change.
Step 3: Branching for Best Practices
Committing directly to the main branch is not a good practice in a collaborative or production environment. Databricks Repos fully supports Git branching. The recommended workflow is to create a feature branch for your work.
Tutorial - Getting Started with Databricks Repos | Databricks Academy
The official Databricks video 'Getting Started with Databricks Repos' provides a great example of using a development branch.
Watch from 03:14 to 06:16. This segment shows how to create a new branch ('dev'), make changes within that branch, and then commit and push those changes specifically to the new branch on the remote repository.
Comprehensive Guide to Git Operations
You've now seen the fundamental operations: clone, commit, push, pull, and branch. The Databricks UI also supports more advanced operations like merging, rebasing, and resolving merge conflicts.
For a comprehensive, hands-on reference, I encourage you to review the official documentation.
Run Git operations on Databricks Git folders
The official documentation page 'Run Git operations on Databricks Git folders' is an excellent resource that covers all the UI-based Git operations in detail.
Skim through this document. You don't need to memorize it, but pay attention to the sections on: 'Access the Git dialog', 'Create a new branch', 'Switch to a different branch', 'Commit and push changes', 'Pull changes', 'Merge branches', and 'Resolve merge conflicts'. This will serve as a valuable reference as you use Repos more.
Conclusion
In this lesson, you have learned how to integrate your Databricks development work with a Git-based version control system using Databricks Repos. This is a non-negotiable skill for any professional data engineer working on the platform, as it underpins collaboration, code quality, and CI/CD.
Key Takeaways:
- Databricks Repos provides native Git integration within your workspace.
- You can connect to a Git provider using OAuth or a Personal Access Token (PAT).
- The Databricks UI allows you to perform all core Git operations: clone, branch, commit, push, and pull.
- The best practice is to work in feature branches to isolate development and use pull requests in your Git provider for code reviews and merging.
- The UI also supports resolving merge conflicts directly within Databricks.
Preview of the Next Lesson:
With your development environment now fully configured for professional code management, you're ready to start building the core components of the lakehouse. In the next lesson, we will begin Module 2 by diving into the foundational storage layer: Delta Lake. You will learn how to Create Delta tables and perform basic queries using SQL and Python, and you can use the Repos skills you learned today to manage that code.