In our previous lesson, we established the theoretical foundation of Solana's architecture: the account model. You learned how Solana separates code (programs) from state (data accounts) and the critical distinctions between an account's owner, an authority defined in its data, and a transaction signer.
Today, we transition from theory to practice. This lesson will guide you through setting up your local development environment and using the Solana Command-Line Interface (CLI). The CLI is an indispensable tool for any Solana developer or security researcher. It's your primary means of interacting directly with the blockchain, creating wallets, and, most importantly for our purposes, inspecting the state of any account on the network. By the end of this hour, you will be able to use the CLI to see the very account fields we discussed—owner, lamports, data, executable—on live accounts.
1. Setting Up Your Development Environment
Your journey into Solana development and security begins with installing the necessary tooling. The core component is the Solana CLI, which bundles a powerful set of commands for interacting with the network. It relies on a few prerequisites, including Rust (which you are already comfortable with) and Node.js.
The following guide provides a comprehensive walkthrough for setting up your environment. We will follow its steps to install the Solana CLI.
Solana Dev Setup Guide (Part 1: CLI) | by Chris St. John
This article provides clear, step-by-step instructions for installing all the necessary tools for Solana development. We'll focus on getting the CLI up and running.
Start with section 1. Install Node.js. Since you are not familiar with the Node.js ecosystem, this part is important. Follow the instructions to install a Node.js version manager (nvm for macOS/Linux or fnm for Windows) and Node.js itself. The guide also mentions pnpm, which is a package manager; it's good practice to install it as well. You can skip the Rust installation in section 1.3, as you already have a working Rust environment. Proceed to Step 2 to install the Solana CLI tool suite. This involves running a single script. Make sure to follow the instructions in 2.1 — Add the CLI to our PATH to ensure the solana command is available in your terminal. Finally, verify your installation by running the command in step 2.2.
A crucial note for Windows users: Solana development, particularly with Rust and native programs, is best supported within the Windows Subsystem for Linux (WSL). The guide mentions this, and it's highly recommended you follow that path to avoid compatibility issues.
2. Configuring the CLI and Creating a Wallet
With the tools installed, your next step is to configure the CLI to talk to the correct Solana network, or "cluster." Solana has several clusters:
- Mainnet-beta: The live, production network with real assets.
- Devnet: A development network that mimics mainnet but uses free, valueless "test" SOL. This is where we'll start.
- Testnet: Another testing network, often used for stress testing and network upgrades.
- Localhost: A private blockchain running entirely on your machine, which you'll use extensively for development and testing exploits.
Let's configure your CLI for Devnet and create your first wallet.
Solana Tutorial - Learn the Solana CLI (clusters, wallets, deploy, etc)
This video gives a good overview of the different clusters and demonstrates creating a new keypair.
First, watch the segment on Solana clusters to get a clear conceptual understanding of the different networks you can connect to. Next, watch the demonstration of generating a new keypair. This will show you the solana-keygen new command in action and explain the output.
Now, let's perform these steps yourself.
-
Set CLI to Devnet: In your terminal, run the following command to point the CLI to the Devnet cluster.
solana config set --url https://api.devnet.solana.comYou can confirm the setting with
solana config get. -
Generate a Keypair: Use the
solana-keygentool to create a new keypair. This file contains the private key for a new account.solana-keygen new --outfile ~/my-solana-wallet.json
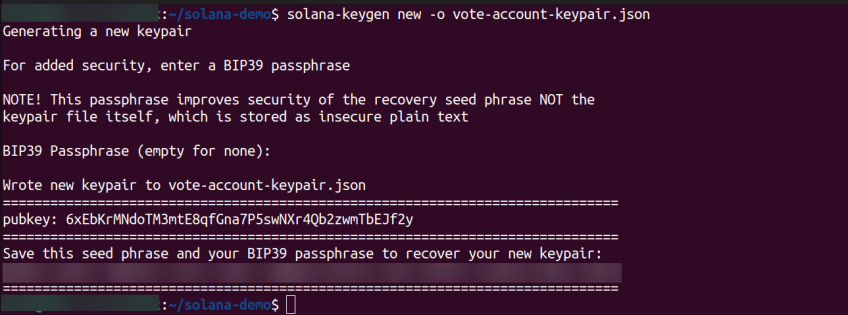
An example of the solana-keygen new command output. It shows the command, prompts for an optional passphrase, and displays the new public key and a secret recovery seed phrase.
As a future security researcher, pay close attention to the output:
- Passphrase: This encrypts your seed phrase, not the keypair file itself. The JSON file on disk remains unencrypted.
- Pubkey: This is your public wallet address. It is safe to share.
- Seed Phrase: This is a secret. Anyone with this phrase can access your account. For development wallets, this is less critical, but you should treat all seed phrases as confidential.
-
Set as Default Wallet: Tell the CLI to use this new keypair for all subsequent commands.
solana config set --keypair ~/my-solana-wallet.jsonYou can now run
solana addressto see your new wallet's public key. -
Fund Your Wallet: You need some SOL to pay for transaction fees. On Devnet, you can get free SOL from a "faucet."
solana airdrop 2
This will request 2 SOL for your default wallet. Check your new balance with `solana balance`.
3. Inspecting On-Chain Accounts
Now you can use the CLI to directly inspect account information on the blockchain, connecting back to the theory from our last lesson. The primary command for this is solana account.
Using Solana Explorers | Solana Development Debugging Guide
This resource from Metaplex provides an excellent overview of debugging tools. We'll focus on the section covering CLI account inspection.
Please read the subsection titled Via CLI under "Inspecting Accounts." It shows the basic solana account command and its JSON output variant, which is extremely useful for scripting and analysis.
Let's try this on two different types of accounts.
First, inspect your own wallet account that you just created. Get your address with solana address and then pass it to the solana account command:
# Replace <YOUR_WALLET_ADDRESS> with the output from `solana address`
solana account <YOUR_WALLET_ADDRESS>
You will see output similar to this:
Public Key: <YOUR_WALLET_ADDRESS>
Balance: 2 SOL
Owner: System Program
Executable: No
Rent Epoch: ...
Data Size: 0
This is a perfect example of a standard data account (in this case, one that holds SOL). Notice the key fields:
- Balance: The
lamportsfield, displayed in SOL. - Owner: The
System Program(11111111111111111111111111111111). As we discussed, the System Program is the default owner and is responsible for creating accounts and transferring SOL. - Executable:
No. This confirms it's a data account, not a program account. - Data Size:
0. Your wallet account doesn't store any custom data; its purpose is just to hold SOL.
Next, let's inspect a program account. We'll use the well-known SPL Token Program, which manages most of the tokens on Solana.
solana account TokenkegQfeZyiNwAJbNbGKPFXCWuBvf9Ss623VQ5DA
The output will look very different:
Public Key: TokenkegQfeZyiNwAJbNbGKPFXCWuBvf9Ss623VQ5DA
Balance: ... SOL
Owner: BPFLoaderUpgradeab1e11111111111111111111111
Executable: Yes
Rent Epoch: ...
Data Size: ... (a large number)
This demonstrates a program account:
- Owner: The
BPFLoaderUpgradeab1e.... This is a system-level program responsible for deploying, upgrading, and executing other programs on Solana. All executable program accounts are owned by a loader. - Executable:
Yes. The runtime knows it can execute the code stored in this account's data field. - Data Size: A large number, representing the size of the compiled BPF bytecode for the SPL Token program.
You have now successfully set up your environment and used the CLI to observe the fundamental differences between data accounts and program accounts live on the blockchain.
Conclusion
In this lesson, you bridged the gap between theory and practice. You've set up a complete local development environment by installing the Solana CLI and its dependencies. You now know how to manage basic CLI configuration, generate keypairs, and fund a wallet on Devnet.
Most importantly, you used the solana account command to inspect on-chain accounts, directly observing the owner, executable, and lamports fields we discussed previously. This skill is foundational for security research, as your first step in analyzing a target program will always be to understand its accounts and their state.
In the next lesson, we will delve deeper into the Solana runtime, exploring how the network processes transactions through validators, slots, and epochs. We will also examine transaction economics, including the role of compute units and priority fees, which are critical for understanding both performance and potential Denial-of-Service vectors.