Hello! Welcome back to our course on building Generative AI expertise.
In our last lesson, we dove deep into the theory and derived the four fundamental equations of backpropagation. Today, we transition from theory to practice. Our goal is to implement both forward and backward propagation from scratch for a multi-layer perceptron (MLP) using Python and NumPy.
This is a milestone lesson. Writing your own neural network training loop demystifies the entire process, giving you a concrete understanding of what frameworks like PyTorch and TensorFlow are doing under the hood. This hands-on experience is exactly the kind of deep, foundational knowledge that contributes to your goal of becoming an indispensable AI engineer.
Let's quickly recap the four equations we derived, which will be our blueprint for today's implementation:
- Output Error ():
- Backpropagate Error ():
- Bias Gradient ():
- Weight Gradient ():
By the end of this lesson, you will have translated each of these mathematical steps into working code.
1. Setting the Stage: Network Structure and Initialization
Before we can propagate anything, we need a network. We'll structure our implementation logically with separate functions for initialization, forward pass, and backward pass.
Initializing Parameters
A neural network's parameters—weights () and biases ()—must be initialized before training begins. A common strategy is to initialize the weights with small random numbers. This breaks the symmetry between neurons and ensures they learn different features. Biases can be initialized to zero or small random numbers.
The dimensions of the weight matrices are critical. For a connection between layer with neurons and layer with neurons, the weight matrix will have the shape (n_neurons_current_layer, n_neurons_previous_layer), or . The bias vector will have the shape .
To see a clean implementation of this, let's watch a short video segment.
Building a neural network FROM SCRATCH (no Tensorflow/Pytorch, just numpy & math)
The video 'Building a neural network FROM SCRATCH' by Samson Zhang shows a very clear function for initializing parameters. This will give you a practical starting point for our code.
Watch from 15:07 to 16:33. Notice how the dimensions of the weight and bias matrices are defined based on the number of nodes in consecutive layers. The weights are initialized to random values between -0.5 and 0.5.
2. The Forward Pass: From Input to Prediction
The forward pass is the process of taking an input and feeding it through the network layer by layer to get a prediction. Given your background, the most efficient way to think about this is in terms of matrix operations.
For each layer :
- Calculate the pre-activation:
- Calculate the activation:
Here, is the matrix of activations from the previous layer, where each column is a separate training example. This vectorized approach allows us to process an entire batch of data at once using NumPy's efficient matrix multiplication (.dot() or @).
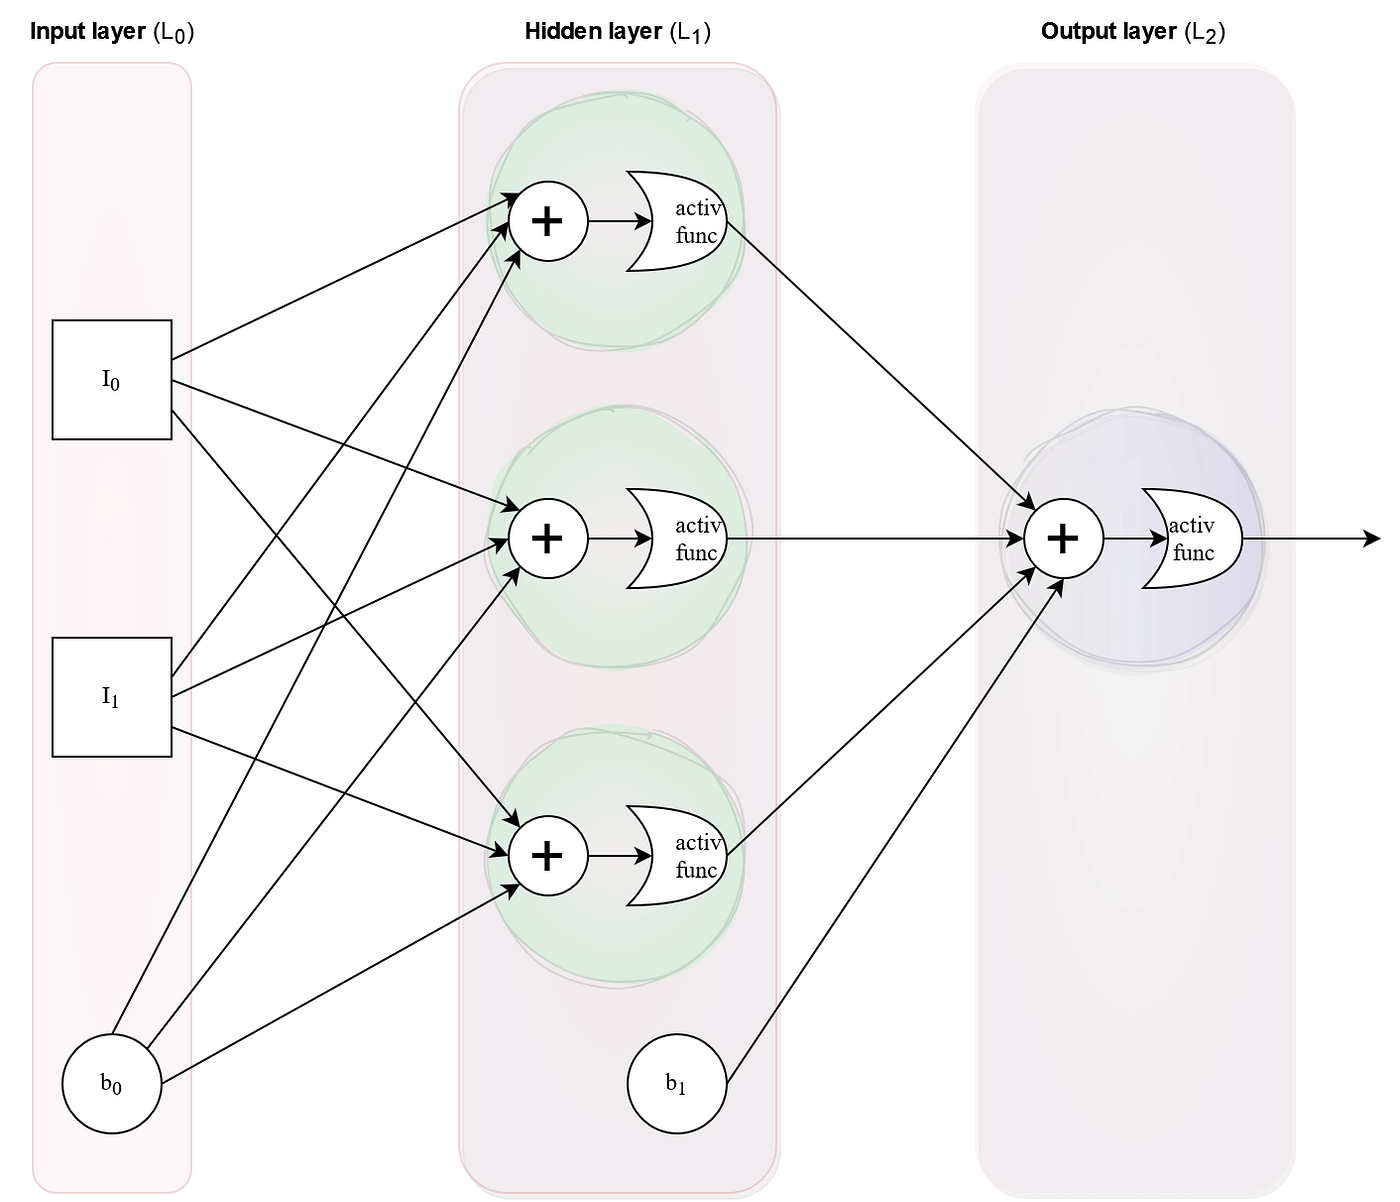
It's crucial to cache the intermediate values ( and ) during the forward pass. We will need them for the backward pass calculations.
Let's see this implemented in code.
Building a neural network FROM SCRATCH (no Tensorflow/Pytorch, just numpy & math)
The same video provides a concise implementation of the forward propagation function, including helper functions for the ReLU and Softmax activations.
Watch from 16:33 to 18:56. Pay attention to how the equations Z = W.dot(A) + B and A = relu(Z) are directly translated into NumPy code. Note how the output of one layer becomes the input to the next.
3. The Backward Pass: Calculating Gradients
This is where we implement the four equations we derived. We start from the final layer and work our way backward, calculating the gradient of the loss with respect to each parameter.
The process for a single training batch is:
- Compute the output error (): This is the first step of backpropagation. It tells us how much the pre-activation of the output layer contributed to the final loss. The calculation depends on your loss function. For MSE, the derivative of the loss term is simply .
- Calculate gradients for the output layer (): Using and the cached activation from the previous layer , we apply our gradient equations.
- Propagate the error to the previous layer: We calculate using and the weights .
- Calculate gradients for the hidden layer (): Using the new and its corresponding input activation .
- Repeat this process until we reach the first layer.
To get a complete, end-to-end view of both the forward and backward passes implemented together, the following tutorial is excellent. It's a bit longer, but it walks through the entire logic with code.
Neural Network From Scratch In Python
The video 'Neural Network From Scratch In Python' from Dataquest provides a comprehensive, step-by-step walkthrough of implementing a full forward and backward pass for a two-layer network.
This is a longer segment, so grab a coffee! Watch from 20:52 to 56:25. It's broken into three main parts: Forward Pass with Matrices (20:52 - 30:27): Reinforces what we just saw, showing how to efficiently calculate layer outputs using matrix multiplication. Backpropagation for Layer 2 (32:47 - 48:12): This is the crucial starting point of the backward pass. Focus on how the output_gradient is used to find the layer_2_weight_gradient. Backpropagation for Layer 1 (48:12 - 56:25): This demonstrates the 'propagation' step. Pay close attention to how the gradient is passed from layer 2 to layer 1 by multiplying by the transposed weights of layer 2. It also covers handling the derivative of the ReLU function.
The article below provides the same logic but in a clean, object-oriented Python class. It's an excellent reference to read through, as the code is a direct translation of the backpropagation equations.
Implement a neural network from scratch with Python/Numpy
This article, 'Implement a neural network from scratch with Python/Numpy', presents a very clear and concise class-based implementation. It's a great way to see the code organized differently from the video.
Read through the code for the feedforward and backpropagation functions. Notice how the backpropagation function first calculates deltas[-1] (the output error) and then iterates backward in a loop to compute the deltas for the hidden layers. The code for calculating dw and db is a direct, vectorized implementation of our gradient equations.
Test your understanding!
In the backpropagation step for a hidden layer , the error is calculated using the weights of the next layer, . Why don't the weights of the current layer, , appear in this specific calculation?
Show answer
This is a great question that gets to the heart of the chain rule. The error (which is ) measures how the pre-activation affects the final loss. The influence of flows forward through the activation , and then through the weights to affect , and so on.
To calculate the gradient, we trace this path backward. The error signal from layer (i.e., ) is propagated back to layer through the very connections it flowed forward through, which are defined by the weights .
The weights of the current layer, , are used later to calculate the gradient of the loss with respect to themselves (i.e., ), but they are not used to propagate the error signal from a future layer to the current one.
4. The Grand Finale: The Training Loop
Now we assemble the pieces. A training loop for a neural network does the following for a set number of epochs (passes over the entire dataset):
- Iterate through the training data in batches.
- For each batch:
a. Perform the forward pass to get the predictions and cached values.
b. Compute the loss.
c. Perform the backward pass to compute the gradients ().
d. Update the parameters using gradient descent:
- Optionally, evaluate the model on a validation set to monitor progress.
The Dataquest video you watched shows a complete, runnable training loop that puts everything together.
Neural Network From Scratch In Python
Let's see the full training loop in action. This segment from the Dataquest video combines all the functions we've discussed into a working neural network.
Watch from 58:24 to 1:12:38. Focus on the structure of the for loop for epochs and the inner for loop for batches. See how the forward and backward functions are called in sequence, followed by the parameter update step.
Conclusion
Congratulations! You have now walked through the complete implementation of a neural network's training algorithm from scratch. This is a formidable and hugely important exercise.
Key Takeaways:
- Forward Propagation is a sequence of matrix multiplications and non-linear activations, flowing from input to output. Caching intermediate values is essential.
- Backward Propagation is an algorithm that computes gradients by propagating an error signal backward, from the output to the input.
- The core of backprop involves calculating an error term for each layer and using it to find the gradients for that layer's weights and biases.
- The Training Loop orchestrates the entire process by repeatedly calling the forward pass, backward pass, and updating the parameters using the computed gradients.
You've bridged the gap between the abstract math of our last lesson and the concrete reality of code. This gives you a powerful mental model for what happens every time you call model.train() in a high-level framework.
Preview of the Next Lesson:
We've built the engine of our neural network. Now, we need to tune it. In the next lesson, we will explore some of the critical components we used today: "Explain the role of various activation functions (e.g., ReLU, Sigmoid) and weight initialization strategies." We've seen ReLU in action, but why is it so popular? Are there better choices? How can smart initialization make our network train faster and more reliably? We'll answer these questions next.