Hello! Welcome to the first lesson in our Django course. I'm excited to get started and build a solid foundation with you.
Given your background in data science and AI engineering, you're already very comfortable with Python and managing project dependencies. We'll leverage that knowledge to move quickly through the setup process and focus on the architectural concepts of Django that are crucial for building robust APIs.
Today, we'll build our project's skeleton. The goal is to initialize a new Django project and a dedicated app, understand the purpose of the files and folders Django creates, and perform the initial configuration. This first step is essential for creating the clean, scalable backend API you aim to build.
Let's begin.
1. The Foundation: Environment and Project Setup
Every professional software project starts with a clean, isolated development environment. This prevents dependency conflicts between different projects on your machine—a concept that's likely familiar from your work with Python in data science. We'll use pipenv, a modern tool that handily manages both virtual environments and package dependencies.
To get started, let's watch a section of a comprehensive Django tutorial by Programming with Mosh. This video will guide you through installing the necessary tools and creating your first project.
Django Tutorial for Beginners – Build Powerful Backends
This first video segment covers the basics of Django, the client-server model, and most importantly, how to set up your development environment and create an initial Django project.
Please watch from the beginning of the 'What is Django?' section until the end of 'Creating Our First Project'. Pay close attention to the environment setup with pipenv and the django-admin startproject command. The timestamps are from 02:37 to 18:41.
As you followed along with the video, you've completed these key steps:
- Created a project directory (e.g.,
api_project). - Installed Django within a new virtual environment using
pipenv install django. This created aPipfileto track dependencies. - Activated the virtual environment with
pipenv shell. - Created the Django project using
django-admin startproject myproject ..
The . at the end is a crucial detail that prevents Django from creating a redundant, nested project directory, keeping our file structure clean from the start.
Your project directory should now look something like this:
api_project/
├── manage.py
├── myproject/
│   ├── __init__.py
│   ├── asgi.py
│   ├── settings.py
│   ├── urls.py
│   └── wsgi.py
└── Pipfile
Let's quickly break down the most important pieces:
manage.py: Your project's command-line utility. You'll use this for almost all interactions, like running the server, creating apps, and managing the database. It's a thin wrapper arounddjango-adminthat points to your project'ssettings.pyfile.myproject/: This is the main project configuration package.settings.py: Contains all project settings, such as database configuration, installed apps, and security keys. This is the central configuration file.urls.py: The main URL declaration file. It's like a table of contents for your site, mapping URL patterns to the code that handles them.
Pipfile: Managed bypipenv, this file declares your project's dependencies, similar to arequirements.txtfile.
To confirm everything is working, run the development server from your terminal:
python manage.py runserver
You should see output indicating the server is running. Visiting http://127.0.0.1:8000 in your browser will show you the Django welcome page.
2. Projects vs. Apps: Structuring Your Code
In Django, there's a key distinction between a project and an app.
- A Project is the entire web application. It's a collection of configurations and apps. You have one project.
- An App is a self-contained module within a project that performs a specific function. For example, you might have an app for handling user accounts, another for managing products, and a third for processing blog posts. A project is composed of one or more apps.
This modular design is one of Django's strengths, promoting code reusability and separation of concerns.
For our project, we'll create our first app. A common best practice for keeping custom apps organized is to place them within a dedicated apps directory. This makes it immediately clear which apps are part of your project versus third-party packages.
Let's create this structure. In your project's root directory (where manage.py is), do the following:
- Create a new directory named
apps:mkdir apps - Navigate into the new directory:
cd apps - Now, create your first app. We'll call it
core, as it will contain the core functionality of our API. Note that we callmanage.pyfrom one level up.python ../manage.py startapp core
If you go back to the root directory and list the contents, your structure should now include the new app:
api_project/
├── apps/
│   └── core/
│       ├── __init__.py
│       ├── admin.py
│       ├── apps.py
│       ├── migrations/
│       │   └── __init__.py
│       ├── models.py
│       ├── tests.py
│       └── views.py
├── manage.py
├── myproject/
│   ...
└── Pipfile
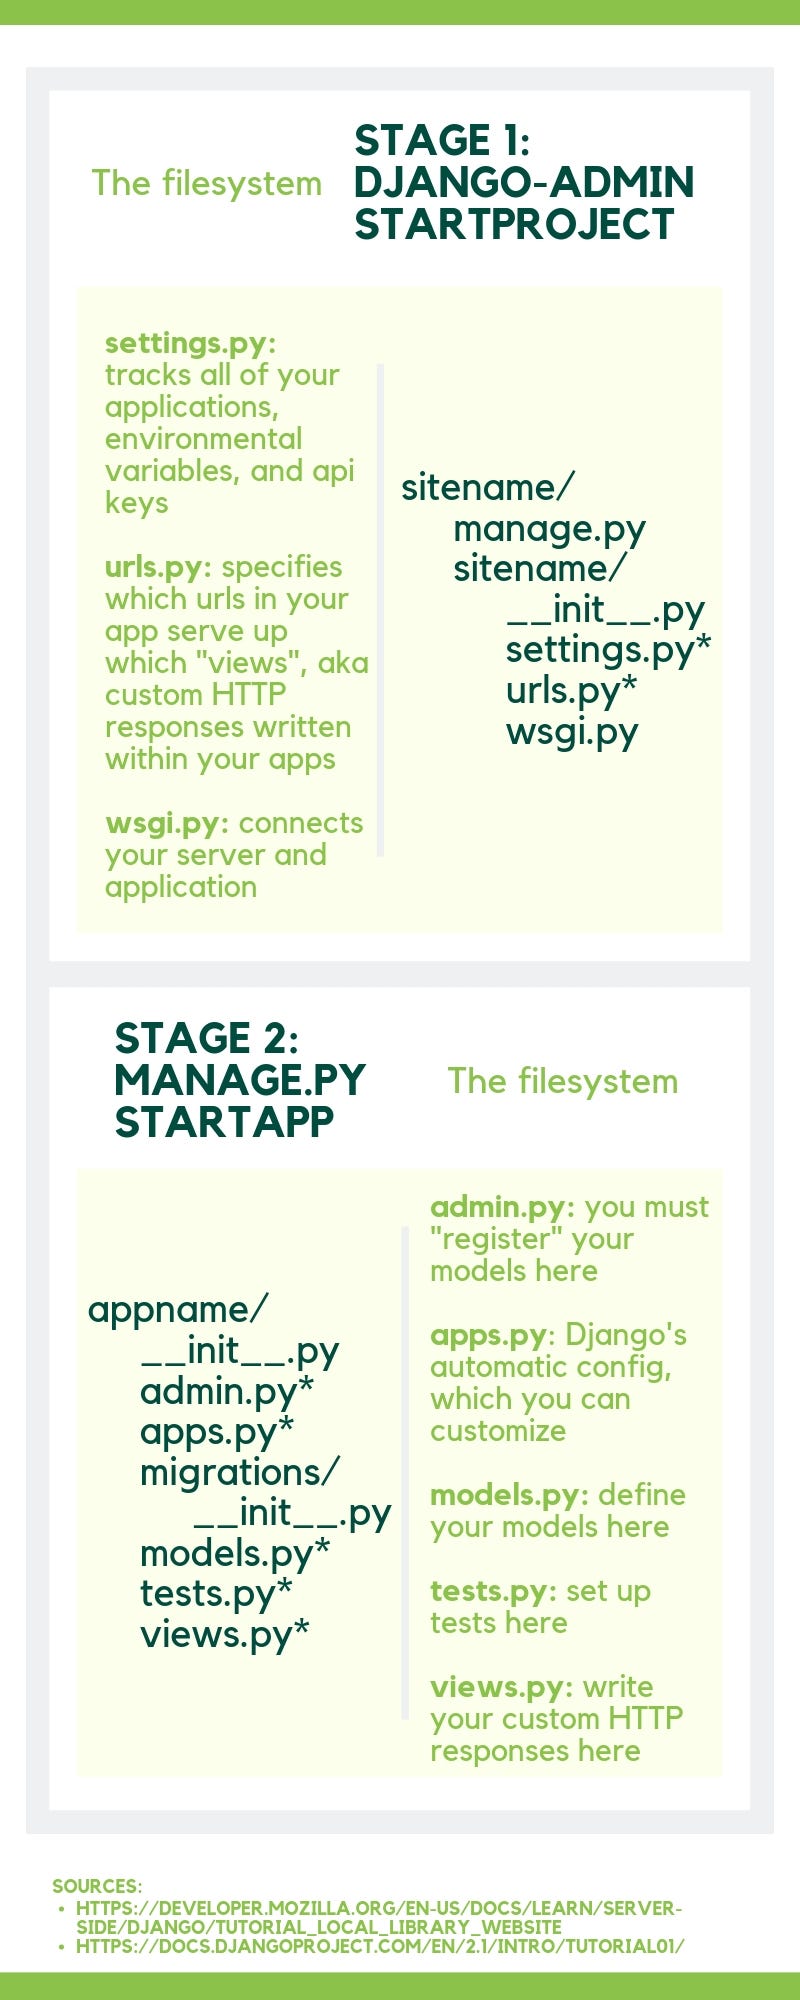
Here’s a quick rundown of the files inside your core app:
models.py: Where you'll define your database models (data structure).views.py: Where you'll write the logic to handle requests and return responses. For our API, these will be our request handlers or "endpoints".admin.py: For registering your models with Django's built-in admin interface.apps.py: Configuration file for this specific app.migrations/: Stores database schema changes.
3. Registering the App and Configuring Settings
You've created the app, but the Django project doesn't know it exists yet. We need to register it in the main settings.py file.
The following resource provides a clear walkthrough of creating an app and registering it.
Setting up a Basic Django Backend
This article, 'Setting up a Basic Django Backend', provides a concise textual guide to creating an app and, most importantly, adding it to the INSTALLED_APPS list in settings.py.
Read the section that starts right after the python3 manage.py startapp 'app_name' command block. Focus on how to add your newly created app to the INSTALLED_APPS list in the settings.py file.
Now, apply this to our project:
- Open
myproject/settings.py. - Find the
INSTALLED_APPSlist. - Add your new app to this list. Because we placed it inside the
appsdirectory, we need to use the full Python path:'apps.core'. It's conventional to add your custom apps after the built-in Django apps.
Your INSTALLED_APPS should look something like this:
INSTALLED_APPS = [
    'django.contrib.admin',
    'django.contrib.auth',
    'django.contrib.contenttypes',
    'django.contrib.sessions',
    'django.contrib.messages',
    'django.contrib.staticfiles',
    # Our custom app
    'apps.core',
]
By using the apps. prefix, we've created a clear namespace for our project's internal applications. This is a small but powerful technique that greatly improves project clarity as it grows.
Test your understanding!
Imagine our API needs to handle product data. Following the structure we've established, what exact shell commands would you run (and from which directory) to create a new products app, and what string would you add to INSTALLED_APPS in settings.py?
Show answer
- From the project's root directory, navigate into the
appsfolder:cd apps - Run the
startappcommand to create the new app:python ../manage.py startapp products - In
myproject/settings.py, add the following string to theINSTALLED_APPSlist:'apps.products'
Conclusion
Congratulations on completing the first lesson! We've accomplished a lot in this initial session:
- Set up a professional development environment using
pipenvto isolate our project. - Initialized a Django project and understood the roles of
manage.py,settings.py, andurls.py. - Established a scalable directory structure by creating an
appsnamespace for our custom Django applications. - Created and registered our first app,
core, which will serve as the foundation for our API.
You now have a clean, well-organized Django project ready for development. This structure will serve you well as we begin to build more complex features.
In our next lesson, we will bring our API to life by defining our first data model in models.py. We'll then learn how to use Django's Object-Relational Mapper (ORM) and migration system to create the corresponding tables in our database, all without writing a single line of SQL.