Hello! Welcome back to our Django course.
In our last lesson, we laid the groundwork for our project by setting up the environment, initializing the project and our first app (core), and organizing the file structure. We now have a clean, scalable skeleton for our API.
Today, we're going to build the data layer. The goal of this lesson is to define our first data model, use Django's migration system to create the database schema, and interact with our data using the Django Object-Relational Mapper (ORM) directly from the command line. This is the heart of your backend, defining what data your API will manage and how it's stored.
1. The ORM: Bridging Python and SQL
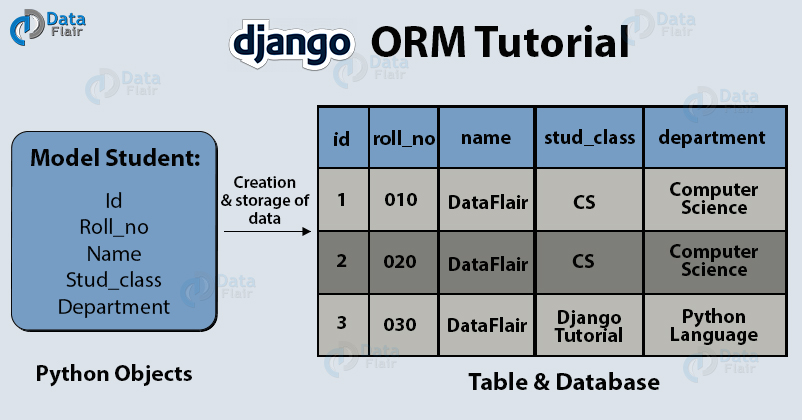
Before we write any code, let's understand the core concept we'll be using: the Object-Relational Mapper (ORM). As someone with a background in Python and SQL, you'll find this concept particularly powerful. The ORM is an abstraction layer that lets you interact with your database using high-level Python code (objects and methods) instead of writing raw SQL queries.
Think of it like this: you use libraries like Pandas to manipulate dataframes without writing low-level C code. Similarly, Django's ORM lets you manage your database using Python classes, which it then translates into efficient SQL behind the scenes.
A Model in Django is simply a Python class that defines the structure of a piece of data. Each model maps to a single database table, and each attribute of the model class represents a column in that table.
2. Defining Your First Model
Let's put this into practice. For our API, we'll start with a simple Task model. This will represent a to-do item.
Open your project and navigate to the apps/core/models.py file. This is where all models for our core app will live.
To see how a model is constructed, let's watch a short segment of a video that walks through creating two simple models.
Django - Models, Databases and Migrations
This video from BugBytes clearly demonstrates how to define Django models. Pay close attention to how a class is defined, how it inherits from models.Model, and the syntax for adding different types of fields.
Watch the section 'Creating models' from 04:55 to 09:36. The video discusses two models, Question and Choice. For now, focus on the basic field types like CharField and DateTimeField. The video also introduces ForeignKey, which is a concept we will cover in detail in our next lesson, so just take note of it for now.
Now, let's apply those concepts to create our own Task model. Add the following code to your apps/core/models.py file:
from django.db import models

class Task(models.Model):
    title = models.CharField(max_length=200)
    description = models.TextField(blank=True, null=True)
    created_at = models.DateTimeField(auto_now_add=True)
    is_completed = models.BooleanField(default=False)

    def __str__(self):
        return self.title
Let's break this down:
class Task(models.Model):: Our classTaskinherits frommodels.Model, which tells Django it should be managed by the ORM.title = models.CharField(...): A field for character data, perfect for short text like a title.max_lengthis a required argument.description = models.TextField(...): Similar toCharField, but for longer text content without a requiredmax_length.blank=True, null=Truemeans this field is optional at both the form validation level (blank) and the database level (null).created_at = models.DateTimeField(auto_now_add=True): A field for storing a date and time.auto_now_add=Trueautomatically sets this value to the current timestamp when an object is first created.is_completed = models.BooleanField(default=False): A true/false field. We set adefaultvalue ofFalse.def __str__(self):: This is a standard Python method. In Django, it's important because it defines the human-readable representation of an object, which is incredibly useful for debugging and in the Django admin interface.
3. The Migration Workflow: From Model to Database
Now that we've defined our model in Python, we need to tell Django to create the corresponding table in our database. This is a two-step process: making the migration and then applying it.
The following resource provides a clear text-based guide to this process.
The Real Python article 'Django Migrations: A Primer' is an excellent reference for this workflow. We'll use it to understand the makemigrations and migrate commands.
Read the sections 'Creating Migrations' and 'Applying Migrations'. This will walk you through the makemigrations and migrate commands and explain what they do.
Let's execute this workflow for our Task model.
Step 1: Create the Migration File
Run the following command in your terminal. This tells Django to inspect the models in the core app, detect the new Task model, and generate a migration file.
python manage.py makemigrations core
You should see output like this:
Migrations for 'core':
  apps/core/migrations/0001_initial.py
    - Create model Task
Django has created a file inside apps/core/migrations/. This file is a Python script that contains the instructions for creating the Task table. It's meant to be committed to your version control system (like Git).
Step 2: (Optional but insightful) Inspect the SQL
Since you're familiar with SQL, you might be curious about what the ORM is doing under the hood. Django provides a command to preview the SQL that a migration will run.
python manage.py sqlmigrate core 0001
This will print the raw CREATE TABLE statement that Django has prepared for your Task model. This is a fantastic way to see the direct translation from your Python class to the database schema.
Step 3: Apply the Migration
Finally, let's apply the migration to create the table in our database. The default database is a file named db.sqlite3 in your project's root directory.
python manage.py migrate
You'll see Django apply migrations not just from our core app, but also from its built-in apps (for handling users, sessions, etc.). When it gets to our migration, you'll see a line like:
Applying core.0001_initial... OK
Success! Your Task model now has a corresponding table in the database.
4. Talking to the Database: The Django Shell
Now that our table exists, let's interact with it. The Django Shell is an interactive Python interpreter that has your project's environment loaded, giving you full access to the ORM.
This short video provides a perfect demonstration of using the shell to create and view data.
Try DJANGO Tutorial - 9 - Create Product Objects in the Python Shell
This video from CodingEntrepreneurs gets straight to the point, showing you how to launch the Django shell, import a model, and perform basic database operations.
Watch from the beginning until 02:20. This will cover launching the shell (manage.py shell), importing your model, querying for all objects (.all()), and creating new objects (.create()).
Let's try this ourselves with our Task model.
1. Launch the shell:
python manage.py shell
2. Import the model:
>>> from apps.core.models import Task
3. Create some data:
Let's create a few tasks using Task.objects.create(). The objects attribute is the default "manager" for a model, providing the main interface for database queries.
>>> Task.objects.create(title="Learn Django Models", description="Complete the second lesson of the course.")
<Task: Learn Django Models>
>>> Task.objects.create(title="Build an API", is_completed=False)
<Task: Build an API>
>>> Task.objects.create(title="Deploy to production", description="Figure out hosting later.", is_completed=True)
<Task: Deploy to production>
4. Read (Query) the data:
You can retrieve objects from the database using methods on the objects manager.
- Get all tasks:
all()returns aQuerySetof all objects in the table.
>>> all_tasks = Task.objects.all()
>>> all_tasks
<QuerySet [<Task: Learn Django Models>, <Task: Build an API>, <Task: Deploy to production>]>
- Filter for specific tasks:
filter()returns a newQuerySetcontaining objects that match the given criteria.
>>> incomplete_tasks = Task.objects.filter(is_completed=False)
>>> incomplete_tasks
<QuerySet [<Task: Build an API>]>
- Get a single task:
get()retrieves a single object. It will raise an error if no object is found or if more than one is found.
>>> task = Task.objects.get(id=1)
>>> task.title
'Learn Django Models'
5. Update data:
To update an object, you retrieve it, change its attributes, and then call the save() method.
>>> task_to_update = Task.objects.get(title="Build an API")
>>> task_to_update.is_completed = True
>>> task_to_update.save()
Now, if you filter for incomplete tasks again, it will be an empty list.
6. Delete data:
To delete an object, retrieve it and call the delete() method.
>>> task_to_delete = Task.objects.get(id=3)
>>> task_to_delete.delete()
(1, {'core.Task': 1})
The query for all tasks will now show only two items.
To exit the shell, type exit() and press Enter.
Test your understanding!
Using the Django shell, how would you write a single query to find all tasks that are not completed and whose title contains the word "Django"?
(Hint: Look up Django's filter field lookups for "contains" and "exclude".)
Show answer
You would chain filters or combine lookups in a single filter call. Here are two ways:
# Option 1: Chaining
Task.objects.filter(is_completed=False).filter(title__icontains="django")

# Option 2: Combining in one call (more efficient)
Task.objects.filter(is_completed=False, title__icontains="django")
The __icontains lookup performs a case-insensitive "contains" search. Chaining filter() calls is equivalent to an AND in a SQL WHERE clause.
Conclusion
Excellent work! You've successfully navigated one of the most fundamental and powerful features of Django. Let's recap what we've accomplished:
- Defined a Data Model: You learned how to represent a database table as a Python class in
models.py. - Mastered the Migration Workflow: You used
makemigrationsto generate schema changes andmigrateto apply them to the database. You also saw howsqlmigratedemystifies the process by showing the underlying SQL. - Interacted with the ORM: You used the Django shell to perform CRUD (Create, Read, Update, Delete) operations on your data using high-level Python methods.
You now have a solid understanding of how to define and manage your application's data structure. This is the bedrock upon which we will build our API endpoints.
In the next lesson, we will take our data modeling skills to the next level by learning how to define relationships between different models using ForeignKey, OneToOneField, and ManyToManyField. This will allow us to create the complex, interconnected data schemas required by real-world applications.