Hello! Welcome back to our series on the core tenets of penetration testing.
In the last lesson, you got your hands dirty with the Linux command line, learning how to navigate the file system and manage files with commands like cd, ls, cp, and rm. We established that fluency in this environment is fundamental for any cybersecurity professional.
Today, we'll build directly on that knowledge. It's not enough to just create or move files; you need to understand and control who is allowed to interact with them. This brings us to the learning outcome for this lesson: Manage standard user permissions and file ownership using chmod and chown.
This isn't just an administrative task. For a penetration tester, misconfigured file permissions are a common and critical vulnerability. Understanding how they work is your first step toward identifying and exploiting these weaknesses to gain deeper access to a target system—a process known as privilege escalation.
1. Viewing and Understanding Permissions
Every file and directory in Linux has a set of rules attached to it, defining who can do what. These rules are broken down into three categories of users and three types of permissions.
-
User Categories (The "Who"):
- Owner (user): The single user who owns the file.
- Group: A collection of users who share a set of permissions.
- Others: Everyone else on the system.
-
Permission Types (The "What"):
- Read (r): The ability to view the contents of a file or list the contents of a directory.
- Write (w): The ability to modify a file or create/delete/rename files within a directory.
- Execute (x): The ability to run a file as a program or script, or to enter (cd into) a directory.
You can see these permissions using the ls -l command, which you learned in the previous lesson. The first 10 characters of the output define the file type and permissions.

To see a dynamic explanation of this, let's watch a short segment from a video by Nielsen Networking.
Linux File Permissions for Ethical Hacking & SysAdmins
This clip will walk you through reading the output of ls -l to understand who has what permissions for a given file or directory.
Watch from 02:04 to 06:00. Pay close attention to how the 10-character permission string is broken down into file type, owner (user) permissions, group permissions, and 'other' permissions.
A crucial point is that permissions mean different things for files and directories. The following video segment clarifies this distinction, which is a common point of confusion.
Linux File Permissions for Ethical Hacking & SysAdmins
Let's quickly review the specific meanings of read, write, and execute permissions when applied to a file versus a directory.
Watch from 17:23 to 19:39. This is a vital concept, especially understanding that you need 'execute' permission on a directory to cd into it, and 'write' permission to create or delete files within it.
2. Managing Ownership with chown
Before we change permissions, let's look at changing ownership. The chown (change owner) command allows you to change the owner and/or group of a file or directory. This is often one of the first things an attacker does with a file they've placed on a system, or something a system administrator does to grant a team access to project files.
The basic syntax is chown [new_owner]:[new_group] [file/directory].
- To change only the owner:
chown new_owner file.txt - To change both owner and group:
chown new_owner:new_group file.txt - To change only the group:
chown :new_group file.txt
Note that changing ownership of a file you don't own typically requires superuser privileges, which you can get by prepending the command with sudo.
The video below demonstrates chown and its close relative, chgrp (change group).
Linux File Permissions for Ethical Hacking & SysAdmins
This part of the Nielsen Networking video demonstrates how to use chown and chgrp to manage file ownership.
Watch from 14:41 to 17:23. Observe how to change the user owner and the group owner. While chgrp is shown, remember that chown user:group is a very common and efficient way to set both at once.
3. Managing Permissions with chmod
The chmod (change mode) command is your primary tool for modifying the read, write, and execute permissions. There are two common ways to use it: the symbolic method and the octal (or numeric) method.
Symbolic Method
The symbolic method is more descriptive and easier to read. The syntax combines letters and symbols to specify the changes.
- Who:
u(user),g(group),o(others),a(all) - Operator:
+(add),-(remove),=(set exactly) - Permission:
r(read),w(write),x(execute)
Examples:
chmod u+x script.sh: Adds execute permission for the owner.chmod go-w sensitive.txt: Removes write permission for the group and others.chmod a=r public_info.txt: Sets the permissions for everyone to read-only.
Let's see a demonstration of the symbolic method.
Linux File Permissions for Ethical Hacking & SysAdmins
This clip provides a practical demonstration of using the symbolic method with chmod to add and remove permissions.
Watch from 08:21 to 14:41. Follow along as permissions are granted and revoked for different user classes (u, g, o).
Octal (Numeric) Method
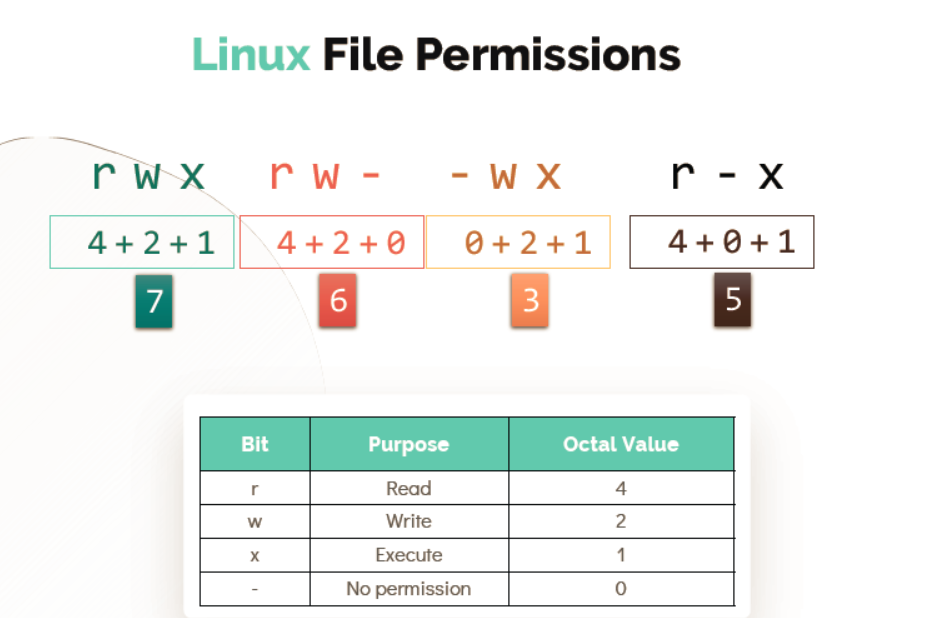
The octal method is a faster way to set permissions using numbers. Each permission has a numeric value:
- r (read) = 4
- w (write) = 2
- x (execute) = 1
You add these numbers together for each user category (owner, group, others) to form a three-digit code.
Common Examples:
chmod 755 script.sh:- Owner:
7(4+2+1) =rwx - Group:
5(4+0+1) =r-x - Others:
5(4+0+1) =r-x
(This is very common for executable scripts and directories.)
- Owner:
chmod 644 config.txt:- Owner:
6(4+2+0) =rw- - Group:
4(4+0+0) =r-- - Others:
4(4+0+0) =r--
(This is very common for non-executable files that should be widely readable.)
- Owner:
This next video provides an exceptionally clear explanation of the octal method.
Linux Crash Course - Understanding File & Directory Permissions
This tutorial from Learn Linux TV excels at explaining the logic behind the octal permission system.
Watch from 21:17 to 27:24. The instructor does a great job of breaking down how the numbers (4, 2, 1) combine and how the three-digit code corresponds to user, group, and other.
Test your understanding!
You have a file named report.docx. You want to set the permissions so that:
- The owner can read and write.
- The group can only read.
- Others have no permissions at all.
What chmod command would you use to achieve this using the octal method?
Show answer
chmod 640 report.docx
- Owner: Read (4) + Write (2) = 6
- Group: Read (4) = 4
- Others: No permissions = 0
To solidify your understanding of these commands, the following article serves as an excellent written reference.
Chmod vs. Chown vs. ACL | Practical Examples
This article provides a clear, structured explanation of file ownership and permissions, reinforcing the concepts from the videos.
Read the following parts of the article: The introduction up to "Part 1: chown". This clearly defines the 'who' (owner, group, others) and the 'what' (read, write, execute). "Part 1: chown": Focus on the purpose and examples. "Part 2: chmod": Read through both the "Symbolic Mode" and "Numeric (Octal) Mode" sections with their examples. Don't worry about the ACL or Special Permissions sections for now; we'll touch on the most important special permission next.
4. The Pentester's View: Permissions and Privilege Escalation
Now, let's connect this to your goal of becoming a penetration tester. One of the most sought-after vulnerabilities related to file permissions is the misuse of a "special permission" called SUID (Set User ID).
When the SUID bit is set on an executable file, the file runs with the privileges of the file's owner, not the user who executed it. If a file is owned by the root user and has the SUID bit set, anyone who can execute that file will run it as root, even if they are a low-privilege user. This is a classic method for privilege escalation.
The video below demonstrates exactly how a misconfigured SUID file can be exploited.
Linux File Permissions for Ethical Hacking & SysAdmins
This is the most important part of the lesson for an aspiring pentester. You will see a practical demonstration of identifying and exploiting a vulnerable SUID binary to gain root access.
Watch from 19:39 to 28:30. Notice how the 's' in the ls -l output indicates an SUID permission and see the immediate impact of running the misconfigured file.
As a pentester, one of the first things you'll do on a compromised Linux system is hunt for these files. The standard command to find all SUID executables on a system is:
find / -perm -u=s -type f 2>/dev/null
find /: Search the entire filesystem.-perm -u=s: Find files where the SUID bit is set for the user.-type f: Look only for files (not directories).2>/dev/null: Redirects any error messages (like "Permission denied" for directories you can't access) so they don't clutter your output.
Conclusion
Excellent work. You've now moved beyond basic file management into the critical domain of access control in Linux. Understanding permissions is fundamental not only for system administration but, more importantly for your goals, for identifying security weaknesses.
Key Takeaways:
- File access is controlled for three entities: Owner, Group, and Others.
- The
ls -lcommand is used to view permissions (rwx). chownchanges the owner and group of a file.chmodchanges the permissions, using either the descriptive symbolic method (u+x) or the efficient octal method (755).- Misconfigured permissions, especially the SUID bit on root-owned files, are a primary vector for privilege escalation in penetration testing.
In our next lesson, we will zoom out from these low-level technical skills. You'll learn how to put them into a professional context by exploring the phases of a structured penetration testing methodology. This will give you the high-level roadmap that guides an entire ethical hacking engagement, from planning to reporting.