Hello! Welcome to your first lesson. Given your goal to master Castigliano's theorem for your exam, we'll start by building a strong and reliable foundation. Your feedback highlighted that you're feeling a bit "rusty" on the basics, so we'll begin by ensuring you are completely confident with the first essential skill: calculating support reactions.
This lesson is designed to be a direct and practical guide to mastering this first step. You cannot determine the internal forces or energy in a structure until you know all the external forces acting on it, and that includes the reaction forces at the supports.
Today, we will focus on finding these reactions for statically determinate beams. We'll cover the three key load types you need for your exam: point loads, uniformly distributed loads (UDL), and uniformly varying loads (UVL).
1. The Foundation: Static Equilibrium
For a structure to be stable and at rest, all the forces and moments acting on it must be in balance. This principle is called static equilibrium. In civil engineering, we analyze 2D structures using three fundamental equations of equilibrium. Understanding and applying these is the key to finding unknown reaction forces.
To learn about these core principles, please read the following sections from an introductory article on engineering analysis.
How to Calculate Reactions using Free Body Diagrams
This reading from Dr. Seán Carroll's 'Fundamental Engineering Mechanics Series' will introduce you to Free Body Diagrams (FBDs) and the three equations of static equilibrium. An FBD is a simplified sketch of the structure showing all the forces and is the starting point for every analysis.
Please read sections '1.0 Free body diagrams' and '2.0 Equilibrium'. Focus on the definition of an FBD and memorize the three equilibrium equations (Equations 1, 2, and 3).
To summarize, for any 2D structure in equilibrium:
- ΣFx = 0: The sum of all horizontal forces is zero.
- ΣFy = 0: The sum of all vertical forces is zero.
- ΣM = 0: The sum of all moments about any point is zero.
We will use these three equations to solve for the unknown reactions at the beam supports.
2. Case 1: Point Loads
Let's start with the most straightforward case: a beam subjected to concentrated forces, or point loads. The process involves drawing a Free Body Diagram (FBD) and then systematically applying the equilibrium equations.
A common and very effective strategy is:
- Take moments (ΣM = 0) about a support where one of the unknown reactions is located. This eliminates that unknown from the equation, allowing you to solve directly for the other reaction.
- Sum vertical forces (ΣFy = 0) to find the remaining vertical reaction.
- Sum horizontal forces (ΣFx = 0) to find any horizontal reactions.
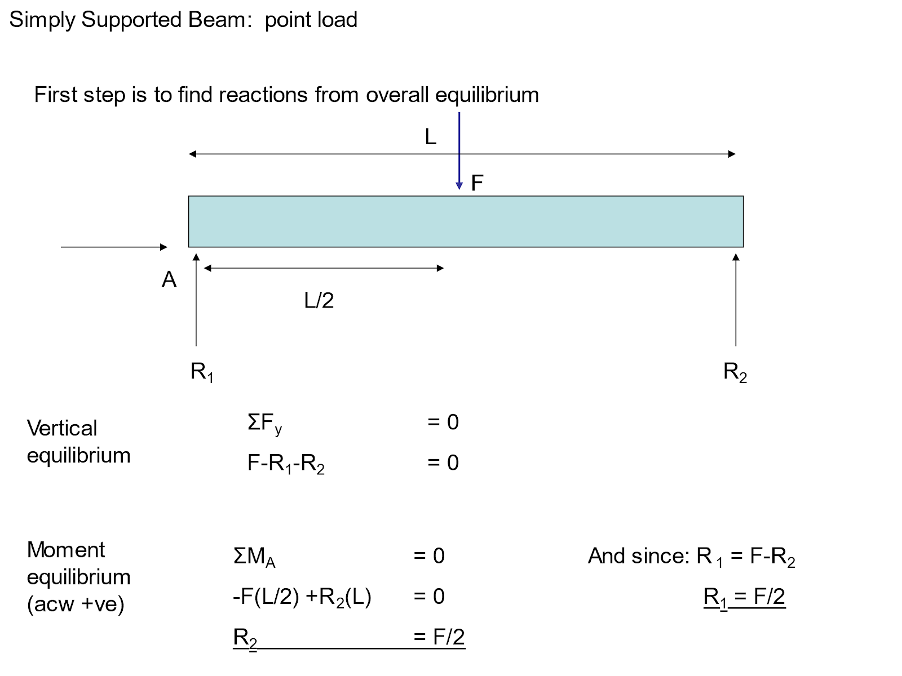
Now, let's look at a more detailed worked example.
How to Calculate Reactions using Free Body Diagrams
This text provides a clear walkthrough for a simply supported beam with two point loads. Pay close attention to how they apply the 'sum of moments' equation about point A to find reaction V_B first.
Read 'Example #1' within the section '3.4 Reaction Forces & Statical Determinacy'. Follow the calculations for V_A and V_B. Notice how taking moments about A simplifies the problem significantly.
3. Case 2: Distributed Loads (UDL & UVL)
Distributed loads are spread out over a length of the beam. For the specific purpose of calculating external support reactions, we can simplify the problem by replacing the distributed load with a single, equivalent point load.
This equivalent load has:
- Magnitude: Equal to the total force of the distributed load (the area of the load diagram).
- Location: Acting at the centroid (the geometric center) of the distributed load's shape.

Uniformly Distributed Load (UDL)
A UDL has a constant intensity (e.g., in kN/m).
- Equivalent Force: Intensity (w) × Length (L)
- Location: At the midpoint of the load (L/2).
The following video is an excellent, concise demonstration of calculating reactions for a beam with both a UDL and a point load—a very common exam-style problem.
How To Calculate Support Reaction Forces For A Beam With A Point Load And A UDL
This video from TheEngineeringExecutive will show you how to convert a UDL to an equivalent point load and then use the equilibrium equations to find the reactions.
Watch the video from 00:47 to 03:44. Pay attention to how the UDL is converted to a 400N point load (00:47), how moments are taken to find Rb (01:22), and how the final answer is checked by summing vertical forces (03:06).
Uniformly Varying Load (UVL)
A UVL typically has a triangular shape, increasing or decreasing along the beam.
- Equivalent Force: Area of the triangle = ½ × Base (L) × Height (w)
- Location: At the centroid of the triangle, which is 1/3 of the length from the tall side or 2/3 from the pointy (zero) side.
This next video tackles a triangular load directly.
Distributed loading on a beam example #2: triangular loads
This video from Engineer4Free demonstrates the process for a triangular load. The steps are the same, but the calculation for the equivalent load's magnitude and location is different.
Please watch from 03:37 to 08:10. Focus on how the total force is calculated as the area of the triangle and how the centroid is located at 2/3 of the base from the short side (which is the same as 1/3 from the tall side).
Important Note: Replacing a distributed load with a single point load is a technique used only to find external support reactions. When we move on to calculating internal bending moments, we must use the distributed load in its original form. We will cover this in our next lesson.
Conclusion
You've now reviewed the fundamental process for analyzing statically determinate beams, which is the absolute starting point for any beam problem.
Here are the key takeaways:
- Static Equilibrium is Key: The three equations (ΣFx=0, ΣFy=0, ΣM=0) are your primary tools.
- Start with an FBD: Always draw a Free Body Diagram to clearly visualize all forces and reactions.
- Simplify Distributed Loads: For finding reactions, replace UDLs and UVLs with their equivalent point loads acting at the centroid of the load shape.
- UDL (Rectangle): Force = wL, located at L/2.
- UVL (Triangle): Force = ½wL, located at L/3 from the high side.
- Be Strategic: Taking moments (ΣM=0) at a support is the most efficient way to start solving for reactions.
In our next lesson, we will build directly on this. Now that you can find the external reactions, we will "cut" the beam at various points to derive the expression for the internal bending moment, M(x). This expression is the core component you'll need to calculate strain energy and apply Castigliano's theorem.