Welcome to the next lesson in our journey through Spring Boot's internals. In our previous session, we examined the lifecycle of a bean after the Spring container decides to create it, covering scopes and lifecycle callbacks. Today, we'll take a step back and investigate the "magic" that happens before that: Spring Boot's auto-configuration.
You've seen that simply adding a starter dependency, like spring-boot-starter-data-jpa, is enough to enable a whole host of features. This isn't magic; it's a powerful and inspectable system. This lesson focuses on demystifying that system. You will learn how Spring Boot uses conditional logic to decide what to configure, and more importantly, how to use its diagnostic reporting to understand and debug these decisions. Mastering this is a key differentiator in technical interviews, showing you understand how the framework operates, not just how to use it.
What is Spring Boot Auto-Configuration?
At its core, auto-configuration is Spring Boot's mechanism for automatically configuring your application based on the JAR dependencies you have added to the classpath. For example, if Spring Boot detects H2Database.class on the classpath, and you haven't manually configured a database connection, it automatically sets up an in-memory H2 database for you.
This is driven by the @SpringBootApplication annotation, which conveniently bundles @EnableAutoConfiguration, among others. The following video gives a great introduction to this concept, showing how auto-configuration works in a practical database example.
How Spring Boot Auto Configuration Works with Spring's @EnableAutoConfiguration Annotations
Watch the initial segment of "How Spring Boot Auto Configuration Works" by Cameron McKenzie.
Pay attention to the first part of the video, from the beginning up to the introduction. The key idea is how adding dependencies and properties enables Spring to provide a fully configured bean, like a DataSource, without you writing the factory code.
How Spring Decides: The @Conditional Family
So, how does Spring Boot make these intelligent decisions? It uses a family of @Conditional annotations. An auto-configuration class will be processed and its beans created only if certain conditions are met.
This is a fundamental concept for interview preparation. An interviewer might ask, "How does Spring Boot know to create a DataSource bean when I add the JDBC starter?" The answer lies in these conditional annotations.
The most common conditions are:
@ConditionalOnClass: The configuration is applied only if a specific class is present on the classpath. This is the primary way Spring Boot detects the technologies you want to use.@ConditionalOnProperty: The configuration is applied only if a specific property in yourapplication.propertiesorapplication.ymlfile has a certain value (or is present/absent). This allows you to create features that can be enabled or disabled via configuration.@ConditionalOnMissingBean: This is the key to customization. Spring Boot will apply its default configuration unless it finds a bean of the same type that you have defined yourself. This allows you to override defaults gracefully.
The following video provides an excellent visual explanation of how Spring uses these conditions to make decisions, making the application lightweight and intelligent.
How Spring Boot Auto Configuration works ? | Create Custom Auto configuration | @Conditional
Watch this segment from "How Spring Boot Auto Configuration works ?" by Selenium Express.
Watch the section from explaining conditional annotations. Focus on how annotations like @ConditionalOnClass prevent beans from being created unnecessarily, using the example of a Tomcat server in a non-web application.
The Condition Evaluation Report: Your Debugging Tool
When your application doesn't behave as expected—a bean you need isn't being created, or one you don't want is—the first step is to ask Spring Boot why it made the decisions it did. The Condition Evaluation Report is the tool for this.
You can enable this report by either starting your application with the --debug flag or, more commonly during development, by adding debug=true to your application.properties file.
In your IDE, you can also add --debug to the program arguments of your run configuration.

When enabled, Spring Boot will print a detailed report to the console upon startup. This report is divided into key sections:
- Positive matches: Shows all the auto-configuration classes that were applied and the conditions that passed.
- Negative matches: This is often the most useful section for debugging. It shows auto-configuration classes that were not applied and, crucially, lists the specific condition that failed.
- Unconditional classes: Lists configurations that are always applied if present.
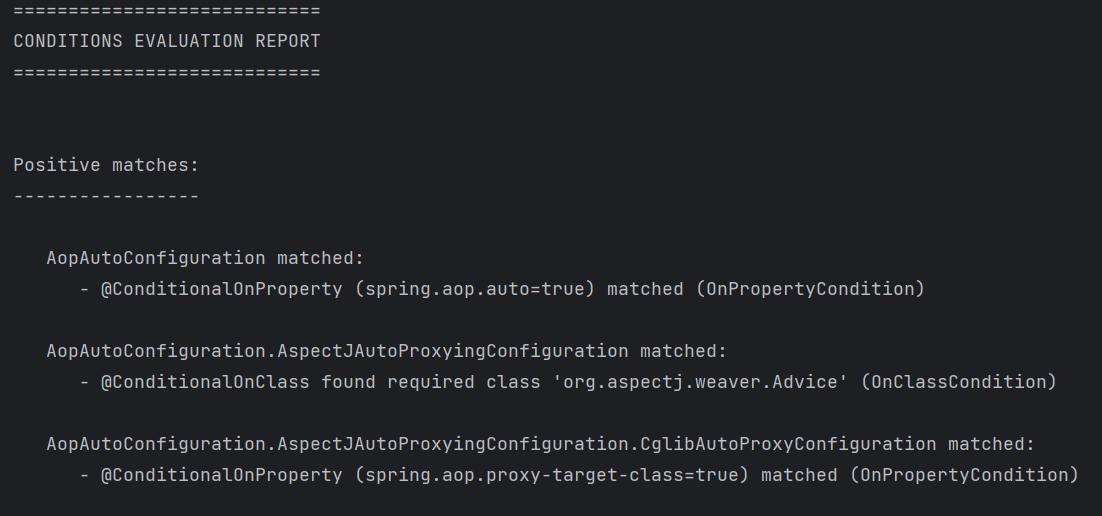
The following resource provides a step-by-step guide to enabling and interpreting this report, with practical scenarios you are likely to encounter.
Troubleshooting Spring Boot Auto-Configuration Issues With --debug Mode
This article from codingeasypeasy.com is a fantastic, practical guide to using the debug mode for troubleshooting. It walks through several common problems and shows exactly how the report helps you solve them.
Read the article from the beginning. Pay close attention to the sections on enabling the mode, understanding the output structure, and the excellent set of practical scenarios. These examples are perfect preparation for interview questions like, "My datasource isn't being configured, how would I debug that?"
From Report to Resolution: A Common Scenario
Let's walk through a typical problem. You've added spring-boot-starter-data-jpa to your pom.xml, and you're trying to @Autowired a DataSource, but the application fails to start with a NoSuchBeanDefinitionException.
Your debugging process should be:
-
Hypothesis: Since you added the starter, you expect
DataSourceAutoConfigurationto run. It seems it didn't. -
Investigation: Add
debug=trueto yourapplication.propertiesand restart the application. -
Analysis: Scan the console log for the "CONDITIONS EVALUATION REPORT". You search for
DataSourceAutoConfiguration. You won't find it under "Positive matches." Instead, under "Negative matches," you'll see an entry like this:DataSourceAutoConfiguration: Did not match: - @ConditionalOnProperty (spring.datasource.url) did not find property 'url' (OnPropertyCondition) -
Resolution: The report tells you the exact problem.
DataSourceAutoConfigurationrequires aspring.datasource.urlproperty to be set. You realize you forgot to configure the database connection details in yourapplication.properties. After adding the URL, username, and password, you restart the app, and it works.
This systematic approach, using the tools provided by the framework, is a hallmark of an experienced developer.
Alternative: The Actuator /conditions Endpoint
For applications already running, or in environments where you can't easily capture startup logs, Spring Boot Actuator provides an alternative. By including the spring-boot-starter-actuator and exposing its endpoints, you can access the same report via HTTP.
Spring Boot Auto-Configuration: How It Works and When to ...
This section from a blog post by Tim Derzhavets explains how to use the Actuator to get the same information at runtime.
Read the subsection on runtime inspection. This is a valuable technique for production support and more advanced debugging scenarios.
Conclusion
You now have the tools to look under the hood of Spring Boot's auto-configuration. Instead of treating it like a black box, you can now analyze its behavior and diagnose issues methodically. This is a critical skill for building and maintaining robust Spring applications and a topic that frequently appears in interviews for mid-level developer roles.
Key Takeaways:
- Auto-Configuration is Conditional: Spring Boot uses
@ConditionalOnClass,@ConditionalOnProperty, and@ConditionalOnMissingBeanto intelligently decide which beans to create. - The Condition Evaluation Report is Your Best Friend: When auto-configuration doesn't work as expected, enable the report with
debug=trueor--debug. - Focus on Negative Matches: For debugging, the "Negative matches" section is the most valuable part of the report, as it tells you precisely why a configuration was skipped.
- From Report to Fix: Use the information in the report to guide your fix, whether it's adding a missing dependency, configuring a required property, or resolving a bean conflict.
In our next lesson, we will build directly on this by diving deeper into how applications are configured. We will explore how to externalize application settings with profiles, environment variables, and type-safe @ConfigurationProperties, giving you a powerful toolkit for managing your application's behavior across different environments.