Welcome back. In our previous lesson, we established the theoretical foundation for externalized configuration in Spring Boot, covering profiles, type-safe properties, and the crucial concept of precedence. Now, it's time to move from theory to practice.
This lesson is designed to be a hands-on workshop where you will directly observe and verify the configuration precedence rules we've discussed. Your goal is to be able to confidently predict and control which configuration properties your application uses in any given environment. Mastering this is not just an academic exercise; it's a fundamental skill for building, deploying, and managing modern microservices, and a topic frequently explored in technical interviews to gauge your production-readiness. We will culminate by applying these principles to the common scenario of managing separate configurations for local development and containerized deployments.
Setting the Stage: A Demonstrator Project
To see configuration precedence in action, we need a simple application to work with. We will follow a structure similar to the one demonstrated in a helpful tutorial from GeeksforGeeks, which you can refer to for a complete, step-by-step guide.
Spring Boot – Managing Application Properties with Profiles - GeeksforGeeks
This article provides a complete, runnable Spring Boot project that we will use as a basis for our experiments. It demonstrates setting up multiple profile-specific property files for different environments.
Focus on the implementation part of the article. First, review Steps 1 and 2 to understand the project setup and dependencies. You don't need to create the project from scratch, but ensure you understand the pom.xml uses Java 17 and Spring Boot 3, and includes spring-boot-starter-web. Then, examine Steps 3 through 7. Pay close attention to how properties like spring.datasource.url are defined with different values across application.properties, application-dev.properties, and application-prod.properties. The DataSourceService uses the @Value annotation to inject these properties, which allows us to see which profile is active.
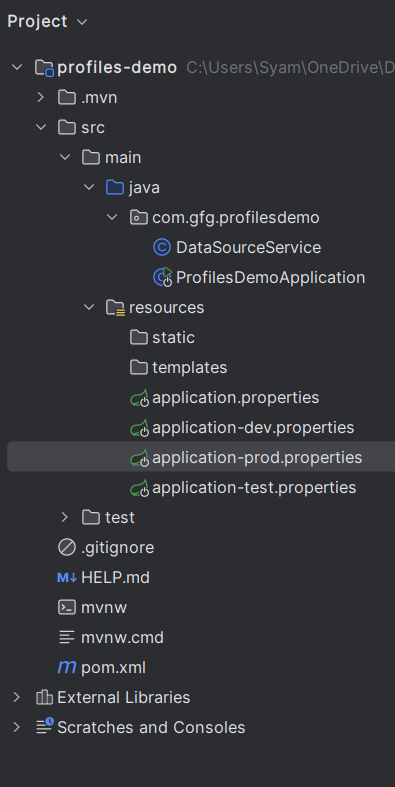
The file structure for such a project would typically look like this, with a base application.properties file and several profile-specific variants.
The Configuration Precedence Hierarchy
As we discussed, Spring Boot has a well-defined hierarchy for loading properties. When the same property is defined in multiple locations, the one from the source with higher precedence wins. For our demonstration, we'll focus on the most common sources you'll encounter day-to-day.

Let's test this hierarchy from the bottom up. We will define a simple property, greeting.message, in each of these locations and observe which one the application picks up at runtime.
Level 1 & 2: Profile-Specific Files vs. Default Files
The most basic override mechanism is using a profile-specific file to provide values that are different from the defaults.
-
In
src/main/resources/application.properties, add the following default value:greeting.message=Hello from application.properties -
In
src/main/resources/application-dev.properties, add the development-specific override:greeting.message=Hello from the DEV profile
Now, if you run the application and activate the dev profile, Spring Boot will load application.properties first and then load application-dev.properties. Since the dev file is higher in precedence, its value for greeting.message will override the default.
You can activate the profile in your IDE's run configuration or by using a Maven command:mvn spring-boot:run -Dspring-boot.run.profiles=dev
The following video provides an excellent walkthrough of setting up these files and creating different run configurations in an IDE to switch between profiles.
Spring Boot Profiles: Manage Dev, Staging & Production Environments Easily
This video from Philipp Lackner clearly explains the rationale behind using profiles and demonstrates the practical steps for creating and activating them for different environments.
Watch the segment from the beginning to understand how Spring uses the application-{profile}.properties naming convention. Then, jump to the section on run configurations, where he shows how to set up different launch profiles in IntelliJ IDEA. This is a very common workflow for local development.
Level 3: Overriding with Environment Variables
Containerized environments and CI/CD pipelines rely heavily on environment variables to supply configuration. These have higher precedence than property files packaged in your application.
Let's test this. Keeping the dev profile active, set an environment variable before running the application. The name should follow Spring Boot's relaxed binding rules (uppercase with underscores instead of dots).
- On Linux/macOS:
export GREETING_MESSAGE="Hello from an Environment Variable" - On Windows (Command Prompt):
set GREETING_MESSAGE="Hello from an Environment Variable" - On Windows (PowerShell):
$env:GREETING_MESSAGE="Hello from an Environment Variable"
Now, run the application again with the dev profile. You will see that the message from the environment variable is used, proving it overrides the value from application-dev.properties.
Level 4: The Ultimate Override - Command-Line Arguments
Command-line arguments sit at the top of this hierarchy. They provide a way to specify or override a property for a single, specific run of the application without making any persistent changes. This is extremely useful for quick tests or one-off tasks.
To demonstrate this, we first need to package the application into an executable JAR file.
mvn clean package
This command will create a JAR file in the target directory. Now, run this JAR from the command line, passing the property as an argument.
java -jar target/your-app-name.jar --spring.profiles.active=dev --greeting.message="Hello from the Command Line"
When you run this, the application will use "Hello from the Command Line" as the value, overriding the environment variable and both property files.
The following video from Java Brains provides a crystal-clear demonstration of running a JAR and overriding its internal properties with both an external file and command-line arguments.
Using external property sources with Spring Boot - Microservice configuration with Spring Boot [04]
This video clearly illustrates how external configuration sources override properties that are baked into the application's JAR file.
Watch the first two parts of the video. The segment on external property files shows how a file placed next to the JAR can override the internal one. More importantly for our current test, watch the section on command-line arguments, which demonstrates their top-tier precedence.
For your reference, the official Spring Boot documentation provides the most exhaustive list of all 17+ property sources. While you don't need to memorize them all, being aware of the main ones we've covered is essential.
Externalized Configuration :: Spring Boot
The official documentation is the definitive source for the full property source hierarchy.
Skim the initial list of property sources to appreciate the full extent of Spring's flexibility. Then, review the section on Config data files, which clarifies the precedence between properties inside and outside your packaged JAR.
Application: Local vs. Container Profiles
Now, let's apply this knowledge to the learning outcome's core task: running an application with separate local and container profiles.
A common pattern is:
- A
localordevprofile: Configured for a local developer environment. It might connect to an in-memory H2 database, use a local file path, or have verbose logging enabled. Credentials can be hardcoded here for convenience. - A
containerorprodprofile: Configured for deployment inside a Docker container or Kubernetes Pod. It expects to connect to an external database (like PostgreSQL) whose hostname is provided by the container orchestrator. Credentials and other secrets must be passed via environment variables or mounted secrets, never baked into the image.
The GeeksforGeeks project we reviewed earlier (LINK) implements exactly this pattern for database connections. The dev profile points to a MySQL database on localhost, while the prod profile points to a different host, prod-db-host.
When running in a container, you would activate the prod profile and provide the database credentials as environment variables. For example:
docker run -e SPRING_PROFILES_ACTIVE=prod -e SPRING_DATASOURCE_URL=jdbc:mysql://db:3306/prod_db -e SPRING_DATASOURCE_USERNAME=user -e SPRING_DATASOURCE_PASSWORD=secret my-app:latest
Here, db would be the name of the database container on the Docker network. This command demonstrates the precedence perfectly:
- We activate the
prodprofile using an environment variable. - We then override the
spring.datasource.url(and other properties) defined inapplication-prod.propertieswith more specific values passed as environment variables.
Conclusion
In this lesson, you have put theory into practice by demonstrating the hierarchy of configuration sources in Spring Boot. You have verified how command-line arguments, environment variables, and profile-specific files interact to produce the final application configuration. This hands-on experience is vital for building robust applications that can be deployed and managed consistently across any environment.
Key Takeaways:
- Precedence is Key: The order of precedence (Command-line > Environment Variables > Profile-specific files > Default files) allows for a powerful and flexible configuration strategy.
- Defaults Inside, Overrides Outside: A best practice is to package sensible defaults inside your application and allow environment-specific overrides to be provided externally at runtime.
- Design for Your Environment: Use profiles to create distinct configurations for local development and containerized deployments, especially for resources like databases.
- Secure Your Secrets: Never hardcode secrets in production profiles. Always supply them through higher-precedence, more secure mechanisms like environment variables or a secrets management tool.
This lesson concludes our module on Spring Boot Internals and Production Configuration. You now have a solid understanding of how a Spring Boot application starts up and configures itself. In our next module, we will build on this foundation to construct robust and well-designed REST APIs. Our first topic will be defining Data Transfer Objects (DTOs) to create clean boundaries between your API and your persistence layer.