Hello! In our last lesson, you did an excellent job setting up your homepage with a dynamic list of tool categories using a Repeating Group. Right now, those categories are just for display. It's time to make them functional and build the pathways that will guide users through your multitool platform.
Today, we'll focus on configuring the navigation between your homepage and the pages that will list your tools. You'll learn how to create a link from each category card to a new, dedicated page for that category. The key concept we'll master is how to "send data" between pages, so your new page knows exactly which category's tools to display. This is the fundamental technique for building scalable, database-driven apps in Bubble.
The Problem with Static Pages
Imagine you had ten tool categories. You could create ten separate pages: page-converters, page-calculators, page-formatters, and so on. But what happens when you add an eleventh category? You'd have to build another page from scratch. This isn't scalable and goes against your goal of creating an easily manageable platform.
The solution is to create a single, reusable "template" page. This page's content will change dynamically based on the data we send to it. This is very similar to how in WordPress, a single category.php or single.php template file is used to display content for any category or post. In Bubble, this is achieved using a feature often called the "Page Thing".
Let's start by understanding this core concept.
How to use the Page Thing in Bubble - Amlie Solutions
This article from Amlie Solutions clearly explains the concept of creating dynamic pages in Bubble by assigning a data type to a page.
Please read the introduction and the section "What is the Page Thing in Bubble.io?". Focus on this part: read this section. Pay attention to the argument for using this "template" approach over building individual pages.
Step 1: Creating Your Dynamic Category Page
First, we need the destination page. We'll create a new page and tell Bubble that it's designed to display information about a single Category.
- In the Bubble editor, create a new page. Let's name it
category. - Once the new page is open, double-click on an empty area of the page to bring up the property editor for the page itself.
- You will see a field named
Type of content. This is where you define what kind of data this page is built to display. - From the dropdown, select your
CategoryOption Set.
By doing this, you've officially turned the category page into a dynamic template that can receive and display data for any of your categories.
How to use the Page Thing in Bubble - Amlie Solutions
Let's refer back to the Amlie Solutions article, which shows exactly where to find this setting.
In the section "Selecting the Data Type for the Page," review the part that shows how to find and set the Type of content attribute. You've just performed this action, selecting your Category Option Set.
Step 2: Sending Data from the Homepage
Now that we have a destination, let's create the link. We'll go back to your index page and set up a workflow that triggers when a user clicks on a category card.
- Navigate back to your
indexpage. - In the Repeating Group that displays your categories, select the main element that a user will click. This is likely the "card" group you designed in the previous lesson.
- With the element selected, go to the
Workflowtab or click 'Add workflow' in the property editor. - This will create a new workflow event:
When [Your Group Name] is clicked... - Click to add an action and select
Navigation>Go to page.... - In the action's properties, set the
Destinationto your newcategorypage. - A new field will appear:
Data to send. This is the most crucial step. Click into this field and create the expressionCurrent cell's Category.
This tells Bubble: "When a user clicks on this card, take them to the category page and send along the specific Category data from the cell that was just clicked."
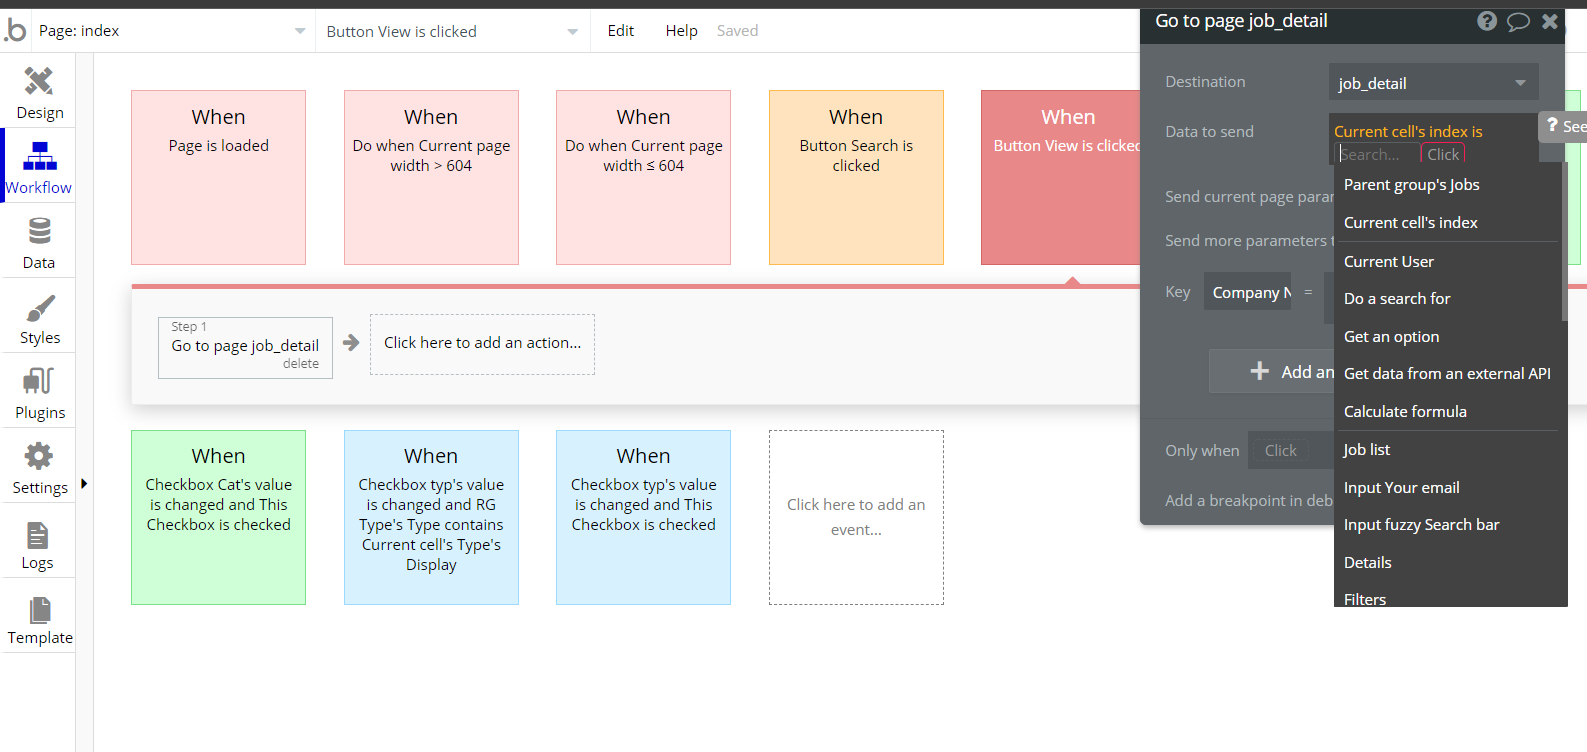
This forum discussion provides another excellent, concise explanation of this exact process.
How to have a detail page for repeating group - Need help - Bubble Forum
This Bubble forum post provides a quick, practical summary of the two main steps we are taking.
Read the first reply by user 'adamhholmes'. Notice how he breaks the process down into setting the content type on the destination page and then sending the data from the repeating group. This is a perfect summary of what you've just built.
Step 3: Receiving and Displaying the Data
The final step is to prove that the data transfer worked. We'll go to our category page and display the name of the category that was sent.
- Go back to your
categorypage. - Add a Text element, perhaps as a page title.
- In the text field, instead of typing static text, click
Insert dynamic data. - The expression you need is
Current page's Category's Display.
This tells Bubble to access the data that was sent to the page (Current page's Category) and show its Display value.
How to use the Page Thing in Bubble - Amlie Solutions
The Amlie Solutions article also explains how to retrieve the data on the destination page.
Review the section titled "Referencing the Page Thing." It demonstrates how to build the Current Page Thing expression, which is exactly what you just did to display the category's name.
If you preview your app now, you should be able to click on a category from your homepage, be taken to the category page, and see that category's name displayed in the text element.
Building the Tool List
With the category data successfully being passed, you can now display the list of tools associated with it.
- On your
categorypage, add a new Repeating Group. - Set its
Type of contenttoTool. - For the
Data source, you will perform a search. ClickDo a search for. - The type will be
Tool. Now, you must add a constraint to filter the results. - Click
+ Add a new constraint. Set it up as:Category=Current page's Category. - Inside this new repeating group's first cell, add a Text element and set its dynamic data to
Current cell's Tool's Name.
This Repeating Group will now dynamically show only the tools that belong to the category sent to the page.
Conclusion
Excellent work! You have now mastered a core pillar of building applications in Bubble. You've connected two pages with a dynamic data-driven link, creating a scalable structure for your platform.
Here are the key takeaways from today's lesson:
- Dynamic pages are created by setting a page's
Type of contentto a specific data type or option set. - The "Go to page" workflow action is used to navigate between pages.
- The "Data to send" field in that workflow is used to pass a specific database record to the destination page.
- The destination page retrieves the passed information using the
Current page's [Thing]expression.
You've built the navigation from Homepage -> Category Page. The next logical step, which we will tackle in the next module, is to build the navigation from this Category Page -> Tool Page. As you might guess, the process will be identical: you'll create a tool_page with Type of content: Tool, and the workflow on your new repeating group will send the Current cell's Tool. We'll focus on designing that final, reusable tool page in our next session.