Welcome to your first lesson! We're kicking off your journey into the world of AI and machine learning by setting up the essential tool you'll use throughout this course. Your goal is to build and train AI models, and every craft requires a proper workshop. For us, that workshop will be a powerful, interactive coding environment called Jupyter Notebook.
In this lesson, you will set up your own Python development environment. We'll explore why Jupyter Notebook is the perfect tool for learning and experimenting with code, and I'll guide you step-by-step through installing it and creating your very first notebook. By the end, you'll have a fully functional setup, ready for you to start writing your own Python code.
Your Digital Workbench: Anaconda and Jupyter Notebook
Before we dive into the installation, it's helpful to understand what these tools are. We'll be using Anaconda, which is a comprehensive toolkit for programming in Python, especially for data science and AI. It conveniently bundles Python itself, the Jupyter Notebook application, and many of the specialized libraries we will need later in the course.
Jupyter Notebook is an application within Anaconda that runs in your web browser. It allows you to create documents that contain live code, explanatory text, and even visualizations like charts and graphs, all in one place. This interactive, cell-based structure is ideal for the hands-on, step-by-step learning you prefer, as it lets you write small chunks of code, run them, and see the results immediately.
To get a clearer sense of what Anaconda and Jupyter Notebook bring to the table, please read the introductory section of the following article.
Getting Started with Anaconda and Jupyter Notebook on Windows ...
This article provides an excellent overview of why Anaconda and Jupyter are so popular.
Please read the first two paragraphs, from the beginning of the article until the "Downloading and Installing Anaconda Distribution" heading.
Part 1: Installing Your Environment
Now for the first major hands-on step: installing Anaconda. The following video provides a clear, visual walkthrough of the entire process. It will guide you through downloading the correct file and navigating the installation steps.
Installing Jupyter Notebooks/Anaconda | Python for Beginners
This video by Alex The Analyst will guide you through the download and installation process for Anaconda.
Watch the segment from the start of the installation. Pay close attention to the choices made during the setup, such as the installation type ("Just Me") and the advanced options. The recommendation is to not add Anaconda to your PATH environment variable, as this can sometimes interfere with other programs.
For your reference, you can also follow the text-based instructions for installation in the "Getting Started with Anaconda" article you looked at earlier. It covers the same steps shown in the video.
Part 2: Launching Jupyter and Creating Your First Notebook
With Anaconda installed, you're ready to launch Jupyter Notebook. The easiest way is through the Anaconda Navigator, a graphical interface that shows all the applications included in the Anaconda distribution.
The video you just watched continues by demonstrating exactly how to do this.
Installing Jupyter Notebooks/Anaconda | Python for Beginners
This part of the video shows how to find and launch Anaconda Navigator, and then open Jupyter Notebook from it.
Please watch from this section.
Once launched, Jupyter opens in your web browser, displaying the Jupyter Dashboard. Think of this as your file manager. From here, you can see your folders, open existing notebooks, and create new ones.
Let's create your first notebook.
- In the Jupyter Dashboard, look for the "New" button in the top-right corner.
- Click it and select "Python 3 (ipykernel)" from the dropdown menu, as shown in the image below.
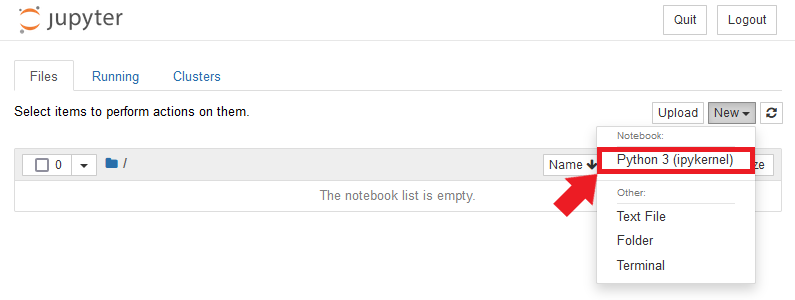
This will open a new browser tab with a blank notebook. By default, it will be named "Untitled". Let's give it a more meaningful name.
- Click on the word "Untitled" at the top of the page.
- A dialog box will appear. Type a new name, like
My First Notebook, and click "Rename".
Your environment is now ready! You have an empty notebook, waiting for your first lines of code.

Part 3: A Tour of the Jupyter Interface
Before we start coding, let's get familiar with the main components of the notebook interface. The two most important concepts are cells and the kernel.
To understand these concepts, please read the following section from a Dataquest tutorial. It gives a clear, concise definition of both.
How to Use Jupyter Notebook: A Beginner's Tutorial
This section clearly defines the two most important concepts in the Jupyter environment.
In the article, find the section "The Notebook Interface." Read the two paragraphs that define the Cell and Kernel.
Cells: Code vs. Markdown
As you just read, cells are the building blocks of a notebook. Let's explore the two main types.
- Code Cells: This is where you write and execute your Python code. The new notebook you created has one empty code cell to start.
- Markdown Cells: This is where you write formatted text for notes, headings, and explanations. Your background in creating organized documents will be useful here; Markdown is a simple way to structure your notes alongside your code.
Let's try them out.
- In the first cell of your notebook (which is a code cell by default), type the following line of code:
print("Hello, world!") - To run the code, you can either click the "Run" button in the toolbar (it looks like a play symbol ▶) or press Shift + Enter on your keyboard.
You should see the text Hello, world! appear directly below the cell. You've just run your first piece of Python code!
Now, let's create a Markdown cell for notes.
- Click the
+button in the toolbar to create a new cell below your first one. - With the new cell selected (it will have a blue or green border), go to the dropdown menu in the toolbar that says "Code" and change it to "Markdown".
- Now, type the following text into the cell:
# My First Notebook This is my first time using a Jupyter Notebook. I just ran my first line of Python code! - Press Shift + Enter to "run" the Markdown cell. The text will render as a formatted heading and paragraph.
The Kernel: The Engine of the Notebook
The kernel is the computational engine that executes the code in your notebook's cells. When you ran print("Hello, world!"), the kernel processed that command and sent the output back to be displayed.
A crucial feature of the kernel is that its state persists throughout your notebook. This means if you define a variable in one cell, it will be available in all other cells after you've run the first one. This is something we will explore in detail in the next lesson.
Sometimes, you might need to manage the kernel. The "Kernel" menu at the top of the notebook gives you several options:
- Restart: This clears all variables from memory and gives you a fresh start.
- Restart & Clear Output: Same as above, but also erases all the output below your code cells.
- Interrupt: This stops a cell that is taking too long to run.
Part 4: Essential Operations
To finish our tour, let's cover a few essential actions you'll use constantly. The following video demonstrates saving, managing cells, and using the toolbar.
Installing Jupyter Notebooks/Anaconda | Python for Beginners
This final video segment covers the practical, day-to-day operations in Jupyter.
Watch from this section to see a demonstration of: Renaming and saving your notebook. Inserting, deleting, cutting, copying, and pasting cells. Moving cells up and down to reorganize your work.
I also highly recommend getting comfortable with a few keyboard shortcuts. They will make your workflow much faster. With a cell selected, press Esc to enter Command Mode (the cell border turns blue). Now you can use keys to manage cells:
A: Insert a new cell above.B: Insert a new cell below.D,D(press twice): Delete the current cell.M: Turn the cell into a Markdown cell.Y: Turn the cell back into a code cell.
Press Enter on a selected cell to enter Edit Mode (the cell border turns green), where you can type into it.
Conclusion
Congratulations on completing this foundational lesson! You have successfully set up a professional Python development environment, which is a significant first step on your path to building AI models.
Here are the key takeaways:
- Anaconda is a toolkit that provides Python, Jupyter Notebook, and other essential data science libraries.
- Jupyter Notebook is an interactive environment for writing and running code, taking notes, and seeing results all in one place.
- Notebooks are made of cells, primarily for
CodeandMarkdown(text). - The kernel is the engine that runs your code, and its state is shared across the entire notebook.
- You can now create, save, and run a simple notebook, and you are familiar with the basic interface.
In our next lesson, we will put this new environment to work and begin exploring the fundamental building blocks of the Python language: variables and print statements.