Introduction
In our previous lesson, you did the essential work of cleaning the "KAT Concession Supply" dataset. You tackled duplicates, standardized text, and corrected errors, transforming the raw data into a much more reliable state. Now, we move to the final and equally important stage of presentation. A client doesn't just want correct data; they want data that is easy to understand, navigate, and use.
This lesson focuses on transforming your cleaned data into a professional, well-organized final output. We'll cover the best practices for structuring your spreadsheet, applying polished formatting, and finalizing the data for delivery. Mastering these steps is crucial for your freelance career, as a polished deliverable signals quality and professionalism, making your work stand out.
The Goal: A Polished and Professional Deliverable
Before we begin, let's look at the difference between a messy, in-progress sheet and a clean, final one.
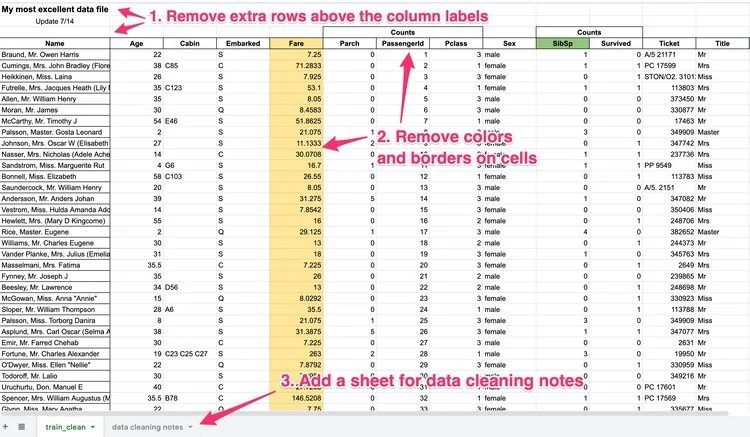
The key principles for creating a professional output are structure, clarity, and readability.
Step 1: Create a Dedicated "Final Output" Sheet
A standard professional workflow separates different stages of work. Keeping your raw data, your cleaning work, and your final output on separate sheets is a critical organizational habit. This allows you to trace your steps, fix errors without destroying the original data, and present a clean final product to a client without all the background clutter.
the-ultimate-guide-to-cleaning-data-with-excel-and-google ...
This guide offers expert tips on organizing your workbook. We'll focus on the section that explains the benefits of using multiple worksheets.
Read the section in the Appendix that begins with this paragraph. It explains the "three-sheet" method: one for raw data, one for cleaning, and a third for the cleaned, final data.
Now, let's apply this to your project:
- In your "KAT Concession Supply" Google Sheet, create a new sheet by clicking the
+icon in the bottom-left corner. - Double-click the new sheet's tab and rename it
Final Output. - Go back to the sheet where you did your cleaning work. Select all the cleaned data you want to include in the final report. Be sure to select only the columns that are necessary for the final output (e.g., exclude the original, uncleaned columns).
- Copy the selected data (
Ctrl+CorCmd+C). - Navigate to your new
Final Outputsheet, select cellA1, and paste the data as values only using the shortcutCtrl+Shift+V(orCmd+Shift+Von Mac).
Pasting as values is crucial. It "locks in" your cleaned data, removing all formulas and links to other sheets. This creates a self-contained, static, and reliable dataset—exactly what a client needs.
Step 2: Structure for Readability
With your data on a clean sheet, the next step is to structure it for easy navigation. This involves arranging columns logically and ensuring key information is always visible.
Reorder and Remove Columns
Look at your columns in the Final Output sheet. Are they in a logical order? For example, it often makes sense to group customer information together, product information together, and financial data together.
- Action: Drag and drop columns to create a more logical flow. For this project, a good order might be: Transaction Info, Customer Info, Product Info, then Financials.
- Action: Double-check that you haven't included any temporary "helper" columns or the original uncleaned columns. If you have, delete them now.
Freeze the Header Row
When you have a dataset with many rows, the headers disappear as you scroll down, making it hard to know what each column represents. Freezing the header row keeps it visible at all times.
Make Your Google Sheets Look PRO in Under 10 Minutes!
The video "Make Your Google Sheets Look PRO" by New EdTech Classroom provides a clear, concise demonstration of how to freeze rows.
Watch the short segment from this video to see how to freeze the top row. The process is simple: select the row, then go to View > Freeze > 1 row.
- Action: Apply this to your
Final Outputsheet to freeze the header row.
Step 3: Apply Professional Formatting
Now that the structure is sound, let's add a layer of polish. Good formatting makes your data significantly easier to read and demonstrates attention to detail.
This next video covers several quick formatting tricks that will make your sheet look professional.
Make Your Google Sheets Look PRO in Under 10 Minutes!
We'll return to the "Make Your Google Sheets Look PRO" video to learn about alignment, bolding, colors, and borders.
Watch these two sections: First, watch the part on text alignment from this segment. Pay attention to both horizontal and vertical alignment. Next, watch how to apply alternating colors, bolding, and borders from this part.
Now, apply these techniques to your Final Output sheet:
- Adjust Column Widths: Make sure all data is visible without being cut off. Double-click the border between column headers to auto-fit.
- Align Text:
- Select the entire header row (Row 1) and Bold the text.
- Center-align the headers both horizontally and vertically.
- For the rest of your data, a good standard is to left-align text and right-align numbers.
- Add Alternating Colors:
- Select all your data (
Ctrl+AorCmd+A). - Go to
Format>Alternating colors. - Choose a subtle color scheme. This dramatically improves readability for wide datasets.
- Select all your data (
- Add Borders:
- Select the header row again.
- Click the
Bordersicon in the toolbar and apply a bottom border to visually separate the headers from the data.
Other Restructuring Techniques to Know
While our current project is now well-structured, other freelance tasks might require different kinds of restructuring. It's useful to be aware of these tools for future projects.
- Splitting and Joining Text: In the last lesson, we discussed splitting text (e.g., a full name into first and last names). The reverse is also common. You can combine text from multiple cells using the
CONCATENATEfunction or the&operator. For example,=A2 & " " & B2would join the contents of A2 and B2 with a space in between. - Transposing Data: Occasionally, you may need to flip your data, turning rows into columns and columns into rows. This is done using
Paste special > Transposed.
This quick video provides a look at these techniques. You don't need to perform them now, but it's good to know they exist.
15 POWERFUL GOOGLE SHEETS TIPS & TRICKS (Insanely Useful Productivity Tips For Beginners)
The video "15 POWERFUL GOOGLE SHEETS TIPS & TRICKS" from Learn With Seb demonstrates several advanced data manipulation techniques.
You can briefly review these concepts: Transposing Rows and Columns Splitting Text Joining Text
Conclusion
Excellent work! You have successfully transformed your cleaned data into a final, professional deliverable. This is a critical skill that bridges the gap between doing the work and presenting the work effectively.
Your key takeaways from this lesson are:
- Organize Your Workspace: Always use separate sheets for raw data, your cleaning process, and the final output.
- Structure for Clarity: Create a logical column order, remove unnecessary clutter, and freeze header rows for easy navigation.
- Format for Readability: Use alignment, bolding, alternating colors, and borders to create a polished, easy-to-read document.
- Finalize Your Data: Always deliver a static dataset by using "Paste values only" to remove formulas and dependencies.
In our next and final lesson for this project, you will learn how to perform a final validation of your data and write a brief summary of your work—the last step before handing it off to a client.