Introduction
Congratulations on reaching the final lesson of your course! This is a significant milestone. You began with the fundamentals of Python programming and have journeyed through the intricate landscapes of linear algebra, calculus, probability, machine learning, and deep neural networks. In our last lesson, we explored the vast array of real-world problems being solved by AI today, from healthcare to engineering.
This final lesson serves as the capstone of your entire learning path. It synthesizes all the theoretical knowledge and practical skills you've acquired into a single, actionable framework. Your goal is to become a "Tony Stark" archetype—someone who can build transformative technology. Building anything, especially complex AI systems, begins with a plan. Without one, even the most brilliant idea can fail.
Today, your learning outcome is to outline the key steps for planning and executing a simple AI project from problem definition to deployment. We will move from abstract concepts to a concrete blueprint that you can use to start bringing your own ideas to life. Think of this as the first page in your personal playbook for building the future.
1. The AI Project Lifecycle: A Bird's-Eye View
An AI project is not a chaotic sprint of coding. It's a structured, cyclical process known as the AI Project Lifecycle. Following this lifecycle ensures that your efforts are focused, your goals are clear, and your final product is robust and useful. While different organizations may use slightly different terms, the core stages remain consistent.
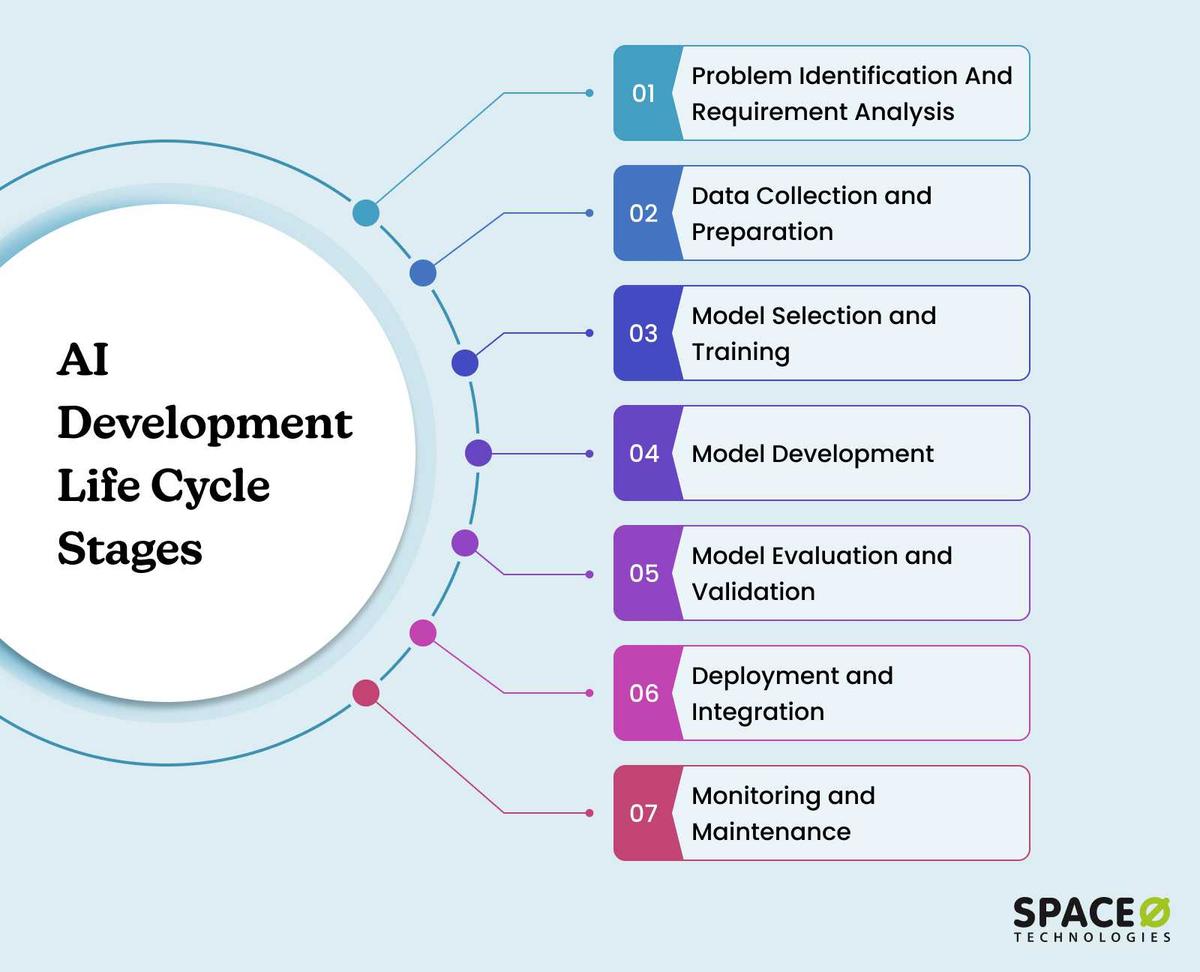
As you can see, the process is a journey through several distinct phases:
- Problem Definition & Planning: What problem are we solving and why?
- Data Collection & Preparation: What fuel does our model need?
- Model Development & Evaluation: How do we build and test our solution?
- Deployment & Maintenance: How do we put our model to work and keep it effective?
Let's break down each of these phases.
2. Phase 1: From a Vague Idea to a Concrete Plan
This initial phase is the most critical. Flaws in planning are far more difficult to fix later than bugs in code. Your "theory-first" approach is perfectly suited here, as thinking deeply before acting is the essence of good planning.
To begin, I recommend watching a short video that, while not exclusively about AI, perfectly captures the universal principles of planning a technical project.
How I Plan My Coding Projects - 9 Steps
This video from Tech With Tim provides an excellent framework for thinking about any coding project. The principles discussed are fundamental to success and directly applicable to AI.
Watch the following three segments: Start From Your Goal (00:57 - 02:39): Pay close attention to the questions: Why am I making this? Who is it for? What makes it valuable? Write User Stories (02:39 - 04:07): Understand how to define what the application should do from a user's perspective. Nail an MVP (06:27 - 07:37): Grasp the crucial concept of a Minimum Viable Product and the danger of "scope creep."
Building on these ideas, the planning phase for an AI project involves three key steps:
Step 1: Problem Scoping
First, you must translate a real-world problem into an AI problem. This involves defining the project's objectives, constraints, and success criteria. A great tool for this is the 4Ws Problem Canvas.
This article from DataCamp provides a structured overview of the AI project cycle. We will focus on its excellent explanation of the first stage, problem scoping.
Read the section titled 'Stage 1 - Problem scoping'. Focus on understanding the '4Ws problem canvas' (Who, What, Where, Why) as a framework for defining your project.
Let's apply the 4Ws to a hypothetical project: An app to identify recyclable materials from a phone's camera.
- Who? Environmentally conscious individuals who are unsure which items can be recycled.
- What? The app should take a picture of an item and classify it as 'paper', 'plastic', 'glass', or 'other'. This defines our problem as image classification. The output will be one of these four labels.
- Where? The context is a mobile app, meaning the model needs to be efficient enough to run on a smartphone.
- Why? The goal is to reduce recycling contamination and make it easier for people to contribute to sustainability efforts.
Step 2: Defining the MVP (Minimum Viable Product)
As you heard in the video, scope creep—the tendency for a project's requirements to expand uncontrollably—is a project killer. The solution is to define a ruthless MVP: the absolute simplest version of your product that still provides value.
For our recycling app, the MVP would be:
- Classify only three categories: 'paper', 'plastic', 'glass'.
- No user accounts, no social sharing, no history of scanned items.
- Just an interface to take a picture and see the result.
This small, achievable goal allows you to build, test, and deploy quickly. You can always add more features in version 2.
3. Phase 2: The Data Pipeline
Every AI model is built on data. This phase involves gathering the raw material for your model and refining it into a usable state.
AI Model Life Cycle: From Planning to Deployment to Retirement
This video from IBM Technology walks through the entire AI model lifecycle. We'll focus on the sections that detail the data, development, and evaluation stages.
Watch the segments on Data (00:38 - 01:37) and Development (01:37 - 02:23). Notice the emphasis on data quality, cleansing, and bias checks.
The data phase consists of several key activities:
- Data Acquisition: Find and collect the data you need. This could come from open-source datasets (like Kaggle), public APIs, or by creating your own dataset (e.g., taking photos of recyclable items).
- Exploratory Data Analysis (EDA): Before you do anything else, you must understand your data. Using the skills you learned in Module 2 (pandas, Matplotlib), you would visualize the data to answer questions like:
- Do I have a balanced number of images for each category? (Class imbalance)
- Are the images clear or blurry?
- Are there any anomalies or incorrect labels?
- Data Preprocessing/Cleansing: This is where you prepare the data for the model. For our image project, this would involve:
- Resizing all images to a consistent dimension (e.g., 224x224 pixels).
- Normalizing pixel values.
- Augmenting the data (rotating, flipping, and zooming images) to create more training examples and make the model more robust.
4. Phase 3: Modeling and Evaluation
This is where you finally build and train your model. Based on all your previous work in this course, you now have a powerful toolbox at your disposal.
- Model Selection: Choose an appropriate architecture for your problem. For our image classification MVP, a great choice would be to use transfer learning. You could take a pre-trained Convolutional Neural Network (CNN) like MobileNetV2 (which is designed for mobile devices) and fine-tune it on your recycling dataset.
- Model Training: You'll split your data into training, validation, and testing sets, as you learned in Module 7. You then train the model, monitoring its performance (loss and accuracy) on the validation set to prevent overfitting.
- Model Evaluation: Once trained, you must rigorously evaluate the model on the unseen test set. For a classification problem, you would look at metrics like:
- Accuracy: What percentage of predictions were correct?
- Precision and Recall: How reliable are the predictions for each specific class?
- Confusion Matrix: Where is the model getting confused? (e.g., Is it frequently misclassifying clear plastic as glass?)
This stage is iterative. Based on your evaluation, you might go back and collect more data, try a different model architecture, or tune your hyperparameters.
5. Phase 4: Deployment and Maintenance
A model sitting on your laptop isn't solving any real-world problems. Deployment is the process of making your model available to users.
Step 1: Deployment
For our MVP, a simple deployment could involve:
- Model Serialization: Saving your trained model and the preprocessing steps into files using libraries like
pickleorjoblib. - Creating a Web Interface: Building a simple web application using a framework like Flask. This app would provide a webpage where a user can upload an image, the app would load your saved model, run the prediction, and display the result.
- Hosting: You could run this Flask app on a cloud service (like AWS, Google Cloud, or Azure) to make it accessible to anyone on the internet.
Step 2: Monitoring and Maintenance
Deployment is not the end of the story. The real world is messy, and a model's performance can degrade over time—a phenomenon called model drift.
Watch this final clip to understand the importance of the post-deployment stages.
AI Model Life Cycle: From Planning to Deployment to Retirement
We return to the IBM video to cover the final, crucial stages of the lifecycle: deployment and monitoring.
Watch the section on Deployment (03:16 - 04:45). Focus on the concepts of ongoing monitoring for 'drift' and the need for periodic retraining.
Key activities include:
- Monitoring: Keep track of the model's performance on new, real-world data. Are users getting strange predictions? Is the accuracy dropping?
- Maintenance: Periodically retrain your model with new data to keep it accurate and relevant. For our app, this might mean adding data for new types of packaging materials that appear on the market.
6. A Practical End-to-End Workflow
To bring everything together, let's look at a concrete guide that structures these steps for an actual project. This resource includes a recommended folder structure, which is essential for keeping your work organized and scalable.
End-to-End Machine Learning Project Guide
This article provides a superb, practical, end-to-end guide for a machine learning project, including a professional folder structure. This is your blueprint for starting a project today.
Read the following sections: The Table of Contents to see all 16 steps in a full-scale project. '1. Define the Problem' as a recap of our first phase. '2. Set Up Folder Structure': This is a key takeaway. Study this structure carefully. It separates notebooks for experimentation, data, source code, and deployment artifacts, which is a best practice.
Here is a simplified summary of that professional folder structure:
my-ai-project/
├── notebooks/          # Your experimental code (Jupyter notebooks for EDA).
├── data/               # Raw and processed datasets.
├── src/                # Your core, reusable Python source code.
│   ├── pipeline/       # Scripts for training and prediction pipelines.
│   └── components/     # Code for data ingestion, transformation, model training.
├── app.py              # Your Flask application for deployment.
├── requirements.txt    # List of all Python libraries your project needs.
└── README.md           # A description of your project.
Adopting a structure like this from day one will make your projects far more manageable and professional.
Conclusion
You have reached the end of your course, but your journey as a builder is just beginning. Today, we've outlined the systematic process that turns an idea into a functional AI application. This framework is your map and compass.
Key Takeaways:
- The AI Project Lifecycle is Your Guide: A structured approach (Plan -> Data -> Model -> Deploy) is essential for success and prevents wasted effort.
- Planning is Paramount: Clearly define the problem you're solving, who you're solving it for, and the smallest possible version (MVP) you can build first.
- Everything Depends on Data: The quality, cleanliness, and relevance of your data will determine the ceiling of your model's performance.
- Development is Iterative: Building a model is a cycle of training, evaluating, and tuning. Don't expect perfection on the first try.
- Deployment Makes it Real: A model is only useful when people can interact with it. Even a simple web app can bring your project to life.
- The Work Continues After Launch: Models must be monitored and maintained to remain effective in a changing world.
You set out with the goal of becoming a polymath capable of creating world-changing technology. You now possess the foundational knowledge of AI and a practical roadmap for applying it. The tools are in your hands. The next step is to choose a problem you care about, start with a small MVP, and begin to build. Good luck.