Hello! In our last lesson, we explored the theory behind hash tables, discussing hash functions and the key strategies for handling collisions: separate chaining and open addressing. We concluded that separate chaining is a robust and widely-used method.
Today, we transition from theory to practice. Your goal for this lesson is to implement a hash table from scratch using the separate chaining method in Java. This exercise is a cornerstone of data structures education and a frequent topic in technical interviews, designed to test your understanding of fundamental data structures and your coding skills.
Let's start building our own HashMap.
1. The Core Architecture
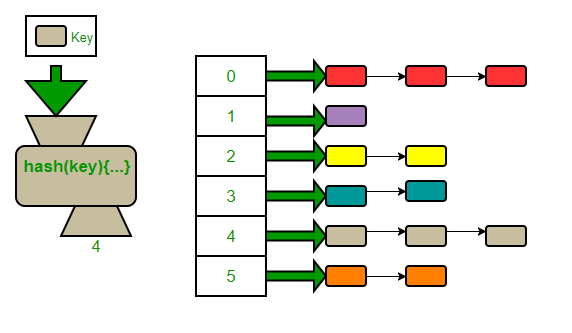
As we discussed, separate chaining resolves collisions by placing all key-value pairs that hash to the same index into a linked list at that index.
Our implementation will have three main components:
HashNode<K, V>: A class representing a single node in our linked lists. It will hold the key, the value, and a reference to the next node.- A Bucket Array: This will be an
ArrayListwhere each element acts as a "bucket." Each bucket will store the head of a linked list. - The
MyHashMap<K, V>class: This will orchestrate everything, managing the bucket array and providing methods likeput,get, andremove.
Here is a visual representation of what we're about to build:
2. A Step-by-Step Implementation Guide
The best way to understand how a hash map works is to build one. The following video provides an excellent, detailed walkthrough of creating a hash map in Java. We will follow its structure, and I will provide key code snippets and explanations along the way.
How are HashMaps implemented in Java? Internal Working Explained With Code
This video, 'How are HashMaps implemented in Java?' by Riddhi Dutta, will be our primary guide. We'll follow its logic to build our map. I recommend having your IDE open to code along.
First, watch from 23:04 to 29:24. This section sets up the basic structure: the MapNode inner class and the OurMap class with its initial constructor and bucket array. Pay close attention to why the bucket array is explicitly populated with nulls.
Step 1: Defining the HashNode and MyHashMap Structure
Based on the video, let's define our core classes. We'll use generics <K, V> to make our hash map type-safe, just like Java's standard HashMap.
The HashNode Class: This will be a private inner class because it's only relevant to our hash map's internal implementation.
// A node of the linked list chain
private class HashNode<K, V> {
    K key;
    V value;
    HashNode<K, V> next; // Reference to the next node in the chain

    public HashNode(K key, V value) {
        this.key = key;
        this.value = value;
        this.next = null;
    }
}
The MyHashMap Class Structure: This is the main class. It will contain the bucket array and essential properties like the number of buckets (capacity) and the number of entries (size).
import java.util.ArrayList;

public class MyHashMap<K, V> {
    // bucketArray stores the heads of the linked lists
    private ArrayList<HashNode<K, V>> bucketArray;

    // The current capacity of the bucket array
    private int numBuckets;

    // The current number of key-value pairs in the map
    private int size;

    // Constructor
    public MyHashMap() {
        bucketArray = new ArrayList<>();
        numBuckets = 10; // Initial capacity
        size = 0;

        // Create empty chains (buckets)
        for (int i = 0; i < numBuckets; i++) {
            bucketArray.add(null);
        }
    }
    // ... methods will go here
}
As the video explains, initializing the ArrayList with nulls is crucial. It ensures that we can immediately use bucketArray.set(index, ...) without getting an IndexOutOfBoundsException.
Step 2: The Hash Function (getBucketIndex)
We need a private helper function to convert a key into an index for our bucketArray. This function encapsulates the two-step process:
- Get the integer
hashCodefrom the key object. - Compress this hash code into a valid index within the bounds of our
numBuckets.
// This implements the hash function to find an index for a key
private int getBucketIndex(K key) {
    int hashCode = key.hashCode();
    // The modulo operator compresses the hash code to a valid index
    int index = hashCode % numBuckets;

    // hashCode() can be negative. We need a positive index.
    // Math.abs() can cause issues if hashCode is Integer.MIN_VALUE.
    // A safer way is to handle negative results directly.
    index = index < 0 ? index * -1 : index;

    return index;
}
Step 3: Implementing the get() Method
To retrieve a value, we first hash the key to find the correct bucket and then traverse the linked list in that bucket to find the exact key.
How are HashMaps implemented in Java? Internal Working Explained With Code
Now let's implement the get method. Watch this segment of the video.
Watch from 29:24 to 34:51. The most important concept here is the use of the .equals() method for comparing keys, not the == operator. Understand why this is critical for the hash map to work correctly with objects.
Here's the logic for the get(K key) method:
- Find the index for the key using
getBucketIndex(). - Get the head of the linked list at that index.
- Traverse the list. For each node, check if its key
.equals()the key you're searching for. - If a match is found, return the node's value.
- If you reach the end of the list without a match, the key isn't in the map, so return
null.
public V get(K key) {
    int bucketIndex = getBucketIndex(key);
    HashNode<K, V> head = bucketArray.get(bucketIndex);

    // Search for the key in the chain
    while (head != null) {
        if (head.key.equals(key)) {
            return head.value;
        }
        head = head.next;
    }

    // If key not found
    return null;
}
This highlights the famous hashCode() and equals() contract in Java. For a custom object to work correctly as a key in a HashMap, you must override both methods: if two objects are equal according to .equals(), they must have the same hashCode().
Step 4: Implementing the put() Method
Adding a key-value pair follows a similar logic, with two possible outcomes:
- If the key already exists, we update its value.
- If the key is new, we add a new node to the front of the linked list in the appropriate bucket.
How are HashMaps implemented in Java? Internal Working Explained With Code
Let's implement the put method. This involves both updating existing entries and adding new ones.
Watch from 34:51 to 37:33. Notice the two-part logic: first, iterate to check for an existing key to update. If none is found, then create and insert a new node at the head of the chain.
Here is the implementation of put(K key, V value):
public void put(K key, V value) {
    int bucketIndex = getBucketIndex(key);
    HashNode<K, V> head = bucketArray.get(bucketIndex);

    // Check if key is already present
    while (head != null) {
        if (head.key.equals(key)) {
            head.value = value; // Update the value and return
            return;
        }
        head = head.next;
    }

    // If key not found, insert it at the head of the chain
    size++;
    head = bucketArray.get(bucketIndex);
    HashNode<K, V> newNode = new HashNode<>(key, value);
    newNode.next = head; // New node points to the old head
    bucketArray.set(bucketIndex, newNode); // Bucket now points to the new node
}
Test your understanding!
You have an empty MyHashMap with an initial numBuckets = 5. The getBucketIndex(key) function is Math.abs(key.hashCode()) % 5. Trace the state of the bucketArray after executing the following operations in order:
put("A", 10)(Assume"A".hashCode()is 65)put("F", 20)(Assume"F".hashCode()is 70)put("B", 30)(Assume"B".hashCode()is 66)
Show answer
-
put("A", 10):getBucketIndex("A")->65 % 5 = 0.- A new node
("A", 10)is created. - It's inserted at index 0.
bucketArray[0]now points toNode("A", 10).
-
put("F", 20):getBucketIndex("F")->70 % 5 = 0. This is a collision!- The key "F" is not found in the chain at index 0.
- A new node
("F", 20)is created. - It's inserted at the head of the list at index 0.
bucketArray[0]now points toNode("F", 20), andNode("F", 20).nextpoints toNode("A", 10).
-
put("B", 30):getBucketIndex("B")->66 % 5 = 1.- A new node
("B", 30)is created. - It's inserted at index 1.
bucketArray[1]now points toNode("B", 30).
Final State of bucketArray:
- Index 0:
-> Node("F", 20) -> Node("A", 10) -> null - Index 1:
-> Node("B", 30) -> null - Index 2:
-> null - Index 3:
-> null - Index 4:
-> null
3. Keeping Performance High: Rehashing
Our hash map works, but what happens if we add many elements? The linked lists will get longer, and our get() and put() operations will slow down from towards . To prevent this, we introduce the concept of a load factor and rehashing.
- Load Factor: A measure of how full the hash table is.
- Rehashing: When the load factor exceeds a certain threshold (e.g., 0.7), we create a new, larger bucket array (usually doubling the size) and re-insert all existing entries into it. This redistributes the entries and keeps the chains short.
How are HashMaps implemented in Java? Internal Working Explained With Code
This is the most advanced part of our implementation. This final segment from the video explains the load factor and demonstrates how to implement the rehashing mechanism.
Watch from 39:42 to 48:55. Focus on why you must re-insert every element instead of just copying the old chains. The hash index for each key changes because numBuckets has changed.
To implement rehashing, we modify our put() method. After adding a new element, we check the load factor.
public void put(K key, V value) {
    // ... (logic from before to find/update or add new node)

    // Insert key in chain (same as before)
    size++;
    // ... (rest of the insertion logic) ...

    // If load factor goes beyond threshold, then double hash table size
    if ((1.0 * size) / numBuckets >= 0.7) {
        rehash();
    }
}

private void rehash() {
    System.out.println("Rehashing, size: " + size + ", numBuckets: " + numBuckets);
    ArrayList<HashNode<K, V>> temp = bucketArray;
    bucketArray = new ArrayList<>();
    numBuckets = 2 * numBuckets;
    size = 0; // The put method will increment this again
    for (int i = 0; i < numBuckets; i++) {
        bucketArray.add(null);
    }

    for (HashNode<K, V> headNode : temp) {
        while (headNode != null) {
            // Re-insert every node into the new, larger bucket array
            put(headNode.key, headNode.value);
            headNode = headNode.next;
        }
    }
}
Important Note: In the rehash method, when we iterate through the old nodes, we call our existing put() method. The put() method will automatically calculate the new correct index for each key based on the doubled numBuckets and place it in the new bucketArray.
For a complete, well-commented code example, you can also refer to this article. It presents the same logic in a textual format.
Implementing our Own Hash Table with Separate Chaining in Java
This GeeksforGeeks article provides a full, self-contained Java implementation of a hash table with separate chaining, including the logic for rehashing. It's a great reference to check your own code against.
Skim through the Java code provided. Focus on the add method (which is our put), especially the section that checks the load factor and triggers the resizing and rehashing logic. Notice how it's structurally identical to what we've just discussed.
Conclusion
Congratulations! You've just walked through the complete implementation of a hash map using separate chaining, a fundamental data structure. This is a significant milestone that moves you from being a user of hash maps to understanding how they are built.
Key Takeaways:
- A hash map is built on an array of buckets, where each bucket is the head of a linked list to handle collisions.
- The process involves a
HashNodefor the list, agetBucketIndexfunction to map keys to array indices, and the coreget()andput()methods. - Proper key comparison requires using the
.equals()method, relying on theequals()andhashCode()contract. - To maintain average performance, the hash map monitors its load factor and performs rehashing (resizing and re-inserting all elements) when it gets too full.
Preview of the Next Lesson:
Now that you have a deep understanding of how hash maps work internally, you're perfectly equipped to wield them effectively. In the next lesson, we will focus on applying hash maps to solve common interview problems, such as "Two Sum" and "Subarray Sum Equals K," leveraging the power of constant-time lookups to create highly efficient solutions.