Hello! We're now moving into a new module focusing on fundamental pointer-based data structures. In the last module, we tackled advanced string searching with the KMP algorithm. Now, we'll take a step back to build one of the most essential data structures from the ground up: the Linked List.
Your goal for this lesson is to implement a singly linked list with insertion, deletion, and traversal operations. Mastering this is a cornerstone for technical interviews, as it tests your understanding of pointers, memory management, and edge cases. We will build a complete SinglyLinkedList class in Java, piece by piece.
1. What is a Linked List?
Unlike an array, which stores elements in a single contiguous block of memory, a linked list is a collection of elements called nodes. Each node is a separate object that contains two key pieces of information:
- Data: The actual value stored in the node.
- Next: A reference (or "pointer") to the next node in the sequence.
The first node is called the head, and the last node's next reference points to null, signifying the end of the list.
For a great conceptual overview of why we use linked lists and how they differ from arrays, let's watch the beginning of a detailed tutorial.
Linked List Tutorial - Singly + Doubly + Circular (Theory + Code + Implementation)
The video 'Linked List Tutorial' by Kunal Kushwaha provides an excellent introduction to the concept of linked lists, the structure of a node, and the role of head and tail pointers.
Watch from 02:26 to 10:32. This section explains the limitations of arrays that linked lists solve, the visual representation of a linked list, and the basic anatomy of a node.
2. Building the Foundation in Java
To implement this in Java, we typically use two classes:
- A private inner
Nodeclass to represent each element. - The main
LinkedListclass to manage the overall structure, keeping track of thehead,tail, andsize.
Let's see how this structure is set up in code.
Linked List Tutorial - Singly + Doubly + Circular (Theory + Code + Implementation)
Continuing with the same video, let's look at the initial Java implementation of the Node and LinkedList classes.
Watch from 12:26 to 16:16. The instructor will set up the private Node class with value and next fields, and the LinkedList class with head, tail, and size attributes.
Here is the basic structure we will build upon. This organization encapsulates the logic and is a standard approach you'll see in interview problems.
public class SinglyLinkedList {

    private Node head;
    private Node tail;
    private int size;

    public SinglyLinkedList() {
        this.size = 0;
    }

    // All our methods (insert, delete, etc.) will go here.

    private class Node {
        private int value;
        private Node next;

        public Node(int value) {
            this.value = value;
        }

        public Node(int value, Node next) {
            this.value = value;
            this.next = next;
        }
    }
}
3. Core Operations: Traversal, Insertion, and Deletion
Now, let's implement the essential operations. For each operation, it's crucial to visualize how the pointers (next, head, tail) are manipulated.
Traversal (Displaying the List)
To print the elements, we must traverse the list from head to tail. A common mistake is to move the head pointer itself, which would permanently alter the list. Instead, we use a temporary pointer.
Linked List Tutorial - Singly + Doubly + Circular (Theory + Code + Implementation)
Let's learn how to traverse and display the linked list without losing our reference to the head.
Watch from 22:29 to 29:21. Pay close attention to the use of a temp node to iterate through the list and the while (temp != null) loop condition.
Insertion
We'll cover the three main insertion scenarios: at the beginning, at the end, and at a specific position.
-
Insert at the Beginning (
insertFirst): This is an efficientO(1)operation.- Create a new node.
- Set the new node's
nextto the currenthead. - Update
headto point to the new node. - Edge Case: If the list was empty,
tailmust also be set to the new node.
-
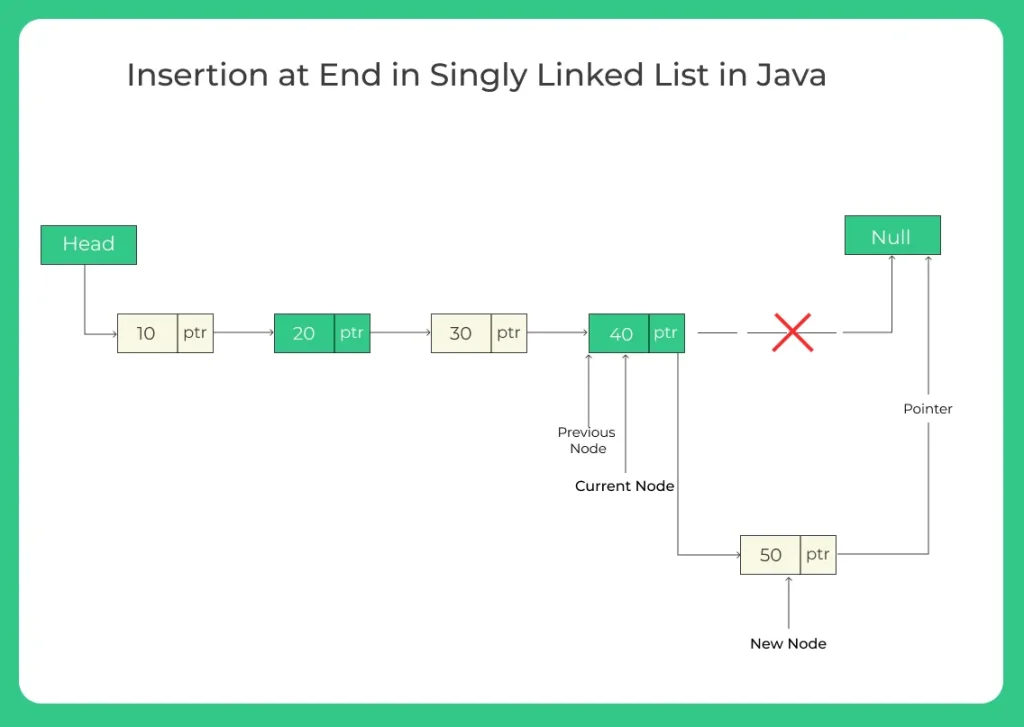
Insert at the End (
insertLast): Thanks to ourtailpointer, this is also anO(1)operation.- Create a new node.
- Set the current
tail'snextto the new node. - Update
tailto point to the new node. - Edge Case: If the list was empty, this is the same as inserting first.
- Insert at a Specific Index (
insert): This is anO(N)operation as it may require traversal.- Traverse to the node just before the target position.
- Create a new node.
- Set the new node's
nextto the previous node'snext. - Set the previous node's
nextto the new node.

Let's watch the implementation of these three insertion methods.
Linked List Tutorial - Singly + Doubly + Circular (Theory + Code + Implementation)
The following sections of the video walk through the code for each insertion type.
Please watch these three segments: Insert First (16:16 - 22:29): Covers insertion at the head. Insert Last (29:21 - 33:45): Shows how the tail pointer enables O(1) insertion at the end. Insert at Index (33:45 - 39:42): Demonstrates the traversal and pointer manipulation for inserting at a specific position.
Deletion
Like insertion, deletion has three main scenarios. Remember to update the size and handle the edge case where the list becomes empty (updating both head and tail to null).
-
Delete First (
deleteFirst): AnO(1)operation.- Move
headtohead.next.
- Move
-
Delete Last (
deleteLast): This is a classic interview question for singly linked lists. It is anO(N)operation.- Since we can't go backward from
tail, we must traverse from theheadto find the second-to-last node. - Set the second-to-last node's
nexttonull. - Update
tailto be the second-to-last node.
- Since we can't go backward from
-
Delete at a Specific Index (
delete): AnO(N)operation.- Traverse to the node just before the one to be deleted.
- Update its
nextpointer to "skip over" the deleted node (i.e.,previous.next = previous.next.next).
Let's see the code for these deletion methods.
Linked List Tutorial - Singly + Doubly + Circular (Theory + Code + Implementation)
The final segments cover the implementation of the three deletion methods.
Please watch these three segments: Delete First (39:42 - 42:59): The simplest deletion. Delete Last (42:59 - 47:32): Note why this operation takes O(N) time. Delete at Index (47:32 - 50:49): Similar logic to insertion, involving finding the previous node.
Test your understanding!
Imagine you have an empty SinglyLinkedList. You perform the following operations in order:
insertLast(10)insertLast(20)insertFirst(5)insert(30, 2)(insert 30 at index 2)deleteLast()deleteFirst()
What is the final state of the list? What are the values of head.value and tail.value?
Show answer
Let's trace the state of the list:
insertLast(10):[10].headis 10,tailis 10.insertLast(20):[10, 20].headis 10,tailis 20.insertFirst(5):[5, 10, 20].headis 5,tailis 20.insert(30, 2):[5, 10, 30, 20].headis 5,tailis 20.deleteLast():[5, 10, 30].headis 5,tailis 30.deleteFirst():[10, 30].headis 10,tailis 30.
The final list is 10 -> 30 -> null.head.value is 10.tail.value is 30.
4. Complexity Analysis
Understanding the time and space complexity is crucial for interviews.
| Operation | Time Complexity | Space Complexity | Notes |
|---|---|---|---|
| Access (get by index) | O(N) |
O(1) |
Must traverse from the head. |
| Search (by value) | O(N) |
O(1) |
Must traverse from the head. |
| Insertion (at beginning) | O(1) |
O(1) |
Simple head pointer update. |
| Insertion (at end) | O(1) |
O(1) |
Possible because we maintain a tail pointer. |
| Insertion (at index) | O(N) |
O(1) |
Worst case requires traversing to the end. |
| Deletion (at beginning) | O(1) |
O(1) |
Simple head pointer update. |
| Deletion (at end) | O(N) |
O(1) |
Must traverse to find the second-to-last node. |
| Deletion (at index) | O(N) |
O(1) |
Worst case requires traversing to the end. |
For a concise review of these complexities, the following video is helpful.
Singly Linked List | Insert, Delete, Complexity Analysis
The 'Singly Linked List' video from Blue Tree Code has an excellent final section dedicated to complexity analysis.
Watch from 12:14 to 14:34. This provides a clear summary of the time and space complexity for all the operations we've discussed.
Conclusion
Congratulations! You have now implemented a singly linked list from scratch, including its most common operations. This is a significant first step in mastering pointer-based data structures.
Key Takeaways:
- A singly linked list is composed of nodes, each with data and a
nextpointer. - The
headpointer marks the start, and anullnextpointer marks the end. - Maintaining a
tailpointer allows for efficientO(1)insertion at the end. - Operations that require finding a specific index or the end of the list without a tail pointer (like
deleteLast) takeO(N)time due to traversal. - Pointer manipulation requires careful handling of edge cases, such as an empty list or a list with a single node.
Preview of the next lesson:
In this lesson, you saw that some operations, like deleting the last element, were inefficient. In our next lesson, we will address this by exploring the doubly linked list. You will learn to implement a doubly linked list with insertion, deletion, and traversal operations and see how adding a previous pointer can optimize certain actions.