Welcome back! In our last lesson, you built a solid foundation by learning to navigate the Linux command line and manage files. You saw how the ls -l command provides a detailed view of a directory's contents, including a curious string of letters like -rwxr-xr--. Today, we're going to decipher that string.
This lesson focuses on Linux file permissions and ownership. You will learn how to read, understand, and modify who is allowed to interact with files and directories on a system. This is a cornerstone of Linux security and is absolutely critical in the world of CTFs. Understanding permissions will allow you to access restricted information, make your own tools executable, and spot misconfigurations that can lead to a foothold on a target machine. We'll use the chmod and chown commands to take full control of file access.
Who Can Do What?
The Linux security model for files is built on three simple questions:
- Who are you? (The User/Owner, a member of the Group, or just an Other)
- What do you want to do? (Read, Write, or Execute)
- Are you allowed?
Let's break down the "who" and the "what".
- User (u): The owner of the file.
- Group (g): A collection of users who share a set of permissions.
- Others (o): Everyone else.
For each of these three categories, there are three basic permissions:
- Read (r): View the contents of a file or list the contents of a directory.
- Write (w): Modify a file, or create, delete, and rename files within a directory.
- Execute (x): Run a file as a program or script, or enter (
cdinto) a directory.
The distinction between how these permissions apply to files versus directories is crucial. The following video provides a very clear explanation of this concept.
Linux Crash Course - Understanding File & Directory Permissions
Watch this segment from the "Linux Crash Course" by Learn Linux TV. It does an excellent job of explaining the different meanings of read, write, and execute permissions for files and directories.
Focus on the part where the presenter details the r, w, and x permissions from this timestamp. Pay close attention to what 'execute' means for a directory.
Decoding the ls -l Output
Now, let's revisit the output of ls -l. That 10-character string at the beginning of each line is the key.
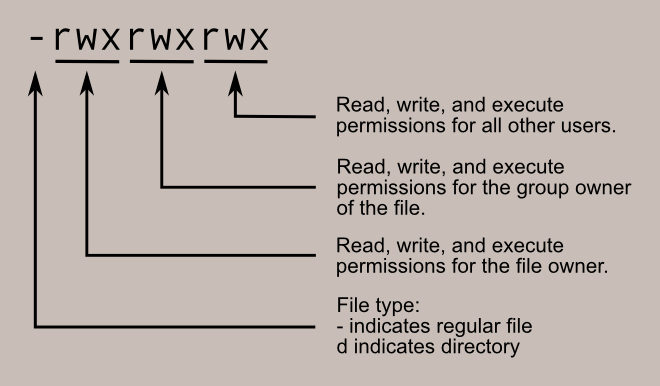
So, a string like -rwxr-xr-- means:
- -: It's a file.
- rwx: The owner (user) can read, write, and execute it.
- r-x: Members of the group can read and execute it, but not write to it.
- r--: All other users can only read it.
Modifying Permissions with chmod
To change these permissions, we use the chmod (change mode) command. There are two ways to use it: the fast-but-less-intuitive numeric mode, and the slower-but-more-readable symbolic mode. We'll cover both, as you'll see them used interchangeably.
Numeric (Octal) Mode
This is the most common method you'll encounter. Each permission is assigned a number:
- Read (r) = 4
- Write (w) = 2
- Execute (x) = 1
To get the permissions for a single entity (user, group, or other), you add the numbers. For example, read + write (4 + 2) is 6, and read + write + execute (4 + 2 + 1) is 7. You then use a three-digit number to set the permissions for the user, group, and others, in that order.

Common examples include:
chmod 755 my_script.sh:rwxr-xr-x. Owner gets all permissions; group and others can read and execute. Ideal for programs and scripts.chmod 644 my_document.txt:rw-r--r--. Owner can read and write; everyone else can only read. Good for regular files.chmod 600 my_private_key:rw-------. Only the owner can read and write. Essential for sensitive files.
This video from Chris Titus Tech gives a quick and practical overview of using the numeric mode.
Linux File permissions and Ownership Explained
Watch this segment to see the numeric chmod method in action.
The explanation of the numeric point system and its usage runs from this timestamp.
Symbolic Mode
Symbolic mode is more descriptive. The syntax is chmod [who][operator][permission] file.
- Who:
u(user),g(group),o(others),a(all) - Operator:
+(add),-(remove),=(set exactly) - Permission:
r(read),w(write),x(execute)
Examples:
chmod u+x script.sh: Adds execute permission for the user. A very common command in CTFs when you download a tool and need to run it.chmod g-w shared_file.txt: Removes write permission for the group.chmod o=r public_info.txt: Sets the permissions for others to be read-only.
This next reading provides a great reference for both modes, along with other essential details.
How to Set Permissions in Linux: A Guide to chmod and ...
This guide from DigitalOcean is a comprehensive reference for file permissions. We'll focus on the sections covering chmod.
Please read the following sections: Start with Understanding Linux Permissions for a review of the concepts. Then, read about the Numeric Representation. Continue to the section File and Directory Permission Basics, which gives a full ls -l breakdown. Finally, read the entire section on The chmod Command, which covers both numeric and symbolic modes with examples.
Modifying Ownership with chown
Sometimes, you don't want to change what can be done, but who owns the file. For this, we use chown (change owner). In CTFs, this is more about understanding ownership than changing it, but it's a vital command. For example, if a file is owned by root, you know you can't modify it as a normal user.
The most common and recommended syntax is chown user:group filename. This changes both the user and group owner at the same time. Since changing ownership is a privileged operation, you will almost always need to use sudo.
- Example:
sudo chown ctf_player:ctf_player important_file
If you need to change permissions or ownership for a directory and everything inside it, you can use the recursive -R flag with both chmod and chown. Be very careful with this!
- Example:
sudo chown -R www-data:www-data /var/www/html
How to Set Permissions in Linux: A Guide to chmod and ...
Let's return to the DigitalOcean guide to learn about changing ownership.
Read the sections on chown and chgrp, and Recursive Permissions.
A CTF Creator's Perspective
To see exactly how these commands are used in a real CTF context, let's look at an article about creating a CTF challenge. The author uses chown and chmod to place and protect the flags.
How to make our own CTF Challenge with ease. | by Akshat Gupta | InfoSec Write-ups
This InfoSec Write-ups article gives us a behind-the-scenes look at how flags are secured in a challenge.
Read the two sections showing how the root.txt and user.txt flags are created. In the first part, notice the use of chmod 600 to make the root flag readable only by the root user. In the next part, observe how chown and chmod are used together to set up the user flag for a specific non-root user.
This is a perfect example of the Principle of Least Privilege in action—a core security concept you'll see everywhere. Don't give permissions that aren't absolutely necessary. The common beginner mistake of using chmod 777 on everything is a security nightmare that you, as a future CTF player, will learn to exploit.
Conclusion
In this lesson, you've unlocked the meaning behind Linux file permissions. You learned how to interpret the rwx permissions for users, groups, and others, and how their meaning changes between files and directories. You are now equipped with the chmod command to modify these permissions using both numeric and symbolic modes, and the chown command to manage file ownership. Most importantly, you've seen how these fundamental commands are directly applied in CTF challenges to protect sensitive information like flags.
In our next lesson, we will cover grep, a powerful command for searching text patterns inside files. Now that you know how to control access to files, the next logical step is to learn how to efficiently search for the information hidden within them.