In our last lesson, we transformed grep from a simple search tool into a sophisticated pattern-matching engine using regular expressions. You learned to build complex one-liners to extract specific information, like IP addresses or flags, from large amounts of text. This is a powerful skill, but what happens when you need to run a sequence of these commands repeatedly, or when the task involves more logic than a single command can handle?
This is where shell scripting comes in. This lesson introduces you to the world of Bash scripting, where you'll learn to chain commands together, use variables, and apply conditional logic to automate repetitive tasks. For your goal of competing in CTFs, speed and efficiency are paramount. Being able to write a quick script to test a hypothesis, brute-force a simple encoding, or organize your findings can save you precious minutes. We will cover the essentials to get you started on building your own custom toolkit.
What is a Shell Script?
At its core, a shell script is simply a text file containing a sequence of commands that would otherwise be typed one by one into the terminal. By placing them in a script, you create a reusable, executable program. This moves you from being just a user of commands to a creator of your own tools.
Since you're familiar with C and Python, you can think of a simple script as a main function: it's a sequence of instructions executed from top to bottom. The power comes from automating workflows, ensuring consistency, and saving time.
The video below from TechWorld with Nana gives an excellent overview of why shell scripting is so valuable for automation.
Bash Scripting Tutorial for Beginners
This video provides a great conceptual introduction to shell scripting.
Watch the first three minutes, from the introduction, to understand the purpose of shell scripting and how it differs from running commands manually.
Creating and Executing Your First Script
Let's build a simple script. A Bash script has three key components:
- The Shebang: The very first line of a script should be
#!/bin/bash. This line, known as the "shebang," tells the operating system which interpreter to use to run the commands in the file. In our case, it's the Bash shell. - The Commands: The body of your script, which is just a list of the Linux commands you want to execute.
- Execution Permission: By default, text files are not executable. You must explicitly give your script permission to run using the
chmodcommand you learned about previously.
The following guide from freeCodeCamp offers a clear, step-by-step walkthrough of this process.
Bash Scripting Tutorial – Linux Shell Script and Command ...
This article covers the fundamental mechanics of creating and running a bash script.
Please read the section titled Create and Execute Bash scripts. This will guide you through adding the shebang, making the file executable with chmod u+x, and the different ways to run your script. Pay attention to the line-by-line breakdown of the example script.
Essential Scripting Constructs
To write useful scripts, you need to go beyond a simple list of commands. You need ways to store data, make decisions, and handle input.
Variables and Command Substitution
Like in Python or C, variables in Bash are used to store data. However, the syntax is unique.
- Assignment:
my_variable="some value". Note there are no spaces around the=sign. - Accessing:
$my_variableor${my_variable}. The curly braces are useful to explicitly define the variable's name when it's next to other characters, for example:echo "${my_variable}_completed".
A particularly powerful feature is command substitution, which allows you to capture the output of a command and store it in a variable. The syntax is variable_name=$(command).
For instance, you could get the current working directory like this: current_dir=$(pwd). This is a common pattern in CTFs for creating scripts that are aware of their location. John Hammond demonstrates this exact technique in the following clip from one of his PicoCTF walkthroughs.
WRITE BASH SCRIPTS for CTF Solutions (PicoCTF 08 'file-run1')
This video shows a practical CTF use case for variables and command substitution.
Watch from this segment where he captures the output of the pwd command into a variable named original_directory and then uses it to rename the folder. This is a perfect example of automating a repetitive part of the CTF workflow.
Handling Input: Arguments and read
A script is much more flexible if it can accept input. There are two primary ways to do this:
- Positional Arguments: When you run your script, you can pass arguments to it like you would with any other command (e.g.,
./myscript.sh arg1 arg2). Inside the script, these are accessible as special variables:$1for the first argument,$2for the second, and so on.$0holds the name of the script itself. - Interactive Input (
read): You can prompt the user for input while the script is running using thereadcommand. A common usage isread -p "Enter your name: " user_name, which displays the prompt and stores the user's input in theuser_namevariable.
Conditional Logic: if-then-else
To make your scripts "intelligent," you need to control their flow with conditional statements. In Bash, this is done with the if-then-else-fi structure. The concept is identical to if statements in C and Python, but the syntax is very different.
The basic structure is:
if [[ condition ]]; then


    # code to run if condition is true
elif [[ another_condition ]]; then


    # code to run if another_condition is true
else


    # code to run if all conditions are false
fi
- The
[[ ... ]](double brackets) are a modern and robust way to perform tests. fimarks the end of theifblock.- String comparison:
[[ "$var1" = "$var2" ]] - Numeric comparison:
[[ "$num1" -eq "$num2" ]](equal),[[ "$num1" -gt "$num2" ]](greater than),[[ "$num1" -lt "$num2" ]](less than), etc.
Here are two visual examples of if-else in action.

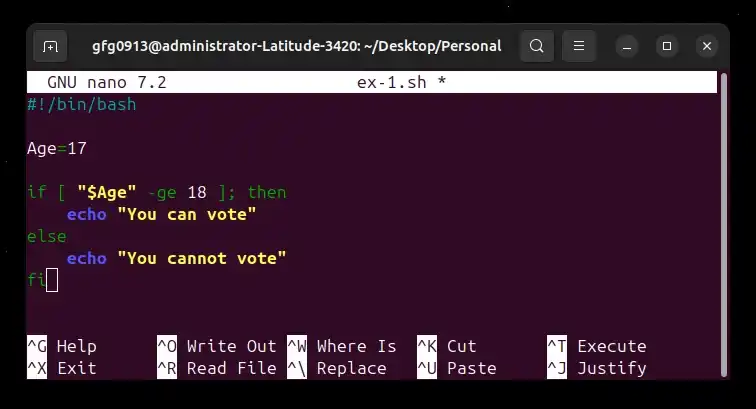
For a detailed reference on all these concepts—variables, input, and conditionals—the freeCodeCamp article is an excellent resource to study.
Bash Scripting Tutorial – Linux Shell Script and Command ...
This part of the article covers the core building blocks of scripting logic.
Please read the following three sections: Variables and data types. Input and output. Focus on the "Gathering input" part. Conditional statements. This provides a clear syntax breakdown and an example.
An Automation Script for CTFs
Now let's put it all together to build a script that automates a common, repetitive task in CTFs: decoding strings. Often, you'll find a string that looks like it's encoded, but you're not sure which "base" encoding was used (Base64, Base32, Base58, etc.). You could manually run echo "string" | base64 -d, then base32 -d, and so on, but that's slow. Let's automate it.
The following resource contains a perfect example of a script that does exactly this.
This CTF writeup demonstrates a simple yet powerful bash script for automating decoding.
In the article, find "Task 8: Another decoding stuff". After the author solves the challenge manually, they present a bash script to automate the process. Read from the sentence <span data-type="resource_reading_textrange" data-resource-subitem-id="b3cff6cb" data-range-start="Being a Maverick" data-range-end="fi echo">"Being a Maverick..." down to the end of the script block. We will analyze this script together.
Let's break down that base-decoder.sh script:
#!/bin/bash


# Read input string from command prompt
read -p "Enter the encoded string: " encoded_string


# ... (echo statements for formatting) ...


# Decode using base32
decoded_base32=$(echo "$encoded_string" | base32 -d)
if [[ -n "$decoded_base32" ]]; then
 echo "Decoded (Base32): $decoded_base32"
fi


# ... (similar blocks for base58 and base64) ...
read -p ... encoded_string: Prompts the user and stores the input in theencoded_stringvariable.decoded_base32=$(...): This uses command substitution. It executesecho "$encoded_string" | base32 -dand captures the entire output into thedecoded_base32variable. If the decoding fails, the command often produces no output, so the variable will be empty.if [[ -n "$decoded_base32" ]]: This is the clever part. The-noperator tests if a string is "not-null" (i.e., not empty). The script only prints the decoded output if the decoding command was successful and produced a result.
This script beautifully combines all the elements we've discussed into a practical tool you could use in a real CTF.
Beyond Conditionals: Loops for Repetitive Logic
What if you want to perform the same action on a whole list of items? Or repeat a block of code for different error types? This is where loops come in. While we won't dive deep into them today, it's important to know they exist. The for loop is especially useful for iterating over lists of files or patterns.
The following video demonstrates how to take a script with repeated logic and refactor it using for loops to make it dynamic and scalable. This is a key step in writing truly powerful automation scripts.
Bash Scripting Tutorial for Beginners
This video shows how to use for loops to make a script dynamic and avoid repeating code.
Watch from this section on loops. The presenter first uses a for loop to iterate over a list of files, and then uses a nested for loop to iterate over a list of error patterns for each file. This shows how loops can dramatically simplify and enhance a script.
Conclusion
In this lesson, you've made the leap from executing commands to authoring your own. You now understand the fundamental structure of a Bash script, including the shebang and execution permissions. You've learned how to use variables to store data, capture command output with command substitution, and handle user input with read and positional arguments. Most importantly, you can now control your script's logic with if-then-else statements. By combining these concepts, you can start building simple but effective tools to automate repetitive tasks, a crucial skill for gaining an edge in CTF competitions.
In our next and final lesson for this module, we will shift our focus from creating scripts to managing the programs and processes already running on a Linux system. You will learn how to view, stop, and manage running processes using essential commands like ps, kill, and systemctl.