Hello! Welcome to your first lesson in the course on building a physics engine.
Your goal is to construct a full-featured 3D physics engine for games, and this course is designed to guide you through that process, from fundamental principles to advanced features like cloth and fluid simulation. Your background in C++, classical mechanics, and mathematics gives us a fantastic starting point, allowing us to focus on the unique architectural and algorithmic challenges of physics simulation.
In this introductory lesson, we will lay the conceptual groundwork for everything that follows. We'll explore the high-level architecture of a typical real-time physics engine, identifying its core components and understanding how they fit together. This will provide you with a mental "map" of the system we are about to build, making the purpose of each subsequent lesson much clearer.
The Engine in the Game Loop
First, let's zoom out and see where a physics engine fits within the larger context of a game. A game typically runs in a continuous loop, and on each iteration (or "frame"), it needs to process user input, update the game state, and render the scene. The physics engine is a critical part of that "update" phase.
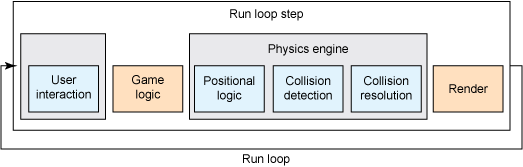
This diagram shows a simplified game loop. The physics engine is a distinct component that takes the current state of the world, simulates the passage of a small amount of time, and computes the new state. This new state is then used by the renderer to draw the frame.
The engine's primary responsibility is to advance the physical state of objects—their position, orientation, and velocities—over time, based on forces and collisions.
The Core Subsystems
A physics engine, while complex, can be broken down into a few primary, interacting subsystems. A great way to get a quick visual overview of these parts is to watch this short video from the author of one of our main reading resources for today.
Designing a Physics Engine in 5 minutes
The video is "Designing a Physics Engine in 5 minutes" by winterdev. It quickly introduces the three main components of a physics engine.
Please watch from the beginning to the end of the dynamics section to get a feel for the first major component.
As the video outlines, we can think of the engine as having three main pillars:
- Dynamics Simulation: This is the heart of the engine's motion-related calculations. Given the current forces on an object (like gravity), its mass, and its current velocity, this subsystem calculates its new position and orientation after a small time step. This involves numerical integration of the equations of motion, a topic your background in mechanics and calculus will make very familiar.
- Collision Detection: This subsystem is purely about geometry. Its job is to figure out which objects in the scene are intersecting or touching. This is often a two-step process: a "broad phase" that quickly rules out pairs of objects that are too far apart to possibly collide, and a "narrow phase" that performs precise intersection tests on the remaining pairs.
- Collision Response: Once the detection system reports a collision, this subsystem takes over to calculate the appropriate reaction. This usually involves applying impulses to the colliding objects to change their velocities (making them bounce or slide) and correcting their positions to prevent them from remaining interpenetrated.
To get a more detailed and structured perspective on these components and see how they map to a C++ implementation, we'll turn to our first main reading.
This article, "Let's start with the physics engine..." by Iain Winter, provides an excellent, design-oriented overview of building a physics engine from the ground up. It aligns perfectly with our goal of understanding the architecture.
Start by reading the introductory section, which outlines the core responsibilities. Then, read the sections on Dynamics, Collision detection, and Collision Response. Focus on: How the author defines each of the three subsystems. You can find these under the headings Dynamics, Collision detection, and Collision Response. The basic C++ structs used to represent objects and the world (Object, PhysicsWorld). The idea of abstracting shape-specific collision tests away from the core logic. The concept of a Solver for handling the response.
The article provides a great breakdown. Another source, the Vulkan Documentation Project, gives a slightly more expanded list of components, which helps preview topics we'll cover later in the course.
Subsystems: Physics Basics :: Vulkan Documentation Project
This section from the Vulkan tutorial provides a concise, bulleted list of the key components in a typical game physics system.
Read the list under the heading Physics System Architecture. Notice that it includes items like Constraints (for joints) and Spatial Partitioning (an optimization for the broad-phase of collision detection), which are advanced features built upon the three core pillars.
The Simulation Pipeline
Now that we know the main subsystems, how do they work together in a single time step? The process is a well-defined pipeline of operations. The Vulkan resource provides an excellent, standard sequence for a single physics update.
// Physics.cpp from "Subsystems: Physics Basics" outlines a six-step process:
- Accumulate forces: Sum all forces acting on each object (e.g., gravity, player input, spring forces).
- Integrate forces: Use the net force and mass to update the object's velocity. This is essentially applying over the time step.
- Detect collisions: Run the broad-phase and narrow-phase collision detection systems to find all contact points.
- Resolve collisions: Iterate through the contacts and apply impulses to resolve velocity changes and positional corrections.
- Integrate velocities: Use the new, post-collision velocities to update the object's position and orientation.
- Clear forces: Reset the accumulated forces for each object to zero, preparing for the next time step.
This sequence is crucial. For instance, we resolve collisions after updating velocities from forces but before updating positions from those new velocities. This ensures the position update reflects the outcome of any bounces that happened during the time step.
From Architecture to C++ Design
A key part of engine design is mapping these abstract concepts to a flexible and extensible code structure. The first article we read discusses an important architectural refinement.
This section of the "Winter" article shows how the initial simple design can be evolved to be more powerful and flexible.
Please read the section titled More Options. Pay close attention to: The motivation for splitting the Object struct into CollisionObject and Rigidbody. What capabilities does a Rigidbody have that a simple CollisionObject doesn't? The corresponding split of PhysicsWorld into CollisionWorld and DynamicsWorld. This is a classic example of the "separation of concerns" principle, which you're likely familiar with from general software engineering. It allows a user of the engine to perform collision queries without incurring the cost of a full dynamics simulation.
This design evolution highlights a key aspect of building a large system: starting simple and refactoring towards a more robust structure as new requirements (like static objects or triggers) are introduced.
The Most Important Architectural Decision: The Game Loop
Finally, we come to one of the most critical aspects of real-time physics architecture: decoupling the simulation from rendering. A physics simulation requires a consistent, fixed time step (e.g., 1/60th of a second) to be stable and deterministic. If the time step varies with the rendering frame rate, the simulation can become unstable, or its behavior can change depending on how fast the computer is.
Conversely, the rendering loop should run as fast as possible to provide smooth visuals to the player. Tying rendering to the fixed physics step would cause stuttering on high-refresh-rate monitors.
The solution is to run the physics simulation and rendering loops independently. The physics engine advances in fixed time increments, while the renderer draws frames as fast as it can, interpolating the positions of objects between the last physics state and the current one to create smooth motion.
Let's return to the "Winter" article one last time to see how this concept is introduced.
This final section explains the problem of jittery movement and the standard solution.
Read the short section that begins just after the second demo video, starting from the paragraph about CS:GO. Focus on understanding why a fixed timestep is necessary and the concept of interpolating the Transform for the renderer.
This decoupling is so fundamental that it will be the very first thing we implement in our next lesson.
Conclusion
In this lesson, we have taken a 30,000-foot view of a real-time physics engine. Let's summarize the key architectural takeaways:
- A physics engine is a component within a game's main loop responsible for updating the physical state of objects.
- It is built on three core pillars: dynamics simulation (moving objects), collision detection (finding intersections), and collision response (reacting to intersections).
- A single simulation step follows a specific pipeline: accumulate forces, integrate to find new velocities, detect and resolve collisions, integrate to find new positions, and clear forces.
- Good C++ design separates concerns, for example by having distinct classes for dynamic rigid bodies versus static collision geometry.
- Crucially, the physics simulation must run on a fixed time step, decoupled from the variable frame rate of the rendering loop, with interpolation used to produce smooth visuals.
In our next lesson, we will get our hands dirty with code for the first time. We will translate the last concept we discussed into a practical implementation by setting up a fixed-timestep simulation loop, which will serve as the foundation for our entire engine.