Hello! Welcome back to our journey into data manipulation with Pandas.
In our last lesson, you learned how to create the fundamental Pandas data structures, the Series and the DataFrame, from various sources like Python dictionaries and lists. Now that you know how to get data into a DataFrame, the next essential skill is to explore, understand, and extract the specific pieces of information you need from it.
This lesson is all about getting to know your data. We will cover how to perform a preliminary "health check" on a DataFrame by inspecting its properties—like its size, data types, and summary statistics. Then, we'll dive deep into the most critical data selection techniques: indexing and slicing. Mastering these skills is fundamental for any data cleaning, analysis, or machine learning task that follows.
1. First Look: Inspecting Your DataFrame
Before you start any serious analysis, you need to get a feel for your dataset. What does it look like? How big is it? What kind of data does it contain? Pandas provides a suite of simple but powerful attributes and methods for this initial inspection.
The video below gives a great tour of these essential tools.
Learning Pandas for Data Analysis? Start Here.
To start, let's watch this segment from the video "Learning Pandas for Data Analysis? Start Here." by Rob Mulla. It provides a practical demonstration of how to quickly get an overview of a DataFrame's contents and structure.
Watch from 03:32 to 06:11. Pay attention to the purpose of each method shown: .head() and .tail(): Viewing the first and last few rows. .shape: Getting the dimensions (rows, columns). .columns and .index: Listing the column and row labels. .info(): A technical summary including data types and memory usage. .describe(): A statistical summary of the numerical columns.
Let's recap the most important methods you just saw:
.head(n)and.tail(n): Show the first or lastnrows (default is 5). This is the quickest way to see a sample of your data and its structure..shape: An attribute (not a method, so no parentheses) that returns a tuple representing the dimensionality of the DataFrame:(number_of_rows, number_of_columns)..info(): Provides a concise summary. It's especially useful for checking the data type (Dtype) of each column and finding columns with missing values (by comparing theNon-Null Countto the total number of entries)..describe(): Generates descriptive statistics for the numerical columns, such as count, mean, standard deviation, min, max, and percentiles. This is a great way to get a quick sense of the distribution and scale of your numerical data.
The official Pandas guide, "10 minutes to pandas," also provides a good summary of these functions.
10 minutes to pandas — Viewing data
For a quick text-based reference on these inspection methods, you can review the official Pandas documentation.
Skim the section titled 'Viewing data'. It reinforces the usage of .head(), .tail(), .index, .columns, and .describe() with code examples.
2. Selecting Data: loc, iloc, and []
Once you have a high-level overview, you'll need to select specific subsets of your data. This is where Pandas' indexing capabilities shine. However, the different options can be confusing for beginners. We'll focus on a clear, consistent approach.
The three primary ways to select data are:
[](Bracket notation): Good for quick column selection..loc: For label-based selection..iloc: For integer position-based selection.
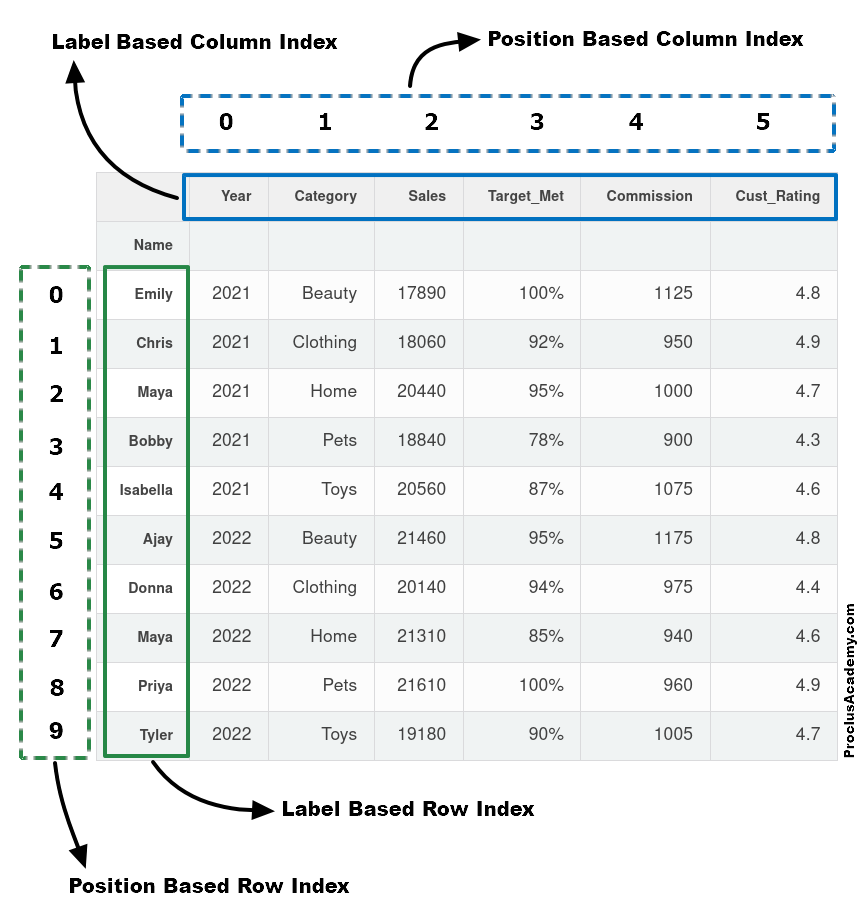
This image clearly illustrates the difference between label-based and position-based indexing, which is the core concept separating .loc and .iloc.
For a robust and readable approach, it's best to follow this simple rule:
Use
.locfor labels and.ilocfor positions. Always be explicit about selecting both rows and columns.
The following video provides an excellent, minimalist guide that champions this exact philosophy.
A minimalist's guide to slicing and indexing pandas DataFrames
This short video by Brandon Rohrer presents a clear, simple, and reliable strategy for indexing in Pandas that will help you avoid common mistakes.
Watch the entire video (about 7 minutes). It's very concise. Focus on the core message articulated at the beginning and end: Use .loc for labels. Use .iloc for positions. Explicitly designate both rows and columns (e.g., df.loc[:, 'column_name']).
Now, let's break down each method with examples. We'll use the DataCamp article "Iloc vs Loc in Pandas" as our guide. It provides clear explanations and examples for both methods.
Iloc vs Loc in Pandas: A Guide With Examples
This article from DataCamp provides a fantastic, detailed comparison of .loc and .iloc. We will use it as a textual guide for the next sections.
Read the introduction and the two main sections, 'Using .loc: Selection by Labels' and 'Using .iloc: Selection by Integer Position'. Don't worry about memorizing every syntax variation; focus on understanding the core difference and the common use cases for each.
A. Selecting Columns with []
The simplest way to select one or more columns is with bracket notation.
- To select a single column, pass the column name as a string. The result is a Pandas
Series.# Assume 'df' is a DataFrame with student data major_series = df['Major'] - To select multiple columns, pass a list of column names. The result is a new
DataFrame.student_info_df = df[['Student', 'Grade']]
While you can use [] to slice rows (e.g., df[0:3]), this can be ambiguous. For clarity, it's better to use .loc or .iloc for any row selection.
B. Label-Based Selection with .loc
Use .loc when you want to select data using the index labels and column names. The syntax is df.loc[row_labels, column_labels].
- Select a single row:
df.loc['row_label'] - Select multiple rows:
df.loc[['row_label_1', 'row_label_2']] - Select a slice of rows:
df.loc['start_label':'end_label'](Note: both endpoints are included). - Select a single value:
df.loc['row_label', 'column_label'] - Select rows and columns simultaneously:
df.loc['start_label':'end_label', ['col1', 'col2']]
Boolean Indexing (a very powerful feature of .loc):
One of the most common uses of .loc is to select rows based on a condition. You can pass a boolean Series (a list of True/False values) as the row selector.
# Select all students who are CS majors
cs_majors_df = df.loc[df['Major'] == 'CS']

# Select all students with a grade above 90
high_achievers_df = df.loc[df['Grade'] > 90]

# Combine conditions (use & for AND, | for OR)
# Note the parentheses around each condition are required!
cs_high_achievers = df.loc[(df['Major'] == 'CS') & (df['Grade'] > 90)]
C. Position-Based Selection with .iloc
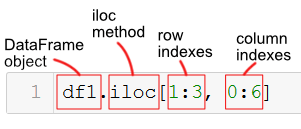
Use .iloc when you want to select data using integer positions (starting from 0). The syntax is df.iloc[row_positions, column_positions].
- Select a single row:
df.iloc[0](the first row) - Select multiple rows:
df.iloc[[0, 2, 5]] - Select a slice of rows:
df.iloc[0:3](selects rows at position 0, 1, and 2. The endpoint is excluded, just like in standard Python slicing). - Select a single value:
df.iloc[0, 1](value at the first row, second column) - Select rows and columns simultaneously:
df.iloc[0:3, [0, 2]](first three rows, first and third columns)
Test your understanding!
Imagine you have the following DataFrame df:
         Major  Grade  Credits
Student
Alice       CS     85       90
Bob       Math     92      105
Charlie     CS     78       80
David  Physics     95      110
'Student' is the index.
Write the code to perform the following selections:
- Select the
Gradefor 'Bob' using.loc. - Select the rows for 'Alice' and 'David' using
.loc. - Select the first two rows of the DataFrame using
.iloc. - Select all students who have more than 100 credits using boolean indexing with
.loc.
Show answer
import pandas as pd

data = {'Major': ['CS', 'Math', 'CS', 'Physics'],
        'Grade': [85, 92, 78, 95],
        'Credits': [90, 105, 80, 110]}
index = ['Alice', 'Bob', 'Charlie', 'David']
df = pd.DataFrame(data, index=index)
df.index.name = 'Student'

# 1. Select the Grade for 'Bob' using .loc
bob_grade = df.loc['Bob', 'Grade']
print(f"Bob's grade: {bob_grade}\n")

# 2. Select the rows for 'Alice' and 'David' using .loc
alice_david_rows = df.loc[['Alice', 'David']]
print("Rows for Alice and David:\n", alice_david_rows, "\n")

# 3. Select the first two rows of the DataFrame using .iloc
first_two_rows = df.iloc[0:2] # or df.iloc[[0, 1]]
print("First two rows:\n", first_two_rows, "\n")

# 4. Select all students with more than 100 credits
high_credits = df.loc[df['Credits'] > 100]
print("Students with over 100 credits:\n", high_credits)
Conclusion
In this lesson, we covered the essential first steps of working with a new dataset in Pandas. You are now equipped to both inspect a DataFrame to understand its characteristics and to precisely select the data you need for your analysis.
Key Takeaways:
- Inspection is key: Always start by using
.head(),.info(), and.describe()to get a quick understanding of your data's structure, types, and statistical properties. - Choose the right tool for selection:
- Use simple bracket notation
df['column']for quick, single-column selection. - Use
.locfor label-based selection (names of rows/columns). It's great for slicing and powerful for conditional (boolean) filtering. - Use
.ilocfor integer-position-based selection (0-indexed). It behaves like standard Python list slicing.
- Use simple bracket notation
- Be explicit: Using
.locand.ilocwith both row and column selectors (df.loc[rows, cols]) leads to clearer and more predictable code.
Preview of the Next Lesson:
We've created DataFrames in memory and learned how to inspect and select from them. In the real world, data almost always comes from external files. In the next lesson, we will focus on the most common I/O (Input/Output) operations: loading data into DataFrames from files like CSV, Excel, and JSON, and exporting your processed DataFrames back to these formats.