Recommended resources
The freely available resources this lesson will direct you to.
- How to Make Screenshots for App Storewww.youtube.com
- Google Play store listings: Maximize app discoverability with store listing experimentswww.youtube.com
- App Store Screenshot Sizes, Guidelines and Requirements for iOS Apps (2025 update)splitmetrics.com
- capgo-skills/skills/capacitor-app-store/SKILL.md at main - GitHubgithub.com
Welcome back. In our last lesson, we successfully archived and uploaded the iOS build to App Store Connect, placing our native packages for both Android and iOS on the respective distribution platforms. The binaries are ready, but now we need to build the "storefront" that will present our app to the world.
This lesson focuses on creating the essential marketing and legal assets required for your store listings. By the end of this session, you will be able to prepare the required screenshots, app descriptions, and privacy policy URL for both the Apple App Store and Google Play Store. These assets are not just a formality; they are critical components that directly influence a user's decision to download your app.
1. The Anatomy of a Store Listing
Think of your app's page on the App Store or Google Play as its primary landing page. Much like in web development, where you optimize a landing page for user conversion, your store listing assets are designed to capture attention and persuade a potential user to take a specific action: installing your app.
These assets fall into three main categories, which we will cover today:
- Visual Assets: Screenshots and (optionally) videos that show your app in action.
- Textual Metadata: The app name, descriptions, and keywords that explain what your app does.
- Legal Documentation: A publicly accessible privacy policy.
2. Crafting Your Visual Story: App Screenshots
Screenshots are arguably the most impactful element of your store listing. They offer the first real glimpse into your app's user experience. Simply uploading raw screen captures is a missed opportunity. Instead, you should aim to create a curated visual narrative that highlights your app's core value proposition.
Technical Requirements
Both stores have strict technical requirements for screenshots. Getting these wrong can block your submission.
- Format: Use PNG or JPEG files (without transparency) in the RGB color space.
- Sizes: This is where the platforms differ significantly.
For iOS, Apple has simplified the requirements. You primarily need to provide screenshots for the largest phone and iPad screen sizes, and Apple will automatically scale them down for smaller devices.
App Store Screenshot Sizes, Guidelines and Requirements for iOS Apps (2025 update)
This guide from Splitmetrics provides an excellent, up-to-date overview of Apple's screenshot requirements and best practices. It's more detailed than the official documentation in some areas.
First, read the section on general requirements to understand the rules about content and file formats. Then, focus on the section covering screenshot sizes. Pay close attention to the mandatory sizes for the 6.7" (or 6.9") iPhone and 12.9" (or 13") iPad, as these are the most critical.
For Android, the Google Play Store is more flexible, accepting a range of sizes. However, it's best to aim for a common aspect ratio (like 16:9) and provide high-quality images.
capgo-skills/skills/capacitor-app-store/SKILL.md at main - GitHub
This document provides a concise summary of the screenshot sizes for both platforms.
Review the table under the "Android Screenshot Sizes" section. While it lists a range, a standard 1080x1920px screenshot is a safe and common choice for phones.
Capturing and Designing Screenshots
The process involves two main steps: capturing the raw screens and then enhancing them with design elements.
Step 1: Capture Raw Screenshots
You can capture screenshots directly from the simulators.
How to Make Screenshots for App Store
This video provides a straightforward walkthrough of capturing screenshots from the iOS and Android simulators.
Watch the first part of the video from the beginning, which demonstrates how to launch different device simulators (iPhone, iPad, Android) and use the Cmd+S keyboard shortcut to save a screenshot to your desktop.
To get the required sizes, follow this workflow:
- Run your app on an iPhone 15 Pro Max simulator (
bunx cap run ios --target "iPhone-15-Pro-Max"). Navigate to the key screens of your app and pressCmd+Sto save each one. - If your app supports tablets, repeat the process on an iPad Pro (12.9-inch) simulator.
- Run your app on an Android emulator (e.g., Pixel 7 Pro) and take screenshots using the camera button in the emulator toolbar or
Cmd+S.
Step 2: Enhance Your Screenshots
Raw screenshots lack context. Good store assets frame these captures within a narrative, often with a device mockup, a background color, and a bold headline.
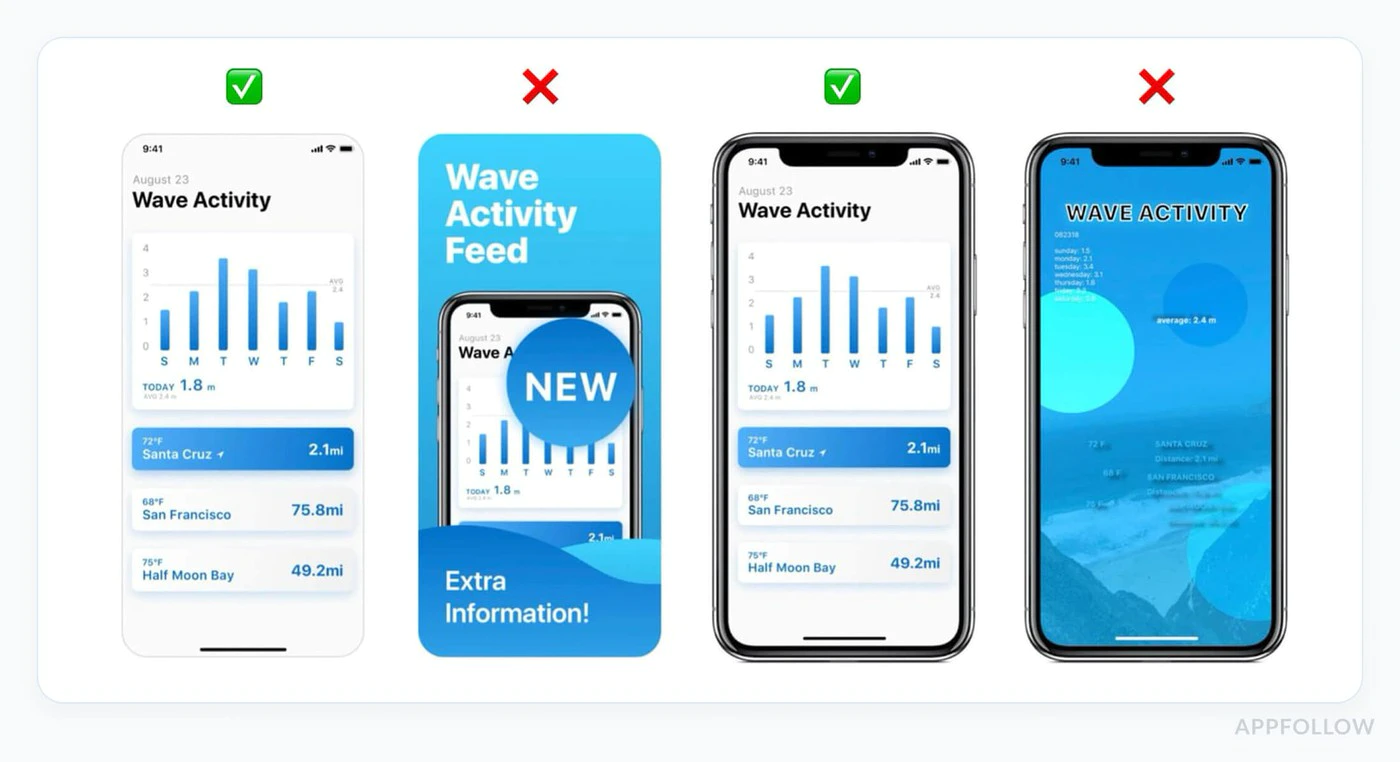
The best screenshots tell a story, with each image highlighting a key feature or benefit.
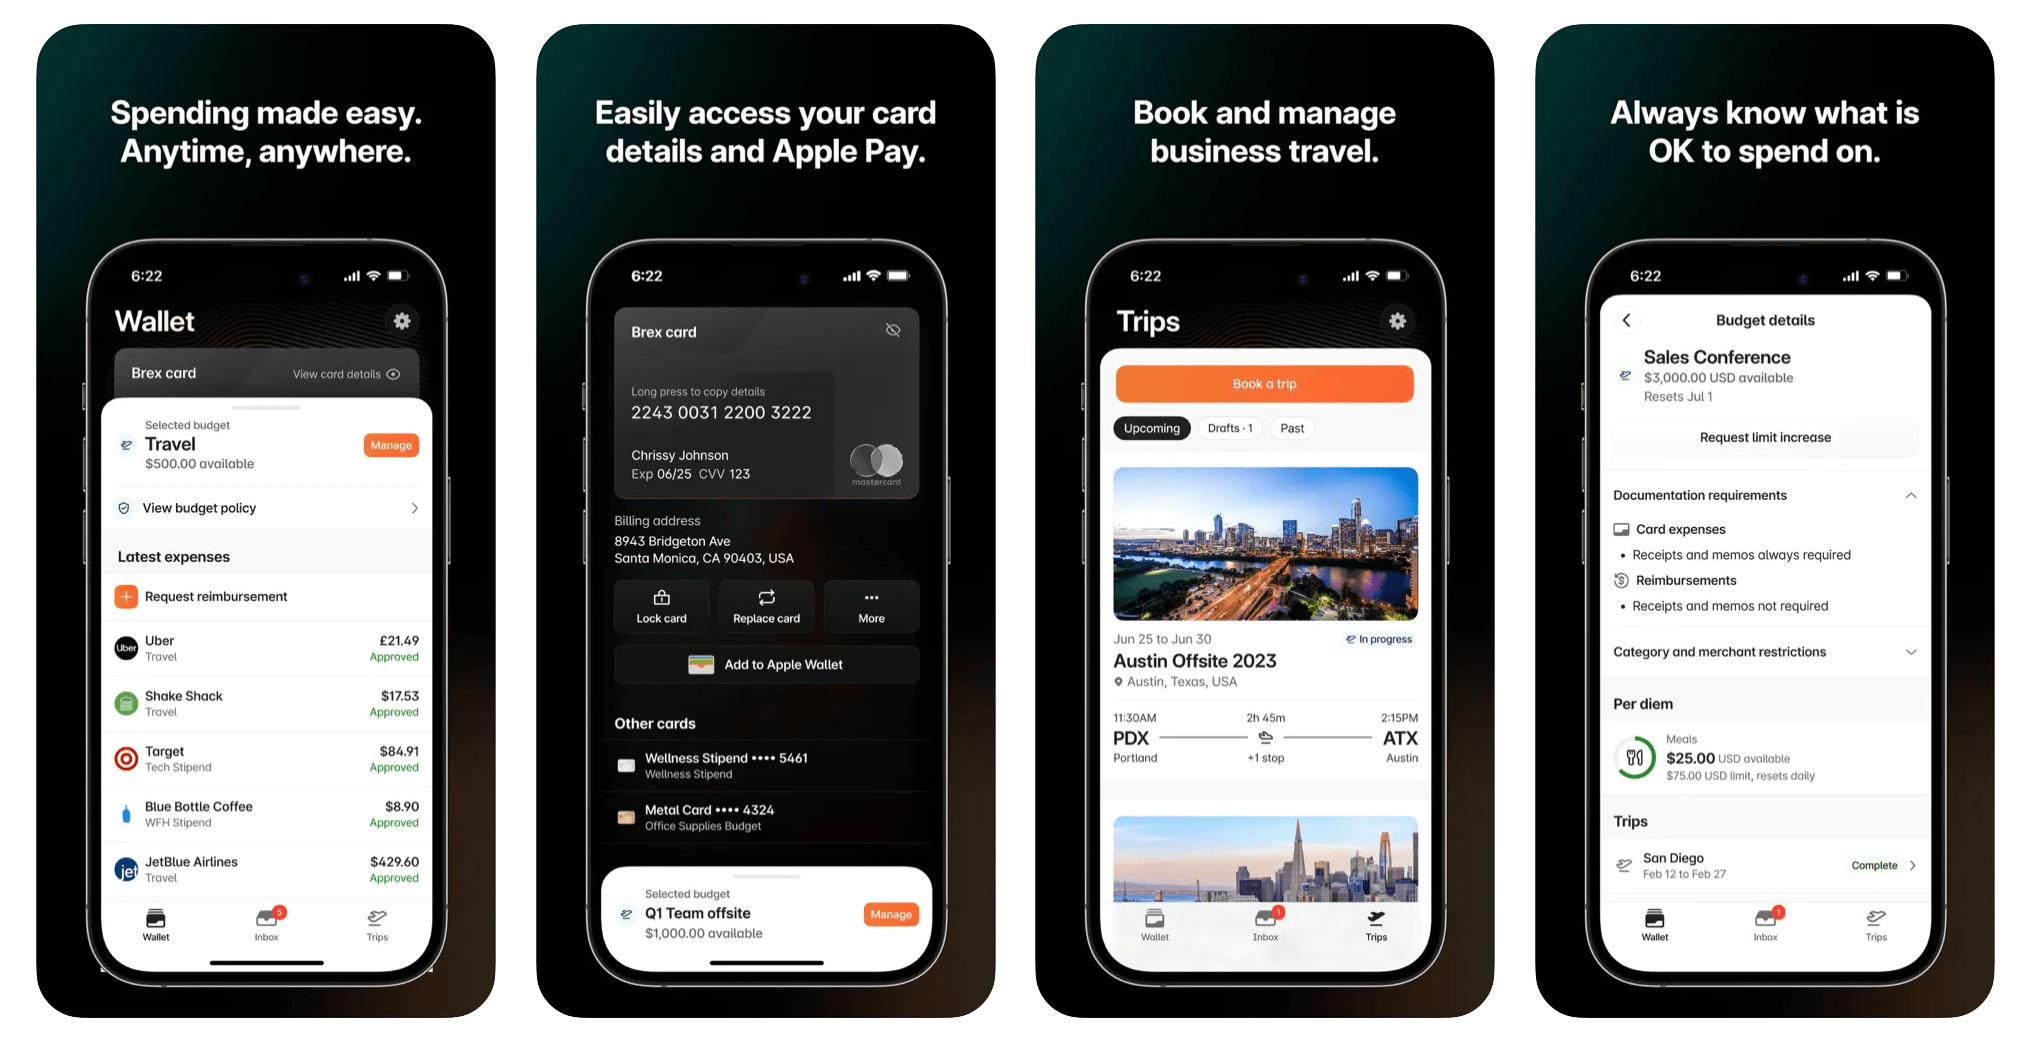
You don't need to be a professional designer to create these. There are many tools available that provide templates specifically for this purpose. Since you have a strong background in web development and likely use Figma, it is an excellent choice. Alternatively, dedicated online tools can streamline this process significantly.
How to Make Screenshots for App Store
The second half of the same video demonstrates using a third-party tool, App Screens, to quickly create polished screenshots from the raw captures we just took.
Watch the segment from "more customizable" to see how you can upload your raw images, add text, and export a full set of professional-looking assets for the stores.
3. Writing Compelling App Descriptions
Your app's textual metadata works hand-in-hand with your screenshots to convince users to download.
Google Play store listings: Maximize app discoverability with store listing experiments
This official video from Android Developers breaks down the key components of a store listing and offers best practices for making them effective. The principles apply to both Google Play and the Apple App Store.
Watch the segment from "win the first moment of truth". It provides a great overview of the roles played by the icon, title, short description, and full description.
Based on the video, here’s how to approach each element:
- App Name / Title: This should be unique and memorable. It's often beneficial to include a primary keyword if it fits naturally (e.g., "WaveTrace - Surf Forecaster").
- Subtitle (iOS) / Short Description (Android): This is your elevator pitch. It appears in search results and is highly visible. It should be a single, concise sentence that summarizes your app's main purpose.
- Full Description: This is where you can elaborate. Don't write a wall of text. Use short paragraphs, bullet points, and clear headings to make the text scannable. Detail the key features and benefits, explain who the app is for, and provide links to your support page or social media if relevant.
You will enter this information later directly into App Store Connect and the Google Play Console, in the "App Information" and "Store Listing" sections, respectively.
4. The Privacy Policy: A Non-Negotiable Requirement
Both Apple and Google mandate that every app must have a privacy policy, accessible via a public URL. This is a legal document that discloses how your app collects, uses, and shares user data.
Why is it required?
Even simple apps often collect data. This can include:
- User-provided information (email, name).
- Analytics data (device type, usage patterns).
- Data collected by third-party SDKs (e.g., Capacitor plugins for push notifications, biometrics, etc.).
Your privacy policy must be transparent about all of this.
How to get a Privacy Policy?
As a developer, writing a legally compliant privacy policy from scratch is challenging. The most practical approach is to use a privacy policy generator service. Companies like Iubenda, Termly, or GetTerms offer templates that you can customize based on the services and plugins your app uses. They will ask you questions about your data practices and generate the necessary text.
Once generated, you must host this policy at a stable, public URL. A common practice is to create a /privacy page on your app's marketing website or even host it as a simple page on a service like GitHub Pages. This URL is what you will provide to both App Store Connect and the Google Play Console. This policy will be the foundation for our next topic: completing the detailed data safety questionnaires.
Conclusion
In this lesson, we've shifted our focus from the technical packaging of our app to the crucial marketing and legal assets needed for its public presentation. You now have a clear roadmap for creating a compelling and compliant store presence.
Here are the key takeaways:
- Store assets are your app's landing page: They are essential for converting views into downloads.
- Screenshots tell a visual story: They must adhere to strict technical specifications and should be designed with clear headlines to showcase core features.
- Descriptions provide the pitch: A concise short description and a scannable full description work together to explain your app's value.
- A privacy policy is mandatory: Use a generator service to create a compliant policy and host it at a public URL.
In our next lesson, we will build upon the privacy policy by diving into the specific data declaration forms for each store: Apple's App Privacy questionnaire and Google's Data Safety section.