Recommended resources
The freely available resources this lesson will direct you to.
Hello! This first module is about making reliable marks in Ibis Paint before using those marks to build drawings. Today you’ll set up the three controls that most directly affect a stroke: pressure sensitivity, brush behavior, and stabilization. The aim is not to find a perfect setting, but to make the app respond predictably to your hand. Allow about 40 minutes, including time to test settings on a canvas.
Make pressure respond to your hand
Pressure sensitivity requires a compatible device and pressure-sensitive stylus. If you draw with a finger, mouse, or non-pressure-sensitive stylus, you can still control line width through brush size and other settings, but pressing harder will not create true pressure variation.
Watch ibisPaint’s How to Pressure Sensitivity and Stabilizer mode for a quick look at the pressure controls. The video begins by turning off Force Fade; we’ll return to why that matters later.
【ibisPaint】How to Pressure Sensitivity and Stabilizer mode
Watch “How to Pressure Sensitivity and Stabilizer mode” from ibisPaint to see a pressure adjustment made in the app.
Watch pressure setup. Notice that the presenter tests strokes after changing the response rather than treating one setting as correct for everyone. The menus may look somewhat different in your version.
For the exact meaning of the adjustment graph, use ibisPaint’s Settings window details. Open the app’s Settings through Back, then Settings; the available items can differ by device.
180. Settings window details - How to use ibisPaint
Read ibisPaint’s explanation of the pressure graph so you can tell whether a change makes your strokes more or less responsive.
Find the subsection “Pressure Sensitivity / Touch Offset,” just below “Smart Feature / Purchases.” Read the pressure controls, starting with “Use Pressure Sensitivity” and ending after the instructions for adding and deleting graph knobs; stop before “Cursor.” Focus on what raising the curve does and when “Use Pressure Sensitivity” is unavailable.
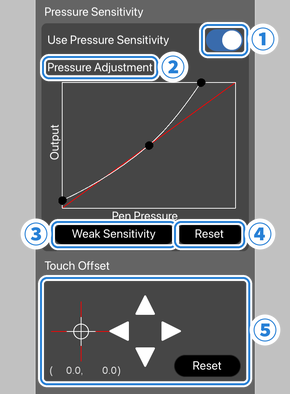
The graph is easier to interpret if you imagine making the same stroke with the same amount of hand pressure. Raising the curve makes that input produce a thicker line; lowering it makes the line thinner. Depending on the brush, opacity may change too. A curve that rises sooner can help if your light marks barely appear. If light marks become unexpectedly heavy, reduce the response instead. Reset restores the initial graph, so there is no need to get it right on the first attempt.
Start with the default curve and make a few light, medium, and firm strokes. Change the curve only if the difference between those strokes is hard to control. If “Use Pressure Sensitivity” is gray, first check whether a supported stylus is connected; changing the graph cannot supply pressure data that the device does not provide. Touch Offset solves a different problem: a mark appearing away from the point where you touch the screen.
Set the brush’s own behavior
The pressure graph affects the input reaching a brush, but the selected brush determines what to do with that input. A brush can respond strongly to pressure, weakly, or not at all. This distinction matters when a pressure-enabled stylus works in the app yet one particular brush draws at nearly constant width.
This short Ibis Paint X demonstration shows where to open brush settings, how start and end thickness affect a line, and where a brush’s “Pressure - Thickness” control may appear.
[Ibis Paint X] How to Customize Brush Settings for Lineart
Watch “How to Customize Brush Settings for Lineart” by Usa-kun【2nd Channel】 for a concrete brush-configuration example. Treat the choices shown as an example, not a preset you must copy.
Watch open brushes to locate the brush window. Then watch stroke ends for “Thickness of Start,” “Thickness of End,” reset, and saving a custom brush. Finish with brush pressure, especially the explanation that a brush can have its own “Pressure - Thickness” response set to zero.
For an initial drawing brush, choose a simple pen whose edge you can see clearly. Set a comfortable brush size and keep opacity high while testing: otherwise, changes in transparency can be mistaken for changes in width. Then check three separate behaviors:
- Size sets the brush’s general scale. If every mark is too wide, adjust size before altering the pressure curve.
- Pressure - Thickness, where available, sets how much this brush varies in width with stylus pressure. A value of zero can make a pressure-capable stylus appear ineffective with that brush.
- Thickness of Start/End, where available, changes the brush’s stroke tips. Narrower ends can help line connections and hair-like marks, but they are not a substitute for pressure control throughout the stroke.
Change one control at a time and retest the same kind of mark. If you find a useful variation, save it as a custom brush rather than losing a known starting point. There is no need to collect many brushes yet; one predictable pen is more useful for learning line control.
Add only as much stabilization as you need
Stabilization smooths a freehand path. It can reduce small wobbles, but a strong setting may make the line feel less connected to where you intended to draw. Compare the line with stabilization off and on at the same brush size before deciding how much correction helps.
Return to the ibisPaint video for its distinction between the two methods.
【ibisPaint】How to Pressure Sensitivity and Stabilizer mode
Continue the ibisPaint video to see when its two stabilization methods are intended to help.
Watch stabilizer methods. Focus on the difference between “After” for slower strokes and “Real Time” for faster strokes; try both rather than assuming that more correction is always better.
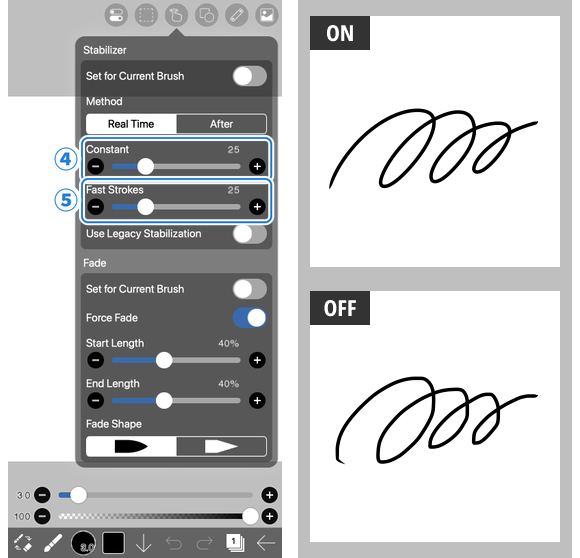
For brisk sketching, Real Time is a sensible first choice. If you deliberately draw slowly and the result remains rough, try After. Begin with a modest correction, draw a curve, and increase it only until unwanted jitter diminishes. If the line starts resisting a sharp turn or feeling detached from your movement, back the correction down.
Force Fade is a separate control that shapes a stroke’s beginning and end into tapered lengths. Leave it off while diagnosing pressure sensitivity: otherwise, a tapered tip might look like a pressure change even when your stylus or brush is not producing one. You can revisit it when you want a particular line-ending effect.
Leave yourself a dependable starting setup
Before moving on, make one small test area on a canvas and keep the brush, size, and zoom unchanged. Draw a light-to-firm stroke, a quick arc, and a slower curve. Use what you see to identify which control needs attention:
| What you notice | First thing to check |
|---|---|
| No width change when you press harder | Stylus support, “Use Pressure Sensitivity,” then the brush’s “Pressure - Thickness” setting |
| Every stroke is too broad or too faint | Brush size or opacity before the pressure graph |
| Light marks suddenly become heavy | Pressure curve response |
| Curves wobble, or correction feels excessive | Stabilizer method and amount |
| Only the stroke ends taper unexpectedly | Start/end thickness or Force Fade |
Keep a note of the brush and settings that feel predictable. This is a baseline, not a final artistic style: it lets you tell whether a later improvement came from your mark-making or from a changed tool.
You now have a way to distinguish device pressure, the global pressure curve, brush-specific controls, and stroke stabilization. Together they make the tool’s response consistent enough to practise deliberately. In the next lesson, you’ll use that setup to draw straight, curved, and tapered strokes with confident hand movement—skills that settings can support, but cannot replace.