Recommended resources
The freely available resources this lesson will direct you to.
- How to Deploy Your Website with GitHub + Vercel!www.youtube.com
- Building a To-Do App with Vercel's V0 and Cursor: Step-by-Step Guidewww.youtube.com
- Deploy & Host Your Static Website on Vercel in Minutes — Using GitHub CI/CD Automation!medium.com
- Deploying and Hosting a Custom Domain on Vercel - DEV Communitydev.to
Hello! Over the last few lessons, we've pieced together the puzzle of putting a web application online. We've explored why Vercel is a great hosting choice and demystified the crucial npm run build command, which packages your project for the world. You now understand that the build or dist folder is the final, optimized product ready for launch.
Today, we'll connect all these pieces and perform your first real deployment. You'll take a project from your GitHub account, connect it to Vercel, and with a few clicks, make it live on the internet. This is the moment your local "vibe coded" creation becomes a shareable, public web app.
The Deployment Workflow: From Your Laptop to the World
Before we dive into the steps, let's look at the high-level workflow. This process is intentionally designed to be clean, automated, and reliable. As a designer, you can think of GitHub as the "single source of truth" for your project's code. Vercel simply listens for changes to that source of truth and handles all the technical work of publishing them.
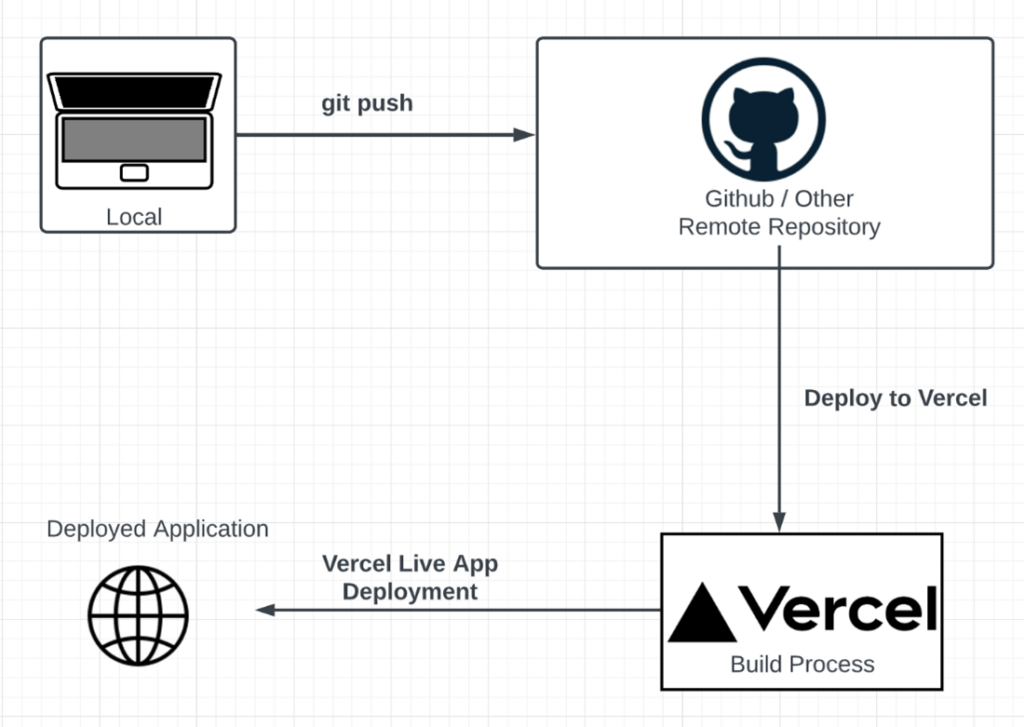
Your personal computer is only involved at the very beginning. Once your code is on GitHub, Vercel takes over entirely. This separation makes the deployment process robust and manageable.
Your Step-by-Step Guide to Deployment
Deploying a modern web app with Vercel and GitHub is a surprisingly straightforward process. Let's walk through it.
Prerequisites:
- A project pushed to a GitHub repository (you learned how to do this in Module 5).
- A Vercel account. If you don't have one, now is the time to sign up. The best way is to sign up using your GitHub account, which will make the connection seamless.
Ready? Let's get your app online.
Deploy & Host Your Static Website on Vercel in Minutes — Using GitHub CI/CD Automation!
This article provides an excellent, step-by-step guide for the exact process we're about to undertake. It clearly shows how to get from a GitHub repository to a live Vercel link.
Focus on Part 3 of the article. Follow the steps visually: you'll log into Vercel, import your repository from GitHub, review the configuration, and deploy.
The article gives you the map. Now, let's add some color to what's happening at each step.
Step 1: Log in to Vercel and Import Your Project
Once you're logged into your Vercel dashboard, you'll start by adding a new project. Vercel's primary workflow is built around Git, so it will immediately prompt you to "Import Git Repository." Because you signed in with GitHub, Vercel can securely access and display a list of your repositories. Find the project you want to deploy and click "Import."
Step 2: Configure the Project
After importing, you'll see a "Configure Project" screen. This screen might look technical, but it’s actually a user-friendly interface for the concepts you already know.

Vercel is smart. It inspects your code and usually autodetects the framework you're using (e.g., Next.js, React, etc.), selecting a "Framework Preset." This preset automatically fills in the following fields:
- Build Command: This will be pre-filled with
npm run buildor the framework-specific equivalent, likenext build. This is the exact command you learned about in the previous lesson. - Output Directory: Vercel knows where your chosen framework places the final files. For Next.js, it's a folder called
.next. For many other tools, it'sdistorbuild. This tells Vercel which folder to make public. - Install Command: This is usually
npm install, the command you learned in Module 2 to download all the project's dependencies frompackage.json.
You rarely need to change these default settings. Vercel is essentially asking, "This looks like a Next.js app. Do I have your permission to run npm install and then npm run build?"
Step 3: Deploy!
Click the "Deploy" button.
That's it. Vercel now springs into action, performing a sequence of tasks on its own servers:
- It clones your project from GitHub.
- It runs the Install Command (
npm install) to fetch all the necessary packages. - It executes the Build Command (
npm run build) to create the optimized, production-ready files. - It takes the contents of the Output Directory and deploys them to its global network (CDN).
You can watch the progress in a live terminal window. Within a minute or two, you'll get a "Congratulations!" message and, most importantly, a public URL for your live application.
This video provides a great visual walkthrough of the entire process, from pushing to GitHub to seeing the live site on Vercel.
How to Deploy Your Website with GitHub + Vercel!
This video from Vibe with AI shows the full workflow, demonstrating how quickly you can go from a GitHub repository to a deployed application.
Watch the segment from using Vercel. The presenter logs into Vercel with GitHub, imports the repository, accepts the default configuration, and clicks deploy. Pay attention to how the Vercel UI mirrors the steps we just discussed.
Conclusion
You have successfully deployed a web application! You've bridged the gap between your local project and the public internet. This process, which once required deep technical knowledge of servers and networking, is now an automated workflow that you can control directly from your Git repository.
Key Takeaways:
- GitHub is the Source of Truth: Vercel deploys code from a Git repository, not your local machine.
- Sign In with GitHub: Connecting your Vercel and GitHub accounts is the key to this seamless workflow.
- Configuration is Automated: Vercel's Framework Presets automatically determine the correct
buildcommand andoutputdirectory, connecting directly to what you've already learned. - Deployment is a Sequence of Commands: Clicking "Deploy" tells Vercel to run
npm installandnpm run buildin the cloud before publishing the results.
In our previous lesson, we saw what npm run build does. In this lesson, you made Vercel run it for you. In our next lesson, we'll explore the most powerful feature of this setup: how a simple git push from your computer can automatically trigger this entire deployment process and update your live site in seconds.