Recommended resources
The freely available resources this lesson will direct you to.
- Safe{Wallet}: How to Securely Set Up and Use Your Safe MultiSig Wallet (Step-by-Step Guide)www.youtube.com
- Gnosis Safe Tutorial | Multisig Wallet for DeFiwww.youtube.com
- How to authorize a multisig payment using Safewww.theaccountantquits.com
- Build a treasury wallet with multisignature Gnosis Safeblog.logrocket.com
Hello! Welcome back to our course on building blockchain applications.
In our last lesson, you successfully deployed and configured your own 2-of-3 Safe multi-sig wallet on the Sepolia testnet. You experienced the fundamental security mechanism of a multi-sig by proposing, confirming, and executing a transaction that required more than one signature.
Today, we will build directly on that foundation. Our goal is to execute a treasury transaction using your multi-sig wallet. This simulates one of the most common and critical responsibilities of managing a decentralized project: handling its funds. We'll start by reinforcing the manual process through the Safe{Wallet} user interface and then, leveraging your backend development experience, transition to a more powerful, programmatic approach using the Safe{Core} SDK and a Node.js script.
The Treasury Management Workflow
A project's treasury is its financial core. Whether it's paying for development, funding marketing, or rewarding community members, all financial actions must be executed securely and transparently. This is the primary role of a multi-sig wallet in a project.
The process you learned—propose, confirm, execute—is the heart of this workflow.
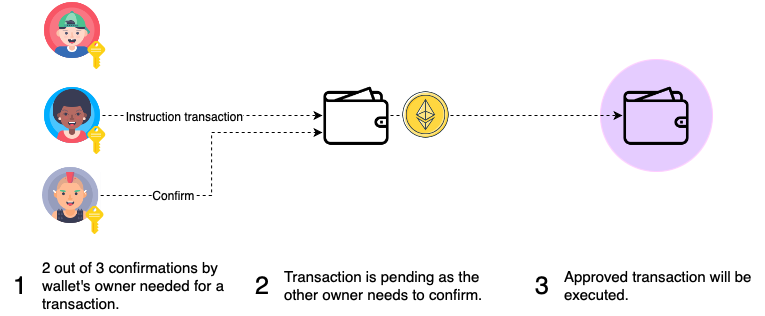
Let's quickly review this flow by watching a demonstration of a transaction being created and executed.
Safe{Wallet}: How to Securely Set Up and Use Your Safe MultiSig Wallet (Step-by-Step Guide)
This video from The Defiant provides a clear, practical demonstration of the multi-signature transaction process. It will serve as a great recap of the steps you performed in the last lesson.
Watch the segment from 04:34 to 05:59. Pay close attention to the roles: one wallet initiates and signs the transaction, and a second wallet provides the final confirmation and executes it. This is exactly the flow we'll be replicating.
The key roles in this process are:
- Initiator: The owner who creates and proposes the transaction (e.g., a project manager proposing a payment).
- Confirmer(s): The other owner(s) who review and approve the pending transaction.
- Executor: The final owner who provides the last required signature. This action also pays the gas fee to submit the fully-approved transaction to the blockchain.
Programmatic Treasury Management with the Safe{Core} SDK
While the web interface is excellent for one-off transactions, real-world projects often need to automate or script interactions with their treasury. For example, you might build a backend service that automates payroll or a script that executes a series of planned token distributions.
This is where your backend development skills become a significant advantage. We will use the Safe{Core} SDK to interact with your Safe programmatically from a Node.js environment.
To get started, we'll follow a tutorial that demonstrates exactly this.
Build a treasury wallet with multisignature Gnosis Safe
This excellent article from the LogRocket blog, 'Build a treasury wallet with multisignature Gnosis Safe', details how to control a Safe using ethers.js and the Safe SDK. We will adapt its principles to interact with the Safe you already deployed.
First, read the sections 'Installing the Gnosis Safe SDK libraries' and 'Setting up the .env file'. This will guide you on setting up a new Node.js project for this task. You can skip the parts about deploying the Safe contracts, as we are using the official ones on Sepolia.
1. Project Setup
Follow the instructions from the article to create a new project:
-
Create a new directory for your project (e.g.,
safe-scripts) and navigate into it. -
Initialize a Node.js project:
npm init -y -
Install the necessary dependencies. The article uses
yarn, but you can usenpmas well:npm install ethers@5.7.2 dotenv @safe-global/safe-core-sdk@3.3.5 @safe-global/safe-ethers-lib@1.10.1(Note: We are using specific versions compatible with the guides to ensure everything works smoothly.)
-
Create a
.envfile to store your sensitive information. You will need:- Your Sepolia RPC URL (from Infura or Alchemy).
- The private keys for two of your Safe's owner accounts.
- The address of the Safe you created in the previous lesson.
Your
.envfile should look like this:SEPOLIA_RPC_URL="https://sepolia.infura.io/v3/YOUR_INFURA_ID" PRIVATE_KEY_OWNER_1="YOUR_FIRST_OWNER_PRIVATE_KEY" PRIVATE_KEY_OWNER_2="YOUR_SECOND_OWNER_PRIVATE_KEY" SAFE_ADDRESS="YOUR_SAFE_CONTRACT_ADDRESS"Security Warning: Remember never to commit
.envfiles to public repositories. Exporting private keys is risky; do this only for development purposes with testnet accounts holding no real value.
2. The Treasury Transfer Script
Now, let's write the script to perform the treasury transaction. Create a file named executeTransfer.js. We will build this script step-by-step, following the logic from the LogRocket article but adapting it for our 2-of-3 Safe.
Step A: Initialization
First, we need to set up our connection to the blockchain and create signer objects for our owners.
require('dotenv').config();
const { ethers } = require('ethers');
const Safe = require('@safe-global/safe-core-sdk').default;
const EthersAdapter = require('@safe-global/safe-ethers-lib').default;

async function main() {
    // Set up provider and signers
    const provider = new ethers.providers.JsonRpcProvider(process.env.SEPOLIA_RPC_URL);
    const owner1Signer = new ethers.Wallet(process.env.PRIVATE_KEY_OWNER_1, provider);
    const owner2Signer = new ethers.Wallet(process.env.PRIVATE_KEY_OWNER_2, provider);

    const safeAddress = process.env.SAFE_ADDRESS;

    console.log('Safe Address:', safeAddress);
    console.log('Owner 1 Address:', await owner1Signer.getAddress());
    console.log('Owner 2 Address:', await owner2Signer.getAddress());

    // ... rest of the script will go here
}

main().catch((error) => {
    console.error(error);
    process.exit(1);
});
Step B: Creating the Transaction and Proposing
Next, the first owner will create and sign the transaction proposal.
Build a treasury wallet with multisignature Gnosis Safe
Now, let's focus on the core logic. This part of the article shows how to create a transaction, get its hash, and have the first signer approve it.
Read the section 'Obtaining multisignature approval'. Pay close attention to how a safeTransaction is created and how the first signer uses approveTransactionHash.
Let's add this logic to our script. We'll connect to the Safe using the first owner's signer, create a simple ETH transfer transaction, and sign it.
// Add this inside your main() function

// Create EthAdapter for owner 1
const ethAdapterOwner1 = new EthersAdapter({
    ethers,
    signerOrProvider: owner1Signer
});

// Connect to the Safe
const safeSdkOwner1 = await Safe.create({
    ethAdapter: ethAdapterOwner1,
    safeAddress: safeAddress
});

// Define the transaction. We'll send 0.001 ETH to Owner 2 for this test.
const destination = await owner2Signer.getAddress();
const amount = ethers.utils.parseUnits('0.001', 'ether').toString();

const safeTransactionData = {
    to: destination,
    value: amount,
    data: '0x' // No data for a simple ETH transfer
};

// Create the transaction and get the hash
const safeTransaction = await safeSdkOwner1.createTransaction({ safeTransactionData });
const txHash = await safeSdkOwner1.getTransactionHash(safeTransaction);

// Sign the transaction
const approveTxResponse = await safeSdkOwner1.approveTransactionHash(txHash);
await approveTxResponse.wait();

console.log('Transaction proposed and signed by Owner 1.');
console.log('Transaction Hash:', txHash);
At this point, if you check your Safe on the web interface, you'll see a pending transaction with 1/2 confirmations.
Step C: Confirming and Executing
Finally, the second owner connects, provides the final signature, and executes the transaction. The LogRocket article shows the final signer using executeTransaction. This single method provides the final required signature and sends the transaction to the blockchain.
// Add this to the end of your main() function

// Create EthAdapter for owner 2
const ethAdapterOwner2 = new EthersAdapter({
    ethers,
    signerOrProvider: owner2Signer
});

// Connect to the same Safe with Owner 2
const safeSdkOwner2 = await Safe.create({
    ethAdapter: ethAdapterOwner2,
    safeAddress
});

// Get the pending transaction (using the same transaction object)
const pendingTx = await safeSdkOwner2.createTransaction({ safeTransactionData });

console.log('Owner 2 is executing the transaction...');

// The final signer uses executeTransaction
const executeTxResponse = await safeSdkOwner2.executeTransaction(pendingTx);
await executeTxResponse.wait();

console.log('Transaction executed successfully!');
console.log('Check the transaction on a block explorer or your Safe UI.');
Now, you can run the complete script from your terminal:
node executeTransfer.js
If everything is configured correctly, the script will propose, sign, and execute the transfer of 0.001 Sepolia ETH from your Safe to your second owner's address. You can verify this on Etherscan or by checking the "Transactions" tab in the Safe web UI.
Test your understanding!
In the code, the first signer uses approveTransactionHash, while the final signer uses executeTransaction. What is the key difference, and why can't the first signer just use executeTransaction?
Show answer
approveTransactionHash simply adds the signer's signature to the transaction stored off-chain (or on-chain depending on the method) but does not attempt to submit it to the network for execution.
executeTransaction does two things: it adds the signer's signature and then checks if the signature threshold has been met. If it has, it broadcasts the transaction to the Ethereum network for execution.
The first signer cannot use executeTransaction because, at that point, the signature threshold (2 in our case) has not been met. An attempt to execute would fail. Only a signer providing the final required signature can successfully call executeTransaction.
Conclusion
In this lesson, you elevated your understanding of multi-sig wallets from a user to a developer. You've now seen how to manage a project's treasury both through the user-friendly web interface and, more powerfully, through a programmatic script. This latter skill is crucial for integrating secure treasury management into larger backend systems and for automating complex operational tasks.
Key Takeaways:
- A treasury transaction is any on-chain action authorized by the multi-sig owners to manage project assets.
- The propose-confirm-execute workflow ensures no single entity can unilaterally control funds.
- The Safe{Wallet} web UI is ideal for manual, one-off transactions.
- The Safe{Core} SDK enables developers to programmatically create, sign, and execute multi-sig transactions, which is essential for automation and integration.
Preview of the Next Lesson:
We've now covered how to securely manage your project's assets. But what about managing the project's code? Smart contracts on Ethereum are immutable by default, which is great for security but poses a challenge when you need to fix a bug or add a new feature. In our next lesson, we will explain the benefits and risks of upgradeable smart contracts, introducing the powerful proxy patterns that make contract upgrades possible.