Recommended resources
The freely available resources this lesson will direct you to.
Hello! Welcome to the final lesson of our module on Governance and Upgradability.
In our last session, you successfully performed a contract upgrade on the Sepolia testnet. You configured Hardhat for a live network, deployed a proxy, and then upgraded its implementation contract, verifying the change on a block explorer. This was a crucial step in understanding how smart contracts are managed and maintained over their lifecycle.
Today, we'll build a vital component that connects our on-chain logic to the off-chain world. The learning outcome for this lesson is to write a Node.js script to listen for and react to specific smart contract events. This is the foundation for building dApp backends, user notifications, data analytics platforms, and much more. Your background as a backend developer will be particularly useful here, as we'll essentially be building a specialized microservice that consumes data from the blockchain.
Why Listen to Events?
Smart contracts on Ethereum are passive; they only execute logic when someone sends them a transaction. They cannot initiate actions on their own. So, how does the outside world know when something important happens inside a contract, like a token transfer or an ownership change?
The answer is events. A contract can emit an event, which is a signal that gets logged to the blockchain's transaction history. These logs are a cost-effective way to store data that doesn't need to be read by other smart contracts but is essential for off-chain services.
An off-chain application, such as a Node.js server, can then listen for these events in real-time.
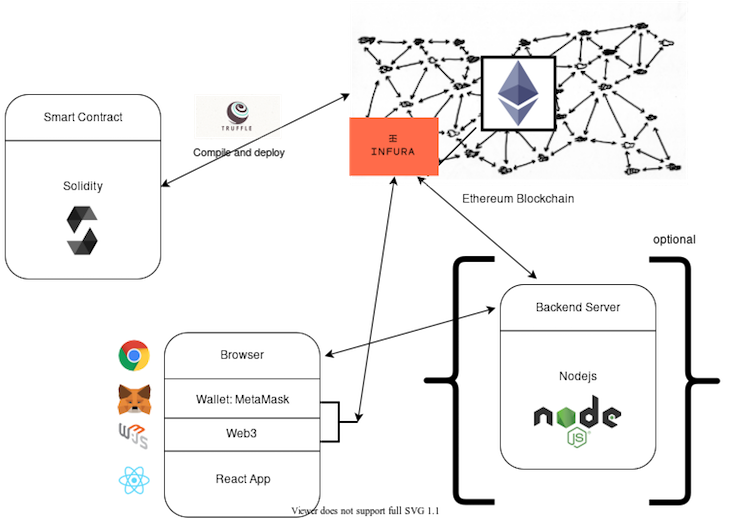
Part 1: Your Event Listener Project Setup
While you could write this script within your Hardhat project, it's common to create a separate Node.js project for off-chain services. This mirrors the separation of concerns in traditional backend development.
Let's set up a new project:
-
Create a new directory for your listener service and navigate into it:
mkdir my-event-listener cd my-event-listener -
Initialize a new Node.js project:
npm init -y -
Install the necessary libraries:
ethers: The JavaScript library we'll use to interact with the Ethereum network.dotenv: To manage environment variables securely, just as we did in the last lesson.
npm install ethers dotenv
Your project is now ready. The script we write will need three key things to communicate with a specific smart contract:
- The contract's address on the testnet.
- The contract's Application Binary Interface (ABI), which defines its functions and events.
- A connection to the network via a Provider.
Part 2: Gathering Your Contract's Information
For this lesson, we'll listen for Transfer events from the ERC-20 token you created and deployed to a testnet in Module 4. This is a perfect, practical example. If you no longer have that contract's details, you can use any verified ERC-20 token on Sepolia (like a mock USDC or WETH).
1. Contract Address
Find the address of your ERC-20 token contract that you deployed on the Sepolia testnet.
2. Contract ABI
The ABI is a JSON object that tells ethers.js how to interact with your contract. You can get it in two ways:
- From your Hardhat Project: This is the best source. In your Hardhat project directory, find the artifact file at
artifacts/contracts/YourTokenName.sol/YourTokenName.json. The ABI is the value of theabikey inside this file. - From Etherscan: If your contract is verified on Etherscan, you can find the ABI on the "Contract" tab. Scroll down to the "Contract ABI" section and copy it.
Once you have the ABI, create a new file in your my-event-listener project called abi.json and paste the entire ABI array into it.
3. Provider URL
For real-time event listening, we need a WebSocket connection to an Ethereum node. Standard HTTP connections are not suitable for this. Your Alchemy or Infura account provides a WebSocket URL, which typically starts with wss://.
Create a .env file in your project root and add your WebSocket URL:
SEPOLIA_WSS_URL="YOUR_ALCHEMY_OR_INFURA_WEBSOCKET_URL"
Remember to add .env to a .gitignore file to avoid committing your secrets.
Part 3: Writing the Event Listener Script
Now we have all the pieces. Let's write the script to listen for events. Create a file named index.js.
How to Listen To Smart Contract Events using ethers.js & node.js
The following video from EatTheBlocks provides a great walkthrough of the exact process we're about to undertake. It demonstrates setting up a Node.js project, getting contract details, and writing the listener script with ethers.js to monitor USDT transfers.
Watch from 00:36 to 03:48. This covers the project setup, finding the contract ABI and address on Etherscan, and writing the core logic for the listener using a WebSocket provider and the contract.on() method. We will be implementing this same pattern.
Based on the pattern shown in the video, here is how you can structure your index.js file:
// 1. Imports and Setup
const { ethers } = require("ethers");
const tokenAbi = require("./abi.json");
require("dotenv").config();

// The main function where all the logic will run
async function main() {
    // 2. Configuration
    const tokenContractAddress = "YOUR_ERC20_TOKEN_ADDRESS"; // <-- Replace with your token's address
    const provider = new ethers.providers.WebSocketProvider(process.env.SEPOLIA_WSS_URL);
    const contract = new ethers.Contract(tokenContractAddress, tokenAbi, provider);

    console.log(`Listening for Transfer events on token: ${tokenContractAddress}...`);

    // 3. Set up the event listener
    contract.on("Transfer", (from, to, value, event) => {
        // This callback function runs whenever a 'Transfer' event is emitted
        console.log("--- New Transfer Event ---");
        console.log(`From: ${from}`);
        console.log(`To: ${to}`);

        // The 'value' is a BigNumber object. We use formatUnits to make it readable.
        // Replace '18' with the number of decimals your token has.
        const formattedValue = ethers.utils.formatUnits(value, 18);
        console.log(`Value: ${formattedValue}`);

        // The 'event' object contains more details like the transaction hash
        console.log(`Transaction Hash: ${event.transactionHash}`);
        console.log("--------------------------\n");
    });
}

main().catch((error) => {
    console.error(error);
    process.exit(1);
});
Let's break down the key parts:
WebSocketProvider: This is crucial. It opens a persistent connection to the Ethereum node, allowing the node to push new event data to our script in real time.new ethers.Contract(...): This creates a contract object, binding the address, ABI, and provider together.contract.on("Transfer", ...): This is the magic. We subscribe to the event named "Transfer". Whenever the smart contract emits this event, the provided callback function is executed with the event's parameters (from,to,value) and some additional metadata (event).ethers.utils.formatUnits(value, 18): Token amounts are handled as large integers in Solidity to avoid floating-point errors.valueis aBigNumber. This utility function converts it back to a human-readable decimal string by dividing it by 10 to the power of the token's decimals (18 is standard for most ERC-20 tokens).
Part 4: Running and Testing Your Listener
-
Start the Listener: In your terminal, run the script:
node index.jsYou should see the message "Listening for Transfer events...". Your script is now waiting.
-
Trigger an Event: Open your MetaMask wallet, make sure you are on the Sepolia testnet, and transfer some of your ERC-20 tokens from one of your accounts to another.
-
Observe the Result: As soon as your transaction is confirmed on the blockchain, you will see the event details printed in your terminal!
--- New Transfer Event ---
From: 0xYourAccountAddress1...
To: 0xYourAccountAddress2...
Value: 100.0
Transaction Hash: 0xabc123...
--------------------------
You have successfully built an off-chain service that reacts to on-chain activity in real time.
Test your understanding!
You are listening for Transfer events for your token. You notice that your script's callback function receives a value parameter that looks like BigNumber { _hex: '0x056bc75e2d63100000' } for a transfer of 100 tokens. How would you convert this into the human-readable string '100.0' in your script, assuming your token has 18 decimals?
Show answer
You would use the formatUnits utility from ethers.js:
const formattedValue = ethers.utils.formatUnits(value, 18);
Since 18 decimals is the standard for Ether itself, you could also use the shorthand:
const formattedValue = ethers.utils.formatEther(value);
Both will produce the string '100.0'.
Beyond Logging: Reacting to Events
Our script currently just logs events to the console, but in a real-world application, the "react" part of the learning outcome is key. Inside the contract.on() callback, you could:
- Update a Database: Store transfer history in a SQL or NoSQL database for fast querying by a frontend application.
- Send Notifications: Use a service like Twilio or SendGrid to send an SMS or email to the
toaddress holder. - Trigger an API: Call another internal or external API to kick off a different business process.
- Update Analytics: Push data to an analytics dashboard to track token velocity or user activity.
This is where your existing backend skills directly apply to the Web3 space.
Conclusion
Congratulations on completing this lesson and the module! You've successfully built a bridge from the on-chain world of smart contracts to the off-chain world of backend services. This is a fundamental pattern in dApp development.
Key Takeaways:
- Events are Signals: Smart contracts use events to broadcast important state changes to the outside world.
- Off-Chain Listeners: Node.js scripts using
ethers.jsare a powerful way to build backend services that consume these signals. - WebSockets for Real-Time: A
WebSocketProvideris essential for creating a persistent connection to receive events as they happen. contract.on()is the Hook: This is the primary method inethers.jsfor subscribing to and reacting to events.- Data Formatting is Key: On-chain data like token values (
BigNumber) must be formatted to be useful in off-chain applications.
Preview of the Next Module:
You have now covered everything from the fundamentals of Ethereum and Solidity to advanced topics like upgradability and off-chain interaction. The next and final module, "Mainnet Launch & Project Management," is where we put it all together. In our first lesson, we will focus on configuring Hardhat for mainnet deployment with secure private key management, preparing you to take your project live.