Recommended resources
The freely available resources this lesson will direct you to.
Hello! Welcome to the next lesson in our journey to build a complete token ecosystem.
In our last lesson, we discussed the crucial trade-offs of smart contract upgradeability, exploring the benefits of fixing bugs and adding features against the risks of centralization, storage collisions, and initialization errors. We established why and how upgrades are possible through the proxy pattern.
Today, we move from theory to practice. This lesson is designed to help you achieve the learning outcome: Implement an upgradeable contract using the UUPS proxy pattern with OpenZeppelin. We'll focus on the UUPS (Universal Upgradeable Proxy Standard) pattern, which is the modern, gas-efficient standard recommended by OpenZeppelin. You'll learn how to write, deploy, and upgrade a contract using the industry-standard Hardhat and OpenZeppelin Upgrades plugin.
From Transparent to UUPS: A Quick Recap
In the previous lesson, we implicitly focused on the Transparent Proxy Pattern, where the upgrade logic lives inside the proxy contract itself. The UUPS pattern takes a different approach.
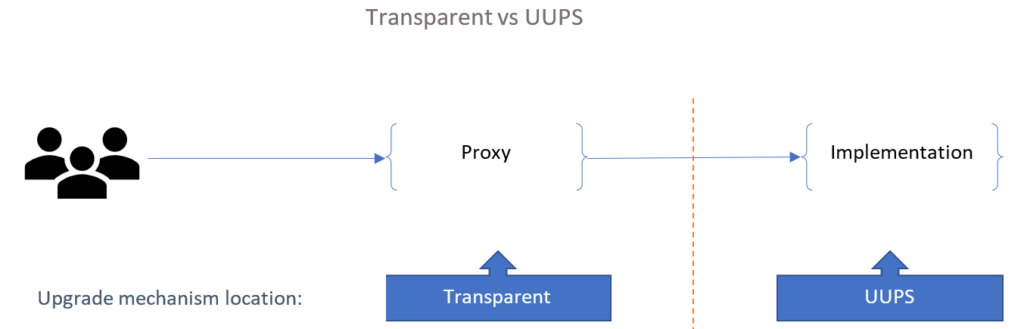
To solidify your understanding of this distinction and its implications, let's watch a few segments from a video by OpenZeppelin, the creators of these tools.
Deploying More Efficient Upgradeable Contracts
This video, 'Deploying More Efficient Upgradeable Contracts', explains the theory behind UUPS and why it's often preferred.
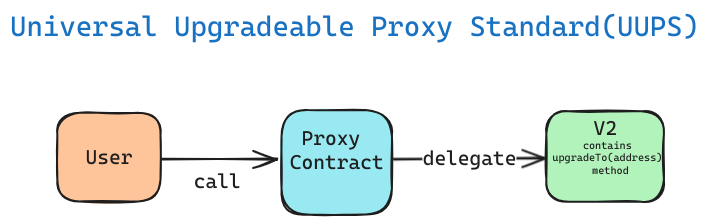
Please watch the following two segments: Proxy Pattern Fundamentals (03:03 - 06:34): This part explains where the upgradeTo function can live and how that choice defines the pattern (Transparent vs. UUPS). The UUPS Pattern Explained (11:02 - 13:58): This segment details how UUPS works, its reliance on delegatecall, and its primary risk—the potential to accidentally remove the upgrade function in a future version.
The key takeaways from the video are:
- UUPS is Cheaper: The proxy contract is a minimal, "dumb" proxy that only knows how to delegate calls. This makes it significantly cheaper to deploy than a Transparent proxy, which contains complex admin and upgrade logic.
- UUPS is More Flexible: Since the upgrade logic is in the implementation contract, you can change it over time. You could start with a single owner and later upgrade to a multi-sig or even a full DAO governance mechanism.
- The Main Risk: The upgrade logic must be included in every new version of your implementation contract. If you forget it, the contract becomes "bricked"—it can never be upgraded again.
Setting Up Your UUPS Project
Let's start building. Your background as a backend developer will be useful here, as the setup involves familiar steps like managing packages and configuring a development environment.
We will use two key OpenZeppelin packages:
@openzeppelin/contracts-upgradeable: A special version of the standard OpenZeppelin contracts library where all contracts useinitializerfunctions instead ofconstructors.@openzeppelin/hardhat-upgrades: A Hardhat plugin that provides functions to deploy and manage upgradeable contracts, handling all the complex proxy interactions for us.
For a detailed walkthrough of the setup, please review the following tutorial from the OpenZeppelin forum.
UUPS Proxies: Tutorial (Solidity + JavaScript)
This tutorial, 'UUPS Proxies: Tutorial (Solidity + JavaScript)', provides a clear, step-by-step guide for what we are about to do. It's an excellent text-based companion to our lesson.
Please read the 'Introduction to UUPS' and 'Project Setup' sections. This will familiarize you with the npm packages we need to install and the basic Hardhat configuration.
To summarize the setup:
- Initialize a new Hardhat project.
- Install the necessary dependencies:
npm install hardhat @nomiclabs/hardhat-ethers ethers @openzeppelin/contracts-upgradeable @openzeppelin/hardhat-upgrades - Configure
hardhat.config.jsto include the upgrades plugin:require('@openzeppelin/hardhat-upgrades');
Writing the UUPS Implementation Contract
Now, let's write our first upgradeable contract. Remember the rules from our last lesson:
- Use
initializerfunctions instead ofconstructors. - Call the
initializerof all parent contracts. - Don't initialize state variables at declaration.
A UUPS implementation has two additional, specific requirements:
- It must inherit from
UUPSUpgradeable. - It must implement the internal function
_authorizeUpgradeto control who can perform an upgrade.
Let's create a simple BoxV1.sol contract.
// contracts/BoxV1.sol
// SPDX-License-Identifier: MIT
pragma solidity ^0.8.18;

import "@openzeppelin/contracts-upgradeable/proxy/utils/Initializable.sol";
import "@openzeppelin/contracts-upgradeable/proxy/utils/UUPSUpgradeable.sol";
import "@openzeppelin/contracts-upgradeable/access/OwnableUpgradeable.sol";

contract BoxV1 is Initializable, UUPSUpgradeable, OwnableUpgradeable {
    uint256 public value;

    /// @custom:oz-upgrades-unsafe-allow constructor
    constructor() {
        _disableInitializers();
    }

    function initialize() public initializer {
        __Ownable_init();
        __UUPSUpgradeable_init();
        // Custom initialization logic would go here
    }

    function store(uint256 newValue) public onlyOwner {
        value = newValue;
    }

    // This function is required by UUPSUpgradeable.
    // It defines the authorization logic for the upgrade.
    function _authorizeUpgrade(address newImplementation)
        internal
        override
        onlyOwner
    {}
}
Let's break down the key UUPS-specific parts:
import ".../UUPSUpgradeable.sol": Imports the necessary UUPS logic.import ".../OwnableUpgradeable.sol": Imports the upgradeable version of the ownership contract, which we'll use for access control.is UUPSUpgradeable, OwnableUpgradeable: The contract inherits from both.__Ownable_init()and__UUPSUpgradeable_init(): We explicitly call the initializers for the parent contracts. This is a common point of error; forgetting to initialize parents can lead to serious vulnerabilities._authorizeUpgrade: This is the heart of the UUPS security model. By adding theonlyOwnermodifier, we are stating that only the owner of the contract can authorize an upgrade to anewImplementation.constructor() { _disableInitializers(); }: This is a security best practice explained in the OpenZeppelin documentation (LINK). It "locks" the implementation contract itself, preventing anyone from calling itsinitializefunction and taking it over.
Deploying and Upgrading with Hardhat Scripts
The @openzeppelin/hardhat-upgrades plugin makes deployment and upgrades incredibly straightforward.
1. Deploying the V1 Proxy
Create a script scripts/deploy.js:
// scripts/deploy.js
const { ethers, upgrades } = require("hardhat");

async function main() {
  const BoxV1 = await ethers.getContractFactory("BoxV1");

  console.log("Deploying BoxV1 as a UUPS proxy...");
  const proxy = await upgrades.deployProxy(BoxV1, [], {
    initializer: "initialize",
    kind: "uups",
  });
  await proxy.waitForDeployment();

  const proxyAddress = await proxy.getAddress();
  console.log("Proxy deployed to:", proxyAddress);
}

main().catch((error) => {
  console.error(error);
  process.exitCode = 1;
});
Notice the upgrades.deployProxy call. We pass the contract factory and an options object specifying kind: "uups". This tells the plugin to deploy the simple ERC1967Proxy and our BoxV1 as its implementation.
2. Creating and Deploying V2
Now, let's create a new version of our contract, BoxV2.sol, with a new feature: an increment function. Remember the storage layout rules: we can only append new variables. For this example, we'll just add a new function.
// contracts/BoxV2.sol
// SPDX-License-Identifier: MIT
pragma solidity ^0.8.18;

import "./BoxV1.sol";

contract BoxV2 is BoxV1 {
    function increment() public {
        value += 1;
    }
}
Important: Because BoxV2 inherits from BoxV1, it also inherits the _authorizeUpgrade function. If it didn't, the upgrade mechanism would be lost.
3. The Upgrade Script
Create a script scripts/upgrade.js. You'll need to paste in the proxy address from your V1 deployment.
// scripts/upgrade.js
const { ethers, upgrades } = require("hardhat");

// REPLACE WITH YOUR PROXY ADDRESS
const PROXY_ADDRESS = "0x...";

async function main() {
  const BoxV2 = await ethers.getContractFactory("BoxV2");

  console.log("Upgrading proxy to BoxV2...");
  const upgradedProxy = await upgrades.upgradeProxy(PROXY_ADDRESS, BoxV2);
  await upgradedProxy.waitForDeployment();

  console.log("Proxy upgraded successfully");
}

main().catch((error) => {
  console.error(error);
  process.exitCode = 1;
});
The upgrades.upgradeProxy function handles everything: it deploys BoxV2, validates that its storage is compatible with BoxV1, and calls the upgrade function to point the proxy to the new implementation address.
To see this entire process in action, let's return to the OpenZeppelin video.
Deploying More Efficient Upgradeable Contracts
This final segment from the OpenZeppelin video demonstrates the entire practical workflow using the Hardhat plugin. It's the perfect visual summary of what we've just discussed.
Watch from 18:43 to 32:20. The presenter does exactly what we've outlined: Tries to deploy with deployProxy and gets errors. Fixes them by specifying kind: 'uups', inheriting UUPSUpgradeable, and adding _authorizeUpgrade. Creates a V2 contract and uses upgradeProxy to perform the upgrade. Pay attention to the errors he encounters and how he resolves them—they are common issues you'll face.
Test your understanding!
You've successfully deployed BoxV2. A few months later, you decide the onlyOwner check in _authorizeUpgrade is too centralized. You want to change it so that upgrades require a 2/3 vote from a board of three members.
How would you implement this change?
Show answer
You would create a BoxV3.sol contract. In this new version, you would implement the voting logic (e.g., using a mapping(address => bool) hasVoted and a uint counter). Then, you would override the _authorizeUpgrade function to require that the vote counter has reached the 2/3 threshold before allowing the upgrade to proceed. Finally, you would use upgrades.upgradeProxy to upgrade your existing proxy to this new BoxV3 implementation. This demonstrates the power of UUPS—the upgrade logic itself is upgradeable.
Conclusion
Congratulations! You have now learned how to implement the industry-standard UUPS pattern for upgradeable smart contracts. This is a powerful and essential skill for building real-world, long-lasting decentralized applications. It gives you the power to evolve your project while maintaining a stable contract address and user state.
Key Takeaways:
- UUPS Pattern: Moves upgrade logic into the implementation contract, resulting in cheaper deployments and a more flexible architecture compared to the Transparent Proxy pattern.
- Core Components: To create a UUPS contract, you must inherit from
UUPSUpgradeableand implement the_authorizeUpgrade(address)function to define who can perform upgrades. - OpenZeppelin Tools: The
@openzeppelin/contracts-upgradeablepackage provides the necessary base contracts (Initializable,UUPSUpgradeable, etc.), and the@openzeppelin/hardhat-upgradesplugin provides thedeployProxyandupgradeProxyfunctions to manage the process securely. - The Golden Rule: Always ensure your new implementation versions include the upgrade logic (
_authorizeUpgrade) and maintain storage layout compatibility.
Preview of the Next Lesson:
In this lesson, we executed our deployment and upgrade scripts on a local Hardhat network. In the next lesson, "Perform a simulated contract upgrade on a testnet using Hardhat," we will take this a step further. We'll configure our project to deploy to a live public testnet like Sepolia, manage private keys securely, and verify our contracts on a block explorer so anyone can see and interact with them.