Recommended resources
The freely available resources this lesson will direct you to.
Hello! Welcome back to our module on implementing agent capabilities.
In our last lesson, we focused on the "what" of tool use: defining clear, structured tool schemas. We learned that a good schema acts as a contract, telling the LLM the tool's name, its purpose, and the parameters it requires. You now know how to describe a function so that an LLM can understand its capabilities.
Today, we transition from defining tools to using them. Our learning outcome is to implement function calling with an LLM API to invoke external tools. We will build the complete, multi-step conversational loop that makes tool use a reality. By the end of this lesson, you'll understand how to:
- Orchestrate the back-and-forth communication between your application and the LLM.
- Parse the LLM's request to use a tool.
- Execute your local functions with the arguments provided by the model.
- Feed the results back to the LLM to synthesize a final answer.
This is where the agent's ability to reason connects to its ability to act on the world. Let's dive in.
The Function Calling Execution Loop
In the previous lesson, we established that the LLM does not execute functions itself. Instead, it generates a structured JSON object indicating which function it wants to call and with what arguments. Your application is responsible for acting on this request.
This process follows a clear, multi-step sequence. The diagram below provides an excellent high-level overview of this flow.
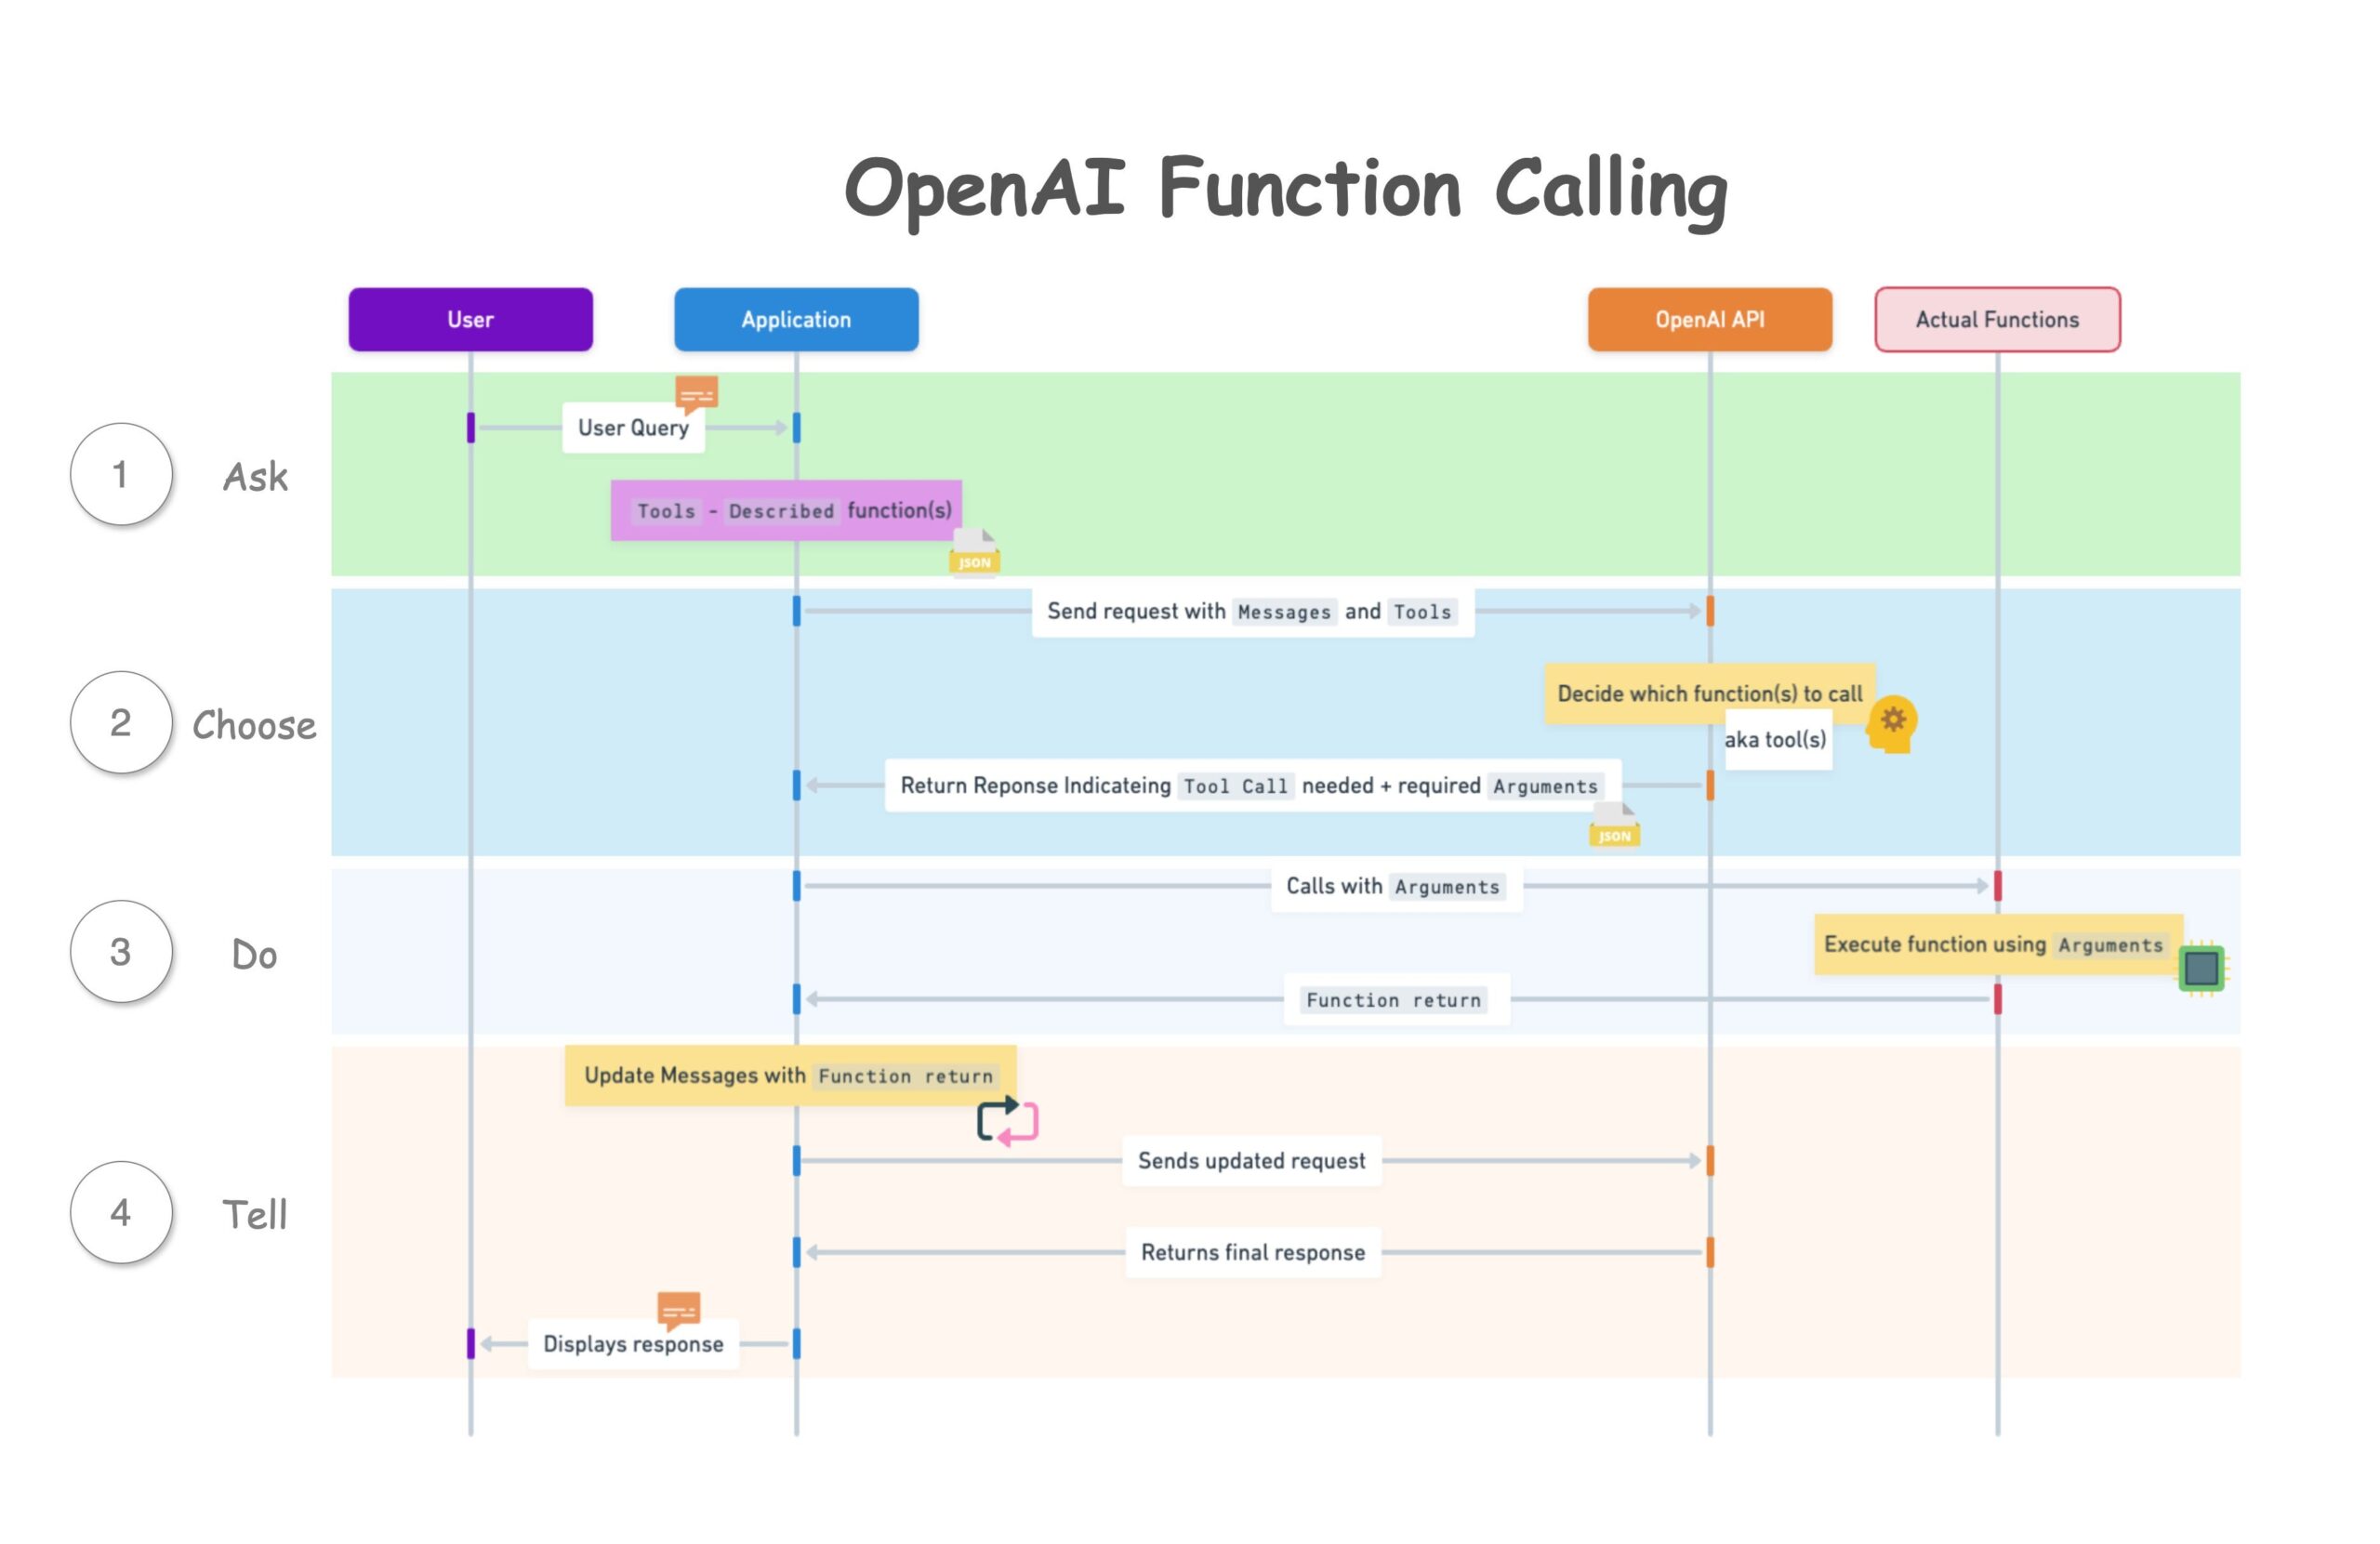
To hear this process explained, let's watch a short video that walks through these exact steps.
LLM Function Calling - AI Tools Deep Dive
The video 'LLM Function Calling - AI Tools Deep Dive' provides a concise explanation of the function calling sequence.
Watch the segment from 01:57 to 03:12. This will verbally reinforce the flow shown in the diagram above, setting the stage for our implementation.
Now that we have the conceptual model, let's translate it into code.
Implementing the Full Loop: A Step-by-Step Guide
We will build the function calling loop using the OpenAI API as our primary example. The principles, however, are nearly identical across other modern LLM APIs like Anthropic's Claude or Google's Gemini.
Step 1: Send the User Prompt and Tools
Our first step is to make an API call that includes the user's message and the list of available tools we defined in the last lesson. The model uses the tool descriptions to decide if any of them can help answer the user's query.
Step 2: Receive and Parse the Tool Call Response
If the model decides to use a tool, its response will not contain a final text answer. Instead, it will contain a tool_calls object. This object is a list, as the model might decide to call multiple tools at once. Each item in the list specifies:
- A unique
idfor the tool call. - The
function.nameof the tool to be executed. - A JSON string of
function.arguments.
The following video demonstrates these first two steps with a practical example.
LLM Function Calling - AI Tools Deep Dive
Let's return to the 'LLM Function Calling - AI Tools Deep Dive' video. This segment shows how to make the initial API call and what the response looks like when the model decides to use a tool.
Watch from 03:12 to 07:06. Pay close attention to the structure of the API call (passing the tools list) and the structure of the response, which contains the tool_calls object instead of a text message.
Step 3: Execute the Function
Your application now has a request from the LLM. The next step is to execute it:
- Parse the arguments: Convert the
function.argumentsJSON string into a Python dictionary. - Map name to function: Use the
function.namestring to look up the actual, callable Python function in your code. A simple dictionary mapping names to function objects is a common and effective pattern. - Execute: Call the function, unpacking the parsed arguments dictionary into it (e.g.,
my_function(**arguments)).
Step 4: Send the Result Back for a Final Answer
After your function runs and returns a result, the loop is not yet complete. The LLM still needs to process this result and formulate a natural language answer. To do this, you make a second API call.
This time, you append the tool result to your message history. The new message must have a role of "tool" and include the tool_call_id from the assistant's previous response, along with the content (the return value of your function).
The model then uses this new context to generate the final, human-readable response.
This next video segment walks through the complete end-to-end implementation of this loop.
LLM Function Calling - AI Tools Deep Dive
This clip puts all the pieces together, showing how to handle the tool call, execute the local function, and make the second API call with the results.
Watch from 07:06 to 12:43. Focus on the 'multi-step process' described. Notice how the message history is appended with the assistant's tool_calls response and then the tool role message before the second API call.
A Second Example: Reinforcing the Pattern
To solidify your understanding, let's look at another implementation of the same pattern. Repetition from a different perspective is key to mastering a new concept. This example explicitly shows the use of an available_functions dictionary to map the tool name to the executable code, a crucial detail for robust implementation.
How does OpenAI Function Calling work?
The video 'How does OpenAI Function Calling work?' by Learn Data with Mark provides another excellent, code-first walkthrough of the entire process.
Watch from 01:34 to 04:22. Pay attention to how the run_conversation function is structured and how the available_functions dictionary is used to call get_current_weather based on the string name returned by the API.
Handling Parallel Tool Calls
What if the user's query requires information from multiple tools? For instance, "What's the weather in Paris and what is the current exchange rate for Euros?" Modern models can handle this by returning multiple tool_calls in a single response.
Your code should be designed to handle this. The logic remains the same, but you'll iterate through the list of tool calls, execute each one, and append all of their results to the message history before making the final call to the LLM.
The following short clip demonstrates the model's output for such a parallel call.
How does OpenAI Function Calling work?
Let's see an example of the model requesting two function calls at once.
Watch from 04:22 to 05:04. Notice that the response now contains two tool_calls objects, one for Paris and one for San Francisco, which your code would then process sequentially or in parallel.
A Modular, Class-Based Implementation
As an experienced software engineer, you know the value of structured, modular code. While the scripts we've seen are great for demonstration, a production system benefits from a more object-oriented design.
The following article walks through building an agent from scratch using a class-based approach. It encapsulates the concepts we've discussed—tool definition, the message loop, tool execution, and error handling—into a clean, reusable Agent class.
Building an AI Agent From Scratch Using the Anthropic API
The article 'Building an AI Agent From Scratch Using the Anthropic API' provides an excellent guide to implementing this logic in a more structured, engineering-focused way. The principles are universal, even though the code targets the Anthropic API.
Read through the following sections to see a robust implementation pattern: 'Designing the Tool Interface' and 'Implementing a Weather Information Tool': Notice the use of a BaseTool class, an abstract base class that defines a contract for all tools. 'Detecting Tool Usage', 'Executing Tools Safely', and 'Processing Tool Results': These correspond directly to the steps we've discussed for parsing, executing, and formatting results. 'Building the Main Agent Loop' and 'Complete Implementation Example': See how everything is orchestrated within a run_agent_loop function that manages the state and conversation history. Focus on the design pattern and the separation of concerns rather than the specifics of the Anthropic API.
This class-based structure provides a solid foundation for building more complex agents, making it easier to manage state, add new tools, and handle errors gracefully.
Conclusion
Today, we've built the engine that powers an agent's ability to act. We moved beyond merely defining tools and implemented the complete, round-trip communication loop that allows an LLM to leverage external functions.
Key Takeaways:
- Function calling is a multi-step conversational process between your application and the LLM API.
- The core loop is: Call -> Parse -> Execute -> Call Again.
- Make an initial API call with the user's prompt and a list of
tools. - Check the response for a
tool_callsobject and parse the function name and arguments. - Execute the corresponding function in your code with the provided arguments.
- Make a second API call, appending the function's return value in a message with
role: "tool".
- Make an initial API call with the user's prompt and a list of
- Modern LLMs support parallel tool calls, returning a list of functions to execute for complex queries.
- For robust applications, structuring your implementation with classes (e.g., an
Agentclass andBaseToolinterfaces) promotes modularity and maintainability.
You are now equipped to build applications where the LLM can go beyond its internal knowledge and interact with real-world data and systems.
In our next lesson, "Handle multi-step tool chains where one tool's output feeds into another," we will build on this foundation. We'll explore more complex scenarios where an agent must reason through a sequence of actions, using the output of one tool as the input for the next to solve a problem.