Recommended resources
The freely available resources this lesson will direct you to.
- Solidity Tutorial: Fixed Rate Staking Contractwww.youtube.com
- Deposit and withdraw ERC20 tokens (USDT, SHIB, MATIC) from a Solidity contract (Hardhat, Ethers.js)www.youtube.com
- Solidity Tutorial: Creating an ERC20 Staking Contractmedium.com
- Guide to Developing a Staking & Unstaking Smart Contractwww.rapidinnovation.io
Hello! Welcome back to our journey into building a token with real utility.
In the last lesson, we laid the critical groundwork by designing the architecture for our StakingRewards contract. We mapped out the necessary state variables, function signatures, and, most importantly, the gas-efficient model we'll use for calculating rewards.
Today, we move from architecture to implementation. Your goal is to implement the functions that allow users to stake (deposit) and unstake (withdraw) their ERC-20 tokens. These two functions are the heart of the user interaction with our staking contract, forming the mechanism for them to lock and retrieve their assets. Let's start coding!
1. The Foundation: The approve and transferFrom Pattern
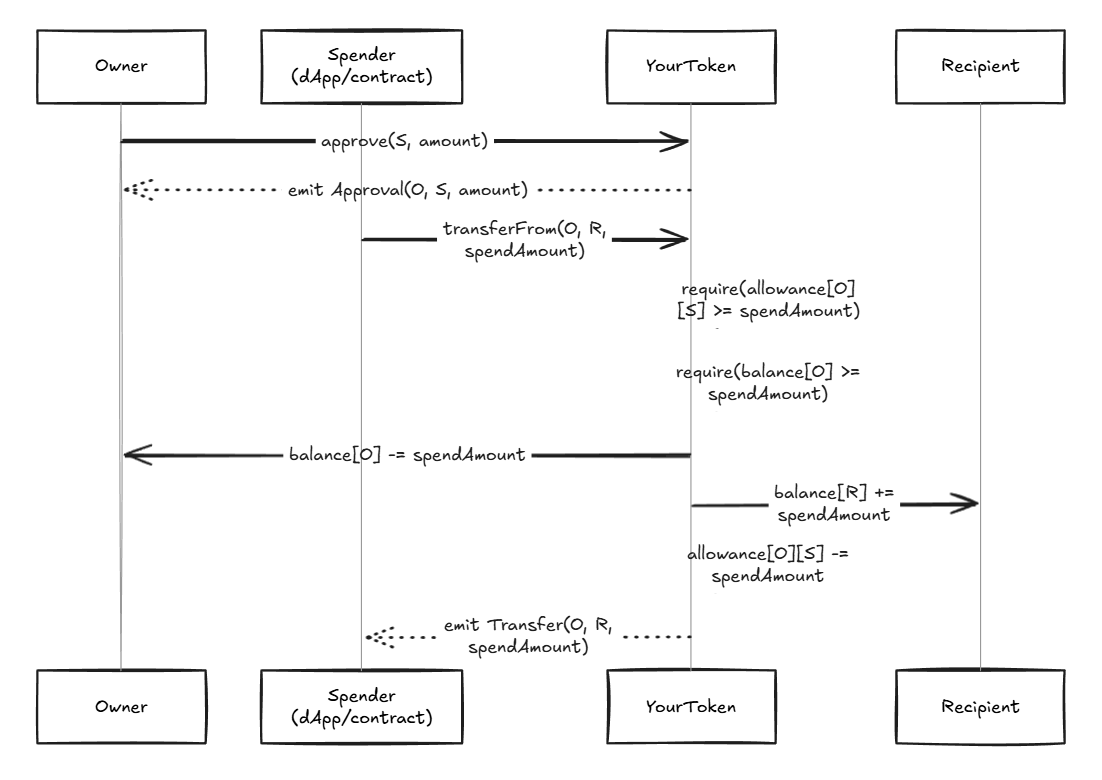
Before a user can deposit tokens into our staking contract, they must first grant it permission to manage those tokens on their behalf. This is a fundamental security pattern in the ERC-20 standard and is crucial for any contract that interacts with users' tokens.
This is a two-step process from the user's perspective:
- Approve: The user calls the
approve()function on the token contract itself, specifying the spender's address (our staking contract) and the maximum amount (allowance) they can pull from the user's wallet. - Transfer From: When the user calls our
stake()function, our contract then uses thetransferFrom()function on the token contract to execute the transfer. This call will only succeed if the staking contract has been granted a sufficient allowance.
This is analogous to granting an application API access to your account with specific permissions. The user retains control and sets a clear limit on the contract's power.
The diagram below illustrates this flow perfectly. Here, the "Spender" is our staking contract.
2. Implementing the stake (Deposit) Function
Now let's translate this into Solidity. The stake() function will be responsible for receiving tokens from the user and updating the contract's internal state to reflect the deposit.
A video from Blockman Codes provides a clear, practical demonstration of building deposit and withdraw functions for ERC-20 tokens. We'll use it as a guide.
Deposit and withdraw ERC20 tokens (USDT, SHIB, MATIC) from a Solidity contract (Hardhat, Ethers.js)
Watch this segment from the video "Deposit and withdraw ERC20 tokens..." to see how a depositTokens function is implemented. Pay close attention to how it updates the user's balance and uses transferFrom.
Watch from 07:47 to 09:41. Notice the two key actions inside the function: updating the accountBalances mapping and calling erc20.transferFrom().
As you saw in the video, the logic for our stake() function involves several distinct steps. Let's build it out.
First, here's the basic structure of our contract, incorporating the architecture we designed previously. We will focus on the stake and withdraw functions for now, leaving the reward logic as placeholders.
// SPDX-License-Identifier: MIT
pragma solidity ^0.8.9;

import "@openzeppelin/contracts/token/ERC20/IERC20.sol";
import "@openzeppelin/contracts/access/Ownable.sol";

contract StakingRewards {
    // Using OpenZeppelin's Ownable for access control
    using Ownable for address;

    // --- State Variables ---
    IERC20 public immutable stakingToken;

    // Total amount of tokens staked
    uint256 public totalSupply;
    // Mapping from user address to staked amount
    mapping(address => uint256) public balanceOf;

    // (Reward-related variables will be added in the next lessons)

    constructor(address _stakingToken) {
        stakingToken = IERC20(_stakingToken);
    }

    // --- Staking and Withdrawing Functions ---

    function stake(uint256 _amount) external {
        // Implementation will go here
    }

    function withdraw(uint256 _amount) external {
        // Implementation will go here
    }

    // (Reward-related functions will be added in the next lessons)
}
Now, let's implement the stake function based on best practices.
function stake(uint256 _amount) external {
    // 1. Require that the amount to stake is greater than zero.
    require(_amount > 0, "Cannot stake 0 tokens");

    // 2. Update the user's staked balance.
    balanceOf[msg.sender] += _amount;

    // 3. Update the total staked supply.
    totalSupply += _amount;

    // 4. Transfer the tokens from the user to this contract.
    // This will fail if the user has not approved the contract first.
    stakingToken.transferFrom(msg.sender, address(this), _amount);

    // (We will also emit an event here, a common best practice)
}
This implementation is simple, but it does everything we need. Note the order of operations: we update our internal state (balanceOf, totalSupply) before the external call to transferFrom. This is part of a security best practice known as the Checks-Effects-Interactions pattern, which we'll cover in detail in Module 6.
3. Implementing the withdraw (Unstake) Function
The withdraw() function is the counterpart to stake(). It allows users to retrieve their staked tokens from the contract. Since the contract already holds the tokens, the process is more direct and uses the standard transfer() function.
Let's return to the Blockman Codes video to see how the withdrawTokens function is built.
Deposit and withdraw ERC20 tokens (USDT, SHIB, MATIC) from a Solidity contract (Hardhat, Ethers.js)
Now, watch the implementation of the withdrawTokens function. Focus on the validation check and how it uses transfer to send tokens back to the user.
Watch from 09:41 to 11:57. The video explains the require statement to check for sufficient funds and the final transfer call.
The logic is straightforward:
- Check if the user has enough staked tokens to withdraw the requested amount.
- Update the state variables to reflect the withdrawal.
- Transfer the tokens from the contract back to the user's wallet.
Here is the implementation:
function withdraw(uint256 _amount) external {
    // 1. Require that the user has enough tokens staked.
    require(_amount > 0, "Cannot withdraw 0 tokens");
    require(balanceOf[msg.sender] >= _amount, "Insufficient staked balance");

    // 2. Update the user's staked balance.
    balanceOf[msg.sender] -= _amount;

    // 3. Update the total staked supply.
    totalSupply -= _amount;

    // 4. Transfer the tokens from this contract back to the user.
    stakingToken.transfer(msg.sender, _amount);

    // (We will also emit an event here)
}
Test your understanding!
Why does the stake() function use transferFrom(), while the withdraw() function uses transfer()?
Show answer
The stake() function needs to pull tokens from the user's wallet into the contract. Because the user (msg.sender) initiates the call, the contract needs prior permission (approve) to execute a transfer on the user's behalf. transferFrom(from, to, amount) is designed for this purpose.
The withdraw() function, however, sends tokens that the contract already owns and controls. The contract is the "from" address, so it can directly initiate a transfer(to, amount) to send tokens to the user without needing any special permission.
For another perspective on implementing these functions, the following article provides a concise code walkthrough.
Guide to Developing a Staking & Unstaking Smart Contract
The article "Guide to Developing a Staking & Unstaking Smart Contract" provides simple and clear code snippets for both stakeTokens and the logic for unstake.
Quickly review sections '4.1. Creating the Stake Function', '5.1. Designing the Unstake Function', and the 'Example Code Snippet for a Basic Staking Contract'. This will reinforce the structure and logic we've just implemented.
Conclusion
Congratulations! You have successfully implemented the two most fundamental functions of our staking contract. Users can now deposit their tokens to participate in the staking program and withdraw them when they choose.
Key Takeaways:
- Staking (depositing) requires the user to first
approvethe staking contract, which then usestransferFromto pull the tokens. - Unstaking (withdrawing) is a direct
transferfrom the contract back to the user, as the contract already owns the tokens. - Both functions must include
requirestatements to validate inputs and prevent invalid states (e.g., staking zero tokens or withdrawing more than you have). - Internal state variables (
balanceOf,totalSupply) must be updated correctly during both operations.
Preview of the Next Lesson:
While users can stake and unstake, they aren't earning anything yet! To implement the reward logic we designed, we first need the right data structures to support it. In the next lesson, you will create the data structures to track each user's staked amount and reward debt, setting the stage for calculating and distributing rewards.