Hello! Welcome back to our module on Visual Storytelling with AI.
In the last lesson, we focused on crafting detailed prompts to generate a single, high-quality image. You learned the Subject + Description + Style formula and how to add artistic layers like lighting and mood. This is a crucial first step.
However, for the books you want to create—especially children's books and comics—a single image isn't enough. Your readers need to recognize your main character from page to page. This brings us to a new, more complex challenge: consistency.
This lesson will teach you how to generate a consistent character design across multiple images using seed numbers and descriptive persistence. Mastering this will allow you to create a cast of recognizable characters for your stories, all using free AI tools.
1. The Challenge: Why AI Forgets Your Character
Before we jump into the solutions, it's helpful to understand the problem, which will resonate with your IT background. Most text-to-image AI models are inherently "stateless." They don't have a working memory of the images they've just created. Each time you click "generate," the AI starts from scratch, interpreting your prompt anew.
Character Consistency: How to Generate Stable AI Character Art
This article, 'Character Consistency: How to Generate Stable AI Character Art,' provides a clear explanation of why consistency is a challenge.
Please read the sections 'Why Character Consistency Is a Challenge for AI Art' and 'The Foundation: Mastering Prompts for Consistency'. This will give you a solid conceptual understanding of the problem we're about to solve.
As the article explains, the AI's reliance on random "noise" and its lack of memory mean that even slight changes to your prompt can result in a completely different-looking character. Our goal is to overcome this by giving the AI a stronger, more persistent set of instructions.
When done correctly, you can achieve results like these, where a character maintains their core look across various actions and scenes.
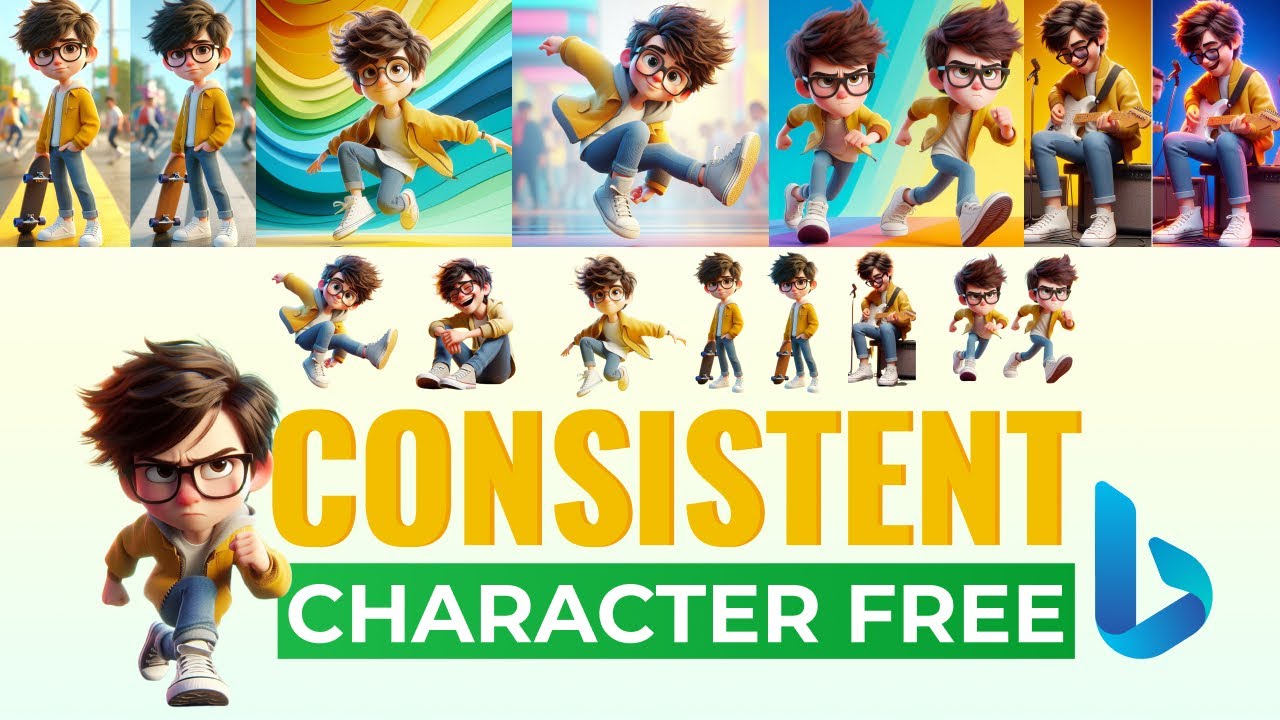

2. Technique #1: Descriptive Persistence and the "Character DNA"
The first and most fundamental technique builds directly on what you learned in the last lesson. We called it a "master prompt," but we're going to formalize it into a concept professional artists use: a character model sheet, or what we'll call the "Character DNA."
This is the "descriptive persistence" part of our learning outcome. It means creating a highly detailed, consistent block of text that defines your character's unchangeable core traits, which you will reuse in every prompt.
How to Create Consistent AI Cartoon Characters (2026)
The article 'How to Create Consistent AI Cartoon Characters' offers an excellent framework for this called the 'Character DNA'. This structured approach will feel familiar given your background in IT.
Please read the sections 'Step 1: Write Your "Character DNA"' and 'Step 3: Lock Your Prompt (Stop "Prompt Drift")'. Pay close attention to the Character DNA template and the concept of a two-layer prompt system (Identity Block and Scene Block).
Creating Your Character DNA
As the article suggests, before you even write a prompt, you should define your character in a separate document.
Character DNA Template:
- Name: Sparky
- Age/Type: Small, friendly exploration robot
- Silhouette: Compact body on two sturdy treads, slightly oversized head
- Face Landmarks: Two large, expressive circular blue optic sensors; a small antenna on the left side of his head with a light that blinks
- Body/Color: Body made of polished white metal with orange accents; black rubber treads
- Signature Details: A small solar panel on his back
- Style Rules: 3D Pixar-style render, vibrant colors, clean look
- Never Change: Blue optic sensors, white and orange body, treads, antenna
- Allowed to Change: Pose, expression (optic sensors can narrow or widen), background
This DNA document becomes your "single source of truth." From this, you create an Identity Block for your prompt that you will copy and paste exactly every single time. The only thing that changes is the Scene Block.
- Identity Block (Never Changes):
Sparky, a small friendly exploration robot with a compact body made of polished white metal and orange accents, on two sturdy black rubber treads. He has a slightly oversized head with two large, expressive circular blue optic sensors and a small antenna on the left side of his head. 3D Pixar-style render, vibrant colors. - Scene Block (Changes Each Time):
standing in a futuristic, clean laboratory.
3. Technique #2: Locking the "Seed" Number
Descriptive persistence is powerful, but we can increase our odds of consistency by also controlling the AI's starting point. The "seed" is a number that acts as an identifier for the initial field of random noise from which an image is generated.
By fixing this seed number, you tell the AI: "Start from the exact same random pattern every time." When you combine a fixed seed with a strong Identity Block, you dramatically increase the likelihood of generating a consistent character.
Let's see how this works in Leonardo.AI.
How to: Create Consistent Characters in Leonardo AI | 3 Different Methods
This short video from 'A.I. Stuff' gets straight to the point, showing you exactly how to find and use a seed number in Leonardo.AI's free version.
Watch from 00:48 to 02:38. Focus on these steps: Hovering over an image to find its details. Copying the 'seed' number. Pasting that number into the generation settings to create variations.
The process is simple:
- Generate your initial character—your "anchor" image.
- Once you have a version you love, copy its seed number.
- In the left-hand settings panel, enable "Use fixed seed" and paste the number in.
- Now, you can modify the "Scene Block" of your prompt to create new images, and the AI will use that same starting point.
4. The Complete Workflow: Combining DNA and Seed
Now, let's put it all together in a comprehensive workflow. We'll use a detailed video that walks through the entire process from start to finish.
Mastering Consistent Characters in Leonardo AI: How to Make AI Influencers (Step-by-Step Tutorial)
This video from 'Blog With Ben' provides an excellent, in-depth demonstration of the 'fixed seed' workflow in Leonardo.AI. While the creator uses a paid account for higher quality, the core process shown is identical for free users.
Watch from 03:18 to 15:39. This is a longer segment but serves as a complete practical guide. Pay close attention to: 4:40 - 8:50: Generating the initial character with a detailed prompt (this is our 'Identity Block' in action). 8:50 - 10:20: Finding and copying the seed number from the preferred image. 10:20 - 11:20: Navigating to 'Show Advanced features' and enabling the 'Use fixed seed' option. 11:20 onwards: Modifying the prompt's scene description while keeping the seed and identity description fixed.
This combined workflow is your most reliable method for character consistency using free tools:
- Define: Write your character's DNA in a separate document.
- Generate Anchor: Use the DNA to create a strong Identity Block prompt and generate your first set of images.
- Select & Copy: Choose the best image that matches your vision and copy its seed number.
- Fix Seed: Enable the "Use fixed seed" option in Leonardo.AI and paste the number.
- Iterate: For every new illustration, use the exact same Identity Block and fixed seed, only changing the Scene Block to describe the new action or setting.
Test your understanding!
You are creating a children's book about a shy but brave little knight named Sir Reginald.
- Using the Character DNA template, briefly define Sir Reginald's key features.
- Write the full "Identity Block" prompt you would use.
- Describe the steps you would take in Leonardo.AI to create two images:
- Image 1: Sir Reginald standing nervously in front of a castle.
- Image 2: Sir Reginald bravely holding his shield to block a friendly dragon's sneeze.
Show answer
Here is one possible solution:
1. Character DNA for Sir Reginald:
- Name: Sir Reginald
- Age: 8 years old
- Silhouette: Short and stocky, wearing slightly oversized silver armor
- Face Landmarks: Big, expressive brown eyes; a scattering of freckles on his cheeks
- Hair: Messy, bright red hair sticking out from under his helmet
- Style: Whimsical storybook illustration, soft watercolor style
2. Identity Block Prompt:Sir Reginald, an 8-year-old knight, short and stocky, with big expressive brown eyes and freckles on his cheeks. He has messy bright red hair sticking out from under his helmet and wears slightly oversized, clunky silver armor. Whimsical children's storybook illustration style, soft watercolor.
3. Workflow in Leonardo.AI:
- Generate Image 1: I would combine the Identity Block with a Scene Block:
"standing nervously in front of a large stone castle."I'd generate images until I got one I liked. - Copy Seed: I would hover over my favorite image of Reginald, copy its seed number.
- Fix Seed: I'd go to the advanced settings, turn on "Use fixed seed," and paste the copied seed number.
- Generate Image 2: I would keep the Identity Block and the fixed seed exactly the same, but change the Scene Block to:
"bravely holding his wooden shield up to block a big, friendly green dragon's fiery sneeze."Then I'd generate the second image.
Conclusion: Your Key to Visual Storytelling
You now possess the two most important techniques for creating consistent characters with free AI tools. While this method isn't foolproof—major changes in pose or angle can still cause the AI to "drift"—it provides a robust foundation for illustrating your books.
Key Takeaways:
- AI image generators are "stateless," so consistency requires deliberate effort.
- Descriptive Persistence via a "Character DNA" and a fixed "Identity Block" in your prompt is the foundation.
- Using a fixed seed number tells the AI to use the same starting point, drastically improving consistency.
- The most effective free workflow combines a fixed seed with a strong, reusable identity prompt.
Preview of the Next Lesson:
Now that you can create a consistent character and place them in different scenes, the next step is to arrange these scenes into a coherent narrative. In our next lesson, we will move on to scripting a comic book page, where you'll learn to think in terms of panels, action, and dialogue to structure your visual story.