Recommended resources
The freely available resources this lesson will direct you to.
- PTE Speaking Test Tips and Tricks - How to Improve Pronunciation & Microphone Positionwww.youtube.com
- Best Mic Position in PTE Exam | Things to take care during Mic Position in PTE Examwww.youtube.com
- Help Center: Scored Practice Tests & Sample Questions | Pearson PTEwww.pearsonpte.com
- Test tip: Make sure you’re familiar with the test equipment | Pearson PTEwww.pearsonpte.com
Hello again. Last time, we separated preparation time from recording time and saw why a prompt response needs to begin promptly. Before you record a speaking baseline, there is a more basic question: will the microphone capture your normal voice clearly?
Your Speaking score of 47 does not tell us whether equipment contributed to the difficulty; hesitation and sentence construction may still be the main issues. Today we will control what we can: microphone position, speaking volume, and posture. Allow about 35–40 minutes, including a short recording check.
Start with the test setup
Pearson’s equipment guidance gives us a useful starting point: position the microphone about two fingers’ distance from your mouth, speak at a natural pace and volume, and keep the headset on during the test. Read the short guidance before adjusting your own headset.
Test tip: Make sure you’re familiar with the test equipment | Pearson PTE
Read Pearson PTE’s test-equipment tips to establish the target for microphone position and speaking level.
In “PTE Academic test equipment,” read “Computer Check” and “Microphones,” from the equipment check. Then read “Headset,” “Speaking levels,” and “Background noise,” from headset and volume through the paragraph about other test takers speaking. Notice that Pearson recommends neither shouting nor speaking unusually slowly.
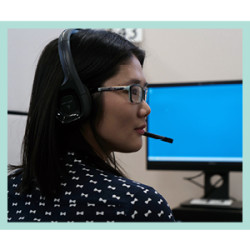
At home, the equipment also matters. Pearson’s guidance for its online Scored Practice Tests recommends a wired headset rather than Bluetooth or a laptop microphone, and warns that a microphone held too close can pick up breathing. This is guidance for home practice; at the test centre, use the supplied equipment and complete its equipment check.
Help Center: Scored Practice Tests & Sample Questions | Pearson PTE
Read Pearson PTE’s advice on recording reliably in its online Scored Practice Tests. Focus on what you can check before practising, rather than treating a home setup as identical to the test centre.
Under “Technical support,” read from the headset advice, including the instruction to complete the microphone check. Farther down the page, in the answer about speaking-question performance, read from the volume advice. Pay particular attention to conversational volume and audible breathing.
Set the microphone, then leave it steady
Put on the headset as you would for a full test. Adjust it until it feels secure without pressing uncomfortably. Place the microphone beside your mouth, about two fingers away as an initial guide. Do not put it directly in front of your lips: a burst of air on sounds such as p or b can create a distracting pop. Nor should you move it so far away that your voice becomes faint.
The two-finger distance is a starting position, not a score-producing formula. Your playback is the deciding check. If words sound faint, first confirm that the microphone is selected and recording; then make a small position adjustment. If you hear breath bursts or harsh distortion, shift the microphone slightly to the side or a little farther from your mouth. Change one thing at a time, so you can hear what helped.
Once the sound is clear, leave the boom alone while speaking. Holding it or repeatedly moving it can introduce noise and change the volume mid-response.
Use a voice you can sustain
Speak as though you are explaining an idea to someone seated across a small table: clear, conversational, and steady. Whispering may make words difficult to capture. Shouting can sound harsh and is difficult to maintain. A more natural voice also makes it easier to concentrate on forming sentences quickly—the skill you have identified as difficult in the real test.
Posture helps keep that voice consistent. Sit upright but not rigid, with your shoulders relaxed and your head facing the screen. Keep a comfortable viewing distance so you do not lean toward the monitor as you read a prompt. When you turn your head, lower it sharply toward notes, or lean back, you also change your mouth’s distance from the microphone. If you use notes later for Retell Lecture or Summarize Group Discussion, aim to glance down briefly rather than speaking an entire sentence with your face pointed at the desk.
You do not need to eliminate every sound in a shared test room. Pearson notes that other test takers may be speaking. Your practical aim is for your words to remain easy to hear through your headset microphone.
Make a test-style recording check
Spend about 15 minutes on this setup check before moving to scored-task practice. You are testing audio capture, not trying to produce a polished answer.
- Record 20–30 seconds at your normal speaking volume. Say several connected sentences about a familiar place or a recent activity. Include a natural breath between sentences; a brief “testing, one, two” does not reveal much about sustained speech.
- Listen through headphones. Check whether the beginnings and ends of words are audible, whether your volume stays similar across sentences, and whether breath bursts or rubbing noises cover any words.
- Adjust only if needed, then record the same kind of speech again. Compare the two recordings rather than relying on how loud you felt while speaking.
- Keep the clearer setup and record one final 30–40-second sample while looking at the screen. Briefly glance down and back up as you might when using notes. Check that this movement does not make your voice fade.
If neither recording contains your voice clearly, check the selected input device and its connection before changing how you speak. If you are using an online Scored Practice Test, follow its microphone check before starting. At the test centre, use the equipment check to confirm the supplied headset is working and ask staff for help if it is not. Do not try to compensate for a faulty microphone by shouting.
Takeaway
A clear recording starts with a secure headset, a microphone about two fingers from and beside your mouth, conversational volume, and a relaxed posture that keeps your distance from the microphone steady. Confirm the result by listening to a sustained recording, then make small adjustments only where the playback shows a problem. Good setup cannot replace relevant, fluent answers, but it ensures we can judge your speaking rather than a recording fault.
Next, we will use a 30-second Personal Introduction as a speaking warm-up before recording a baseline across the scored tasks.