Recommended resources
The freely available resources this lesson will direct you to.
Welcome back. In the previous lesson, you connected the company’s weekly rhythm to metrics, decisions, and follow-up actions. Hiring belongs in that same operating system: opening a role affects budget and workload; choosing a candidate is a meaningful decision; and onboarding is a coordinated set of commitments rather than an informal welcome message.
This lesson completes the people-operations layer for your eight-person e-commerce company. You will build a lightweight Notion workflow that begins with an approved vacancy and ends with a new colleague who has the right role context, access, first-week plan, and accountable support. Notion will coordinate the work, while payroll, identity, and other specialist systems remain authoritative for sensitive records and actual account access.
Start with the business logic: a role is not a vacancy
The Role Directory from an earlier lesson describes the company’s ongoing design: what each role is responsible for, who it reports to, its recurring outputs, and its backup coverage.
A vacancy is a temporary request to fill one of those roles. It answers a different question:
Do we need permission to spend money and time to fill this role now?
For example, your company may already have a defined Customer Experience Associate role. But opening a vacancy for it still requires a decision: perhaps support volume has risen, the current employee is leaving, or the company wants weekend coverage.
Keep these two records distinct:
| Record | Meaning | Typical owner | When it changes |
|---|---|---|---|
| Role | An enduring job design: purpose, manager, responsibilities, expected outputs, backup | Founder or functional lead | When company structure or responsibilities change |
| Vacancy | A request to hire one person into an approved role, with a business reason and timing | Hiring manager | When a role needs to be filled, paused, cancelled, or filled |
| Candidate | A person being considered for one vacancy | Hiring manager or People & Operations owner | As they move through hiring stages |
| Onboarding plan | A coordinated plan to prepare and support one accepted hire | Hiring manager | After offer acceptance through the first week |
This distinction prevents a common Notion-system failure: one “Hiring” database that mixes job descriptions, applicants, hiring approvals, interview notes, signed offers, and onboarding tasks in a single page. It becomes difficult to see what is actually waiting for a decision.
For a company of this size, use a simple approval rule:
- A replacement hire within an already approved budget may be approved by the Founder/GM.
- A new or additional role should first be added to the Role Directory and approved as part of the company structure, then receive vacancy approval.
- The hiring manager drives the request and process; they should not silently approve their own new headcount.
The requisition flowchart below shows the essential control: the hiring manager requests the vacancy, the appropriate manager approves or rejects it, and only approved requests move into candidate search.
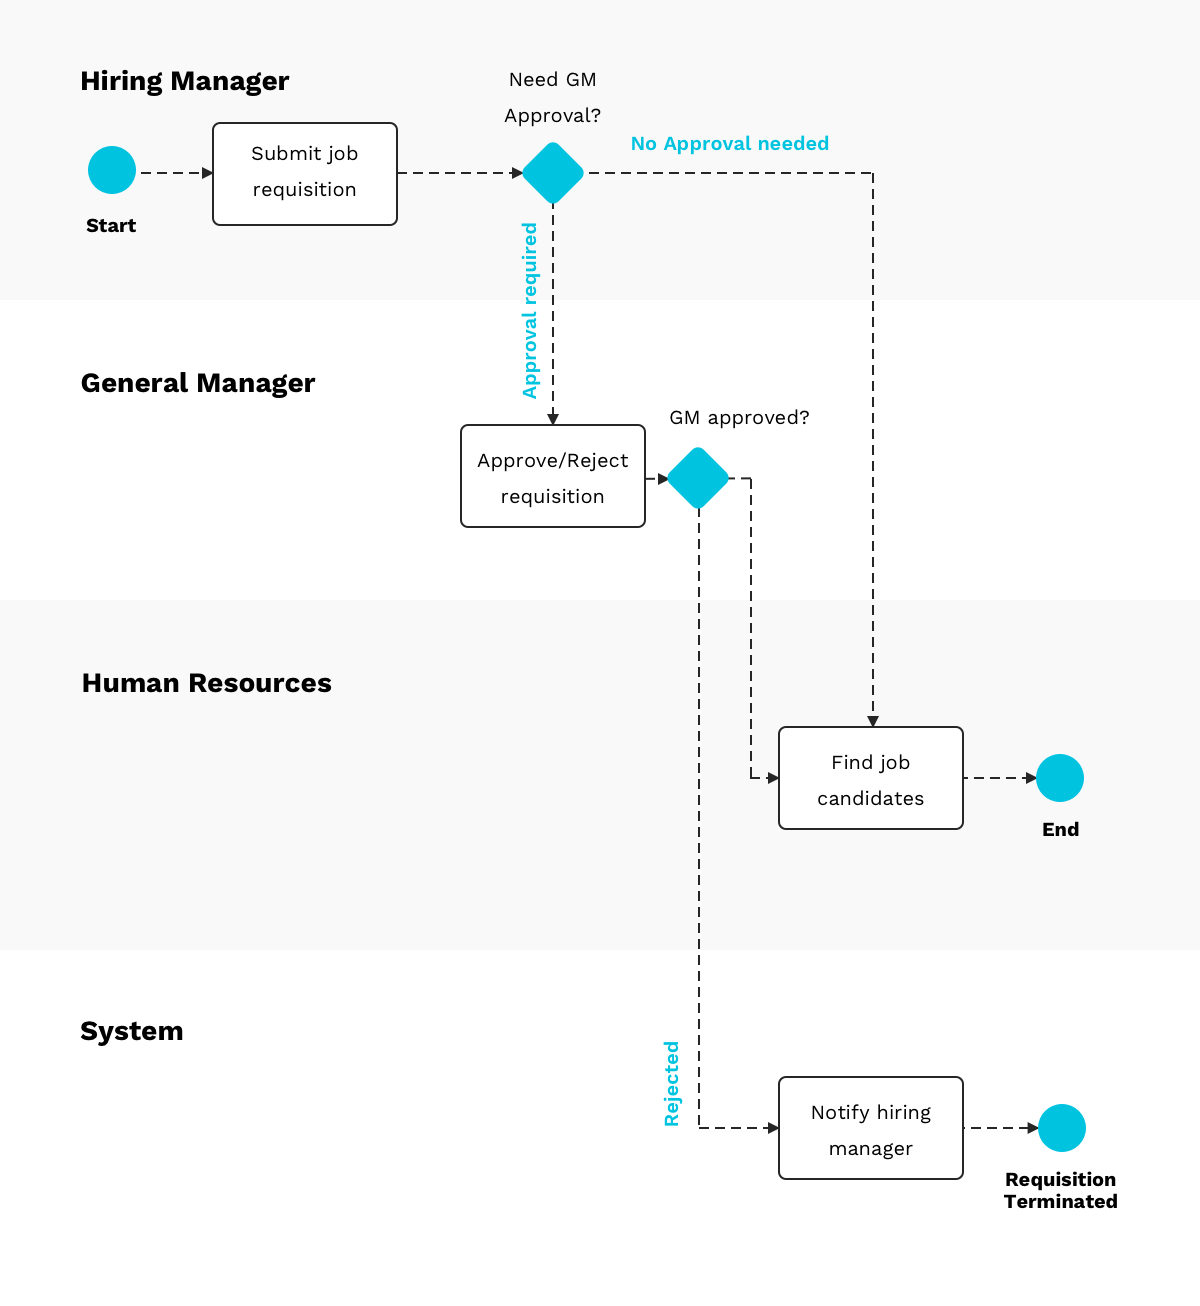
For your company, replace “General Manager” with the real approver from your Decision Rights Catalog. That may be the Founder, GM, or budget owner. The important point is that the person who needs a hire is not automatically the person allowed to commit the company to payroll cost.
Hiring guide template: guidelines for hiring managers - Workable
Read the relevant parts of Workable’s “Hiring guide template.” It is more detailed than a five-to-ten-person company needs, but it clearly separates requisition approval, interview design, evidence-based evaluation, and offer approval.
In “The process,” focus on the Step 2 discussion between the hiring manager and recruiter. Read the hiring kickoff checklist and note the practical inputs that should be decided before candidates are contacted: the job description, interview process, timelines, scorecards, and assignment if one is genuinely needed. Then, in Step 5 under “Evaluation,” read the evaluation guidance. Focus on the distinction between evidence and an unsupported impression. Finally, in Step 8, “The Offer Letter,” read the offer approval sequence. Adapt its approval logic, not its corporate titles or complexity.
Build a linked hiring model, not one large hiring page
Create a private People Operations area in Notion. This should be accessible only to the people who genuinely need hiring information, such as the Founder/GM, hiring manager, and People & Operations owner.
Do not treat a filtered view as security. A view that hides salary, candidate contact details, or interview notes from most people is still based on a database they may be able to access. Keep sensitive databases in an appropriately restricted teamspace from the beginning. You will design the full permission model later in the course.
Also keep the source-of-truth boundaries clear:
- Notion is the workflow and management record: requisition status, interview responsibilities, decision evidence, onboarding coordination, and task completion.
- An ATS or recruiting inbox may be the authoritative location for applications and candidate correspondence.
- Your HR/payroll system is authoritative for employment contracts, tax forms, bank details, legal name, home address, and payroll setup.
- Your identity provider or application admin console is authoritative for whether an account actually exists and what access it has.
Never put passwords, identity-document images, banking details, tax forms, or broad personal background notes in Notion.
1. Create the Vacancies database
Each vacancy is one approved attempt to fill one role. Create a database called Vacancies and connect it to your existing Roles, People, and Decision Log databases.
| Property | Type | Purpose |
|---|---|---|
| Vacancy title | Title | Example: “VAC-2026-04 — Customer Experience Associate” |
| Role | Relation to Roles, one record | The role being filled; required |
| Hiring manager | Relation to People, one record | Owns the need and day-to-day hiring process |
| Vacancy type | Select | Replacement, Growth hire, Temporary/contract |
| Business reason | Text or page content | The demand, capability gap, or replacement rationale |
| Target start date | Date | A planning target, not a promise to candidates |
| Employment arrangement | Select | Full-time, Part-time, Contractor; tailor to your business |
| Status | Select | Draft, Awaiting approval, Approved, Sourcing, Interviewing, Offer pending, Filled, Paused, Cancelled |
| Approval decision | Relation to Decision Log | The formal approval instance |
| Approver | Relation to People, one record | The person with authority to approve this vacancy |
| Candidates | Relation to Candidates | All candidates considered |
| Hiring stages | Relation to Hiring Stages | The interview plan for this vacancy |
| Selected candidate | Relation to Candidates, one record | Filled only after acceptance |
| Onboarding plan | Relation to Onboarding Plans | Created after acceptance |
| Restricted offer reference | URL or text | Link to the approved offer record in the appropriate restricted system |
Make the Role, Hiring manager, Business reason, Target start date, and Approver required in your Vacancy template. A vague request such as “Need another person for support” is not enough to make a good hiring decision.
2. Use your existing decision framework for approval
You already built a Decision Rights Catalog and Decision Log. Add a decision type such as Open vacancy to the catalog.
For a growth hire, the decision record might look like this:
| Decision-right field | Example |
|---|---|
| Decision | Approve a Customer Experience Associate vacancy |
| Driver | Customer Experience Lead |
| Approver | Founder / GM |
| Contributors | Operations & Finance Manager, Fulfillment Lead |
| Evidence | Open-case volume, response-time performance, projected payroll cost, seasonal demand |
| Decision outcome | Approved for a part-time hire starting before the holiday campaign |
| Linked vacancy | VAC-2026-04 |
The vacancy remains Awaiting approval until the Decision Log records an outcome. Do not let a “Yes” in a chat message become the only record of a payroll commitment.
3. Create a minimal Candidates database
Use one Candidate record per person per vacancy. At your current scale, a candidate who applies for two distinct roles can have two records, each connected to the relevant vacancy. This keeps the evaluation tied to the actual job being considered.
| Property | Type | Purpose |
|---|---|---|
| Candidate reference | Title | Use a clear name only in the restricted workspace |
| Vacancy | Relation to Vacancies, one record | Which approved role they are being considered for |
| Current stage | Select | Applied, Screen, Work sample, Hiring manager interview, Team interview, Decision pending, Offer, Hired, Rejected, Withdrawn |
| Process owner | Relation to People, one record | Keeps communication and progress moving |
| Application source | Select | Referral, careers page, agency, direct outreach, other |
| Candidate-system link | URL | Link to the application or ATS record |
| Interview evaluations | Relation to Interview Evaluations | Evidence from each completed stage |
| Recommendation | Select | Advance, Hold, Do not advance, Finalist |
| Final decision | Relation to Decision Log | The hire/no-hire decision for a finalist |
| Offer status | Select | Not applicable, Preparing, Sent, Accepted, Declined, Expired |
| Proposed start date | Date | Populate only after acceptance |
A candidate’s Current stage is a coordination signal. It is not the evidence behind a decision. That evidence belongs in structured interview evaluations.
Make each interview stage purposeful and owned
Small companies often make two opposite mistakes:
- Everyone casually interviews the candidate, asking overlapping questions.
- One manager makes a decision from instinct after an unstructured conversation.
A lightweight middle ground is to decide, before sourcing begins:
- What must this person be able to do?
- Which stage tests each capability?
- Who owns that stage?
- What evidence should they record?
- Who makes the final hiring decision?
For a Customer Experience Associate, do not use a generic “culture fit” interview. You need evidence relevant to the role: clear customer writing, calm judgment under an escalation, ability to learn product information, comfort with e-commerce tools, and reliable handoffs to fulfillment.
Create a Hiring Stages database
A Hiring Stage is a planned step for one vacancy, not an individual candidate’s result. Create a new record from a template whenever a vacancy becomes approved.
| Property | Type | Purpose |
|---|---|---|
| Stage | Title | Example: “Customer Experience Associate — Team interview” |
| Vacancy | Relation to Vacancies | The hiring process this stage belongs to |
| Sequence | Number | The intended order |
| Stage type | Select | Screen, Work sample, Hiring manager interview, Team interview, Reference check, Final decision |
| Purpose | Text | What this stage is meant to learn |
| Responsible interviewer | Relation to People | One person accountable for running it |
| Additional interviewers | Relation to People | Include only people with a defined contribution |
| Evaluation criteria | Text or page content | The questions and evidence expected |
| Required | Checkbox | Whether a candidate must complete it to be considered |
| Evaluation records | Relation to Interview Evaluations | Completed candidate-stage evaluations |
For a small company, use no more than three or four genuine assessment stages for most roles. An appropriate plan for the Customer Experience Associate might be:
| Sequence | Stage | Owner | What it establishes |
|---|---|---|---|
| 1 | Initial screen | People & Operations owner | Availability, practical requirements, relevant experience, candidate questions |
| 2 | Short written customer-response exercise | Customer Experience Lead | Clarity, tone, reasoning, and escalation judgment |
| 3 | Hiring-manager interview | Customer Experience Lead | Role-specific experience, working approach, expectations |
| 4 | Cross-functional conversation | Fulfillment & Inventory Lead | Quality of handoffs, understanding of delivery and stock problems |
| 5 | Final decision | Founder/GM | Confirmation of evidence, constraints, and hiring decision |
Do not create a work sample simply because it sounds rigorous. Use it only if it resembles real job work, is reasonable in size, and does not produce unpaid work that the business will use. Local employment laws vary, so obtain appropriate local advice when setting hiring and pre-start practices.
Create the Interview Evaluations database
This database creates accountability after an interview. One record represents one candidate’s evaluation for one stage.
| Property | Type | Purpose |
|---|---|---|
| Evaluation title | Title | Example: “Candidate A — Customer-response exercise” |
| Candidate | Relation to Candidates | The person evaluated |
| Hiring stage | Relation to Hiring Stages | The planned stage and its purpose |
| Interviewer | Relation to People, one record | The person submitting this evaluation |
| Interview date | Date | When the interaction occurred |
| Status | Select | Scheduled, Completed, Scorecard due, Submitted, Cancelled |
| Evidence and notes | Page content | Role-relevant observations and examples |
| Criteria ratings | Number/select fields or page content | Ratings against defined criteria |
| Recommendation | Select | Advance, Hold, Do not advance |
| Concerns to test | Text | Specific unresolved questions for the next stage |
| Submitted date | Date | Enables a view for missing feedback |
Use a scorecard template inside each evaluation page:
## Evidence against the role criteria

### Criterion 1: [for example, clear written customer communication]
Evidence:
Rating:
Reason for rating:

### Criterion 2: [for example, judgment in an order-delay escalation]
Evidence:
Rating:
Reason for rating:

### Criterion 3: [for example, cross-team handoffs]
Evidence:
Rating:
Reason for rating:

## Recommendation

- [Advance / Hold / Do not advance]
- Evidence supporting this recommendation:
- Specific question the next stage should test:
The rule is simple: record observable evidence, not labels.
“Candidate explained how they would verify carrier status before promising a delivery date, then described when they would escalate a stock discrepancy” is useful evidence.
“Great personality,” “not our type,” or “seems too quiet” is not useful evidence. It also risks turning preference or bias into a hiring criterion.
Turn the final choice into a recorded hiring decision
When a finalist completes the required stages, the hiring manager should summarize the evidence and open a Hire candidate decision in your existing Decision Log.
The hiring manager is usually the Driver. The Founder/GM is often the Approver in a small company, because the decision commits the company to pay, management capacity, and access to systems. Other interviewers contribute evidence; they do not each have an independent veto unless your decision-right policy explicitly gives them one.
Add these relations to your Decision Log if you have not already done so:
| New property | Type | Purpose |
|---|---|---|
| Decision type | Select | Include Hire candidate |
| Related vacancy | Relation to Vacancies | Which approved vacancy is being filled |
| Candidate | Relation to Candidates | The candidate under consideration |
| Evidence summary | Page content | Concise synthesis of scorecards, not copied interview transcripts |
| Offer approval status | Select | Not needed, Preparing, Approved, Sent, Accepted, Declined |
A concise decision record could state:
Decision: Hire Candidate A for VAC-2026-04, Customer Experience Associate.
Evidence: Strong written exercise; demonstrated a disciplined approach to delivery-delay cases; cross-functional interviewer confirmed clear escalation thinking.
Known development need: Limited experience with the company’s helpdesk and inventory tools.
Mitigation: Include tool training and supervised ticket review in the first-week checklist.
Approver outcome: Approved, subject to accepted written offer and completion of required employment steps.
Notice the distinction: a development need is not automatically a rejection reason. It may become a specific onboarding responsibility.
Keep compensation, contracts, required employment documents, and sensitive offer details in the restricted HR/payroll process. In Notion, record only what the wider workflow needs: whether the offer has been approved, sent, accepted, declined, and the intended start date.
Make onboarding a role-based handoff
Offer acceptance is the point where recruiting becomes an operations workflow. The company is no longer deciding whether to hire; it is preparing the person to do useful work safely and confidently.
The most reliable design has two connected parts:
- A role-level access and onboarding template, defined once.
- A person-specific onboarding plan, created for each accepted hire.
Add onboarding relationships to the Role Directory
Extend each Role record with:
| Property | Type | Purpose |
|---|---|---|
| Default access requirements | Relation to Access Requirements | The systems and access levels normally needed for this role |
| Default onboarding template | Relation to Onboarding Task Templates | The standard first-week tasks for the role |
| Onboarding owner | Relation to People or Role | Usually the direct manager |
| Buddy role | Relation to Roles | A colleague who helps with practical questions |
| First-week success outcome | Text | What the new person should be able to do by Friday |
For the Customer Experience Associate role, the first-week success outcome might be:
“Can independently resolve standard delivery-status and order-change cases using the support workflow, and knows when to escalate stock, carrier, refund, or product-quality issues.”
That is more useful than “Complete onboarding.” It describes a visible operating capability.
Create an Access Requirements database
An access requirement describes what a role normally needs. It is not proof that someone has actually been granted access.
| Property | Type | Purpose |
|---|---|---|
| Access requirement | Title | Example: “Customer Experience Associate — Helpdesk standard access” |
| Role | Relation to Roles | The role that needs this access |
| System | Select or relation | Email suite, helpdesk, Notion, Shopify, inventory system, shared drive |
| Access level | Select | View, Standard user, Editor, Admin; tailor to the system |
| Business reason | Text | Why the role needs this access |
| System owner | Relation to People | Person responsible for granting or verifying access |
| Approval needed | Checkbox | Whether an additional owner must authorize it |
| Default | Checkbox | Whether it should be provisioned for every person in the role |
A Customer Experience Associate may need standard access to the helpdesk, order lookup, approved customer-response documentation, and a limited view of relevant order information. They should not receive administrator access to the payment gateway simply because they may need to help a customer with a refund question.
This is the practical version of least privilege: give only the access required to do the role, at the lowest sensible level.
Employee Onboarding Checklist [Steps & Best Practices] | Atlassian
Read Atlassian’s “Employee Onboarding Checklist” for a clear division between preparation before arrival, first-day orientation, and first-week role integration. Use it as a checklist of responsibilities, not as a reason to add unnecessary paperwork to Notion.
In “Employee onboarding checklist,” read the pre-arrival preparation guidance. Focus on the idea that workspace, equipment, and accounts should be ready before the person needs them. Next, in “First-day activities,” read the first-day sequence. Then continue through “First-week integration,” reading the role-specific integration practices. As you read, separate company-owned preparation from the new hire’s paid, on-the-job learning.
Create Onboarding Plans and Onboarding Tasks
Create an Onboarding Plans database. Each record represents one accepted hire’s coordinated first-week plan.
| Property | Type | Purpose |
|---|---|---|
| Onboarding plan | Title | Example: “Candidate A — Customer Experience onboarding” |
| New hire | Relation to People | Create a restricted People record with status Pre-start after acceptance |
| Role | Relation to Roles | Pulls in the approved role context |
| Vacancy | Relation to Vacancies | Preserves the reason this hire exists |
| Hiring decision | Relation to Decision Log | Connects acceptance to the approved decision |
| Manager | Relation to People | Accountable for role integration |
| Buddy | Relation to People | Day-to-day practical support |
| Start date | Date | Drives due dates |
| Status | Select | Preparing, Pre-start ready, Week one active, Complete, Blocked |
| Access tasks | Relation to Onboarding Tasks | Provisioning and verification work |
| First-week tasks | Relation to Onboarding Tasks | Role, people, and workflow integration work |
| Readiness check | Formula or select | Ready, At risk, Blocked |
Then create Onboarding Tasks. Use this database temporarily for onboarding-specific work; in the next module, you will build a company-wide task system and can connect or migrate these records without losing their relations.
| Property | Type | Purpose |
|---|---|---|
| Task | Title | A verifiable action |
| Onboarding plan | Relation to Onboarding Plans | The person and start date it supports |
| Task category | Select | Access, Equipment, HR/payroll, Welcome, Role training, First-week outcome |
| Owner | Relation to People, one record | The person accountable for completion |
| Due date | Date | Usually relative to the start date |
| Status | Select | Not started, In progress, Waiting, Done, Not applicable |
| Access requirement | Relation to Access Requirements | Use for access-related tasks |
| Completion evidence | Text or URL | Confirmation, ticket link, or short note |
| Blocked reason | Text | What is preventing completion |
For every accepted hire, create tasks from the role’s access requirements and default onboarding template. This can be done manually with a Notion template at first. Because hiring is infrequent in a small company, a consistent manual process is better than a fragile automation.
The video below demonstrates why onboarding preparation should include account provisioning, a clear task list, and eventual offboarding controls—not merely an orientation meeting.
Best Employee Onboarding Process for Small Businesses
Watch the selected parts of Layla at ProcessDriven’s “Best Employee Onboarding Process for Small Businesses.” The tool examples are not the point; focus on the operational idea that multiple people can prepare a new hire in parallel, while the actual system of record retains responsibility for access and employment setup.
Watch checklist and access controls for the relationship between onboarding tasks, account setup, and later offboarding security. Then watch first day and reviews for an example of manager meetings, buddy support, and checking progress against expectations set during hiring. Adapt only the first-week portion now; longer 30-, 60-, and 90-day reviews are beyond this lesson.
Use a first-week checklist that creates operating capability
A good first-week checklist has multiple owners. The manager should not be expected to set up email accounts; the system owner should not be expected to teach the role’s customer-service judgment.
For a new Customer Experience Associate, create a Customer Experience first-week template with tasks such as these:
| Timing | Task | Owner | Completion evidence |
|---|---|---|---|
| Before start | Confirm employment and payroll setup in the HR/payroll system | People & Operations owner | Restricted system confirmation |
| Before start | Create company email and helpdesk access at the approved level | System owner | Account active and access tested |
| Before start | Prepare device, workspace, or remote-equipment delivery | Operations owner | Equipment received or ready |
| Before start | Send first-day agenda and introduce buddy | Hiring manager | Calendar invitation and message sent |
| Day 1 | Welcome, team introductions, role purpose, and reporting line | Hiring manager | Meeting completed |
| Day 1 | Review company handbook, policies, and required agreements | People & Operations owner | Required acknowledgement completed in the correct system |
| Day 1 | Explain the order-to-support operating flow and escalation paths | Customer Experience Lead | New hire can identify the right escalation owner |
| Days 2–3 | Read and practice the support SOPs for delivery delays, address changes, refunds, and stockouts | Buddy and new hire | Guided case review completed |
| Days 3–4 | Shadow real customer cases and draft responses for review | Buddy | Feedback recorded |
| Day 5 | Handle a small set of standard cases under supervision | Customer Experience Lead | Quality check completed |
| Day 5 | Hold first-week check-in against the role’s success outcome | Hiring manager | Next learning priorities recorded |
A useful checklist task describes an outcome that can be checked. “Train on customer service” is vague. “Complete two supervised delayed-shipment cases using the documented escalation process” is observable.
Create one readiness view before the start date
On your People Operations home page, create a linked view called Starting Soon — Readiness:
- Filter Onboarding Plans to start dates within the next 14 days.
- Show only plans where Status is Preparing, Pre-start ready, or Blocked.
- Display open access tasks, equipment tasks, manager, buddy, and blocked reason.
- Sort by start date.
The manager should review this view at least several business days before a start date. If the hire begins Monday but cannot access email, the helpdesk, or the documented support process until Wednesday, that is not a new-hire failure; it is a failed company handoff.
Also create these practical operational views:
- Vacancies awaiting approval: Status is Awaiting approval.
- Interview scorecards due: Evaluation Status is Completed or Scorecard due.
- Finalists awaiting decision: Candidate stage is Decision pending.
- Offers awaiting response: Offer status is Sent.
- My onboarding tasks: Owner is the current person and task is not Done or Not applicable.
- Access at risk: Start date is approaching and an Access task remains open.
Build and test the workflow in one pass
Build this system in the following order:
- Extend the existing Role Directory with default access requirements, onboarding template, onboarding owner, buddy role, and first-week success outcome.
- Create Vacancies and link each vacancy to exactly one approved Role record and its approval decision.
- Add Candidates, Hiring Stages, and Interview Evaluations so each stage has a purpose, owner, and evidence record.
- Extend the Decision Log with related vacancy and candidate relations for final hire/no-hire decisions.
- Create Access Requirements and define the least-privilege access profile for one role first.
- Create Onboarding Plans and Onboarding Tasks, then build a role-specific onboarding template.
- Create the six operational views above.
- Test the workflow with one realistic scenario: the company approves a replacement Customer Experience Associate, selects a finalist, the offer is accepted, helpdesk access is delayed, and the manager must see and resolve the resulting readiness risk before day one.
Do not attempt to automate everything initially. First prove that each handoff has one clear owner, a visible due date, and completion evidence. Once the workflow works manually, automations can remove repetitive creation work without hiding accountability.
Key takeaways
A lightweight hire-to-onboard workflow makes hiring an accountable company process rather than a set of disconnected conversations.
- A Role defines an ongoing job; a Vacancy requests permission to fill it now.
- Every vacancy should link to an approved role, business reason, hiring manager, approver, and decision record.
- Hiring stages should have a specific purpose, named interviewer, and structured evidence—not overlapping informal conversations.
- Interview scorecards should document role-relevant facts and reasoning, not vague impressions or personal assumptions.
- The final hiring choice belongs in the existing Decision Log, linked to the candidate and vacancy.
- After offer acceptance, create a person-specific onboarding plan from the role’s access and first-week templates.
- Notion coordinates preparation and accountability; HR/payroll and access-management systems remain authoritative for sensitive personal data and actual permissions.
- A first-week checklist should produce a concrete ability to perform the role’s basic work, not merely a list of orientation activities.
You have now completed the foundational operating layer for the company: workflows, data ownership, roles, decision rights, cadence, and lightweight people operations. In the next module, you will begin coordinating longer-lived work by building a project portfolio that connects company initiatives to objectives, owners, timelines, status, and expected results.