Recommended resources
The freely available resources this lesson will direct you to.
Hello! Let's continue our journey into making web pages dynamic.
In our last lesson, we learned how to select any HTML element on a page using document.querySelector() and document.querySelectorAll(). This is the essential first step—finding the element you want to work with. Now, we'll move on to the second step: changing what that element displays.
This lesson addresses the learning outcome: Modify element content using textContent for plain text and innerHTML to render HTML tags, while understanding the security risks of innerHTML.
We will cover two primary ways to change an element's content, explore when to use each, and, crucially, discuss an important security consideration that every front-end developer must understand.
1. Modifying Plain Text with textContent
The simplest and safest way to change the content of an element is by using the textContent property. This property allows you to get or set the raw text inside an element, ignoring any HTML markup.
Imagine you've selected a heading and want to update its text after a user action.
HTML:
<h1 id="welcome-message">Hello, Guest!</h1>
JavaScript:
// First, we select the element, just like in the last lesson.
const welcomeMessage = document.querySelector('#welcome-message');

// Now, we change its text content.
welcomeMessage.textContent = 'Welcome back, Alex!';
After this code runs, the browser will display "Welcome back, Alex!".
If you try to include HTML tags in the string, textContent will treat them as literal text, not as instructions for the browser.
// The <strong> tags will be displayed as text, not rendered as bold.
welcomeMessage.textContent = 'Welcome back, <strong>Alex</strong>!';
The output would literally be: Welcome back, <strong>Alex</strong>!
This behavior makes textContent the perfect choice when you are working with plain text, especially text that might come from a user, like their name or a comment they've written.
2. Rendering HTML with innerHTML
Sometimes, you need to insert content that includes HTML styling, like making a word bold or adding a link. For this, you can use the innerHTML property. This property gets or sets the entire HTML content—tags and all—inside an element.
Let's use the same example but with innerHTML:
JavaScript:
const welcomeMessage = document.querySelector('#welcome-message');

// The browser will now parse and render the <strong> tag.
welcomeMessage.innerHTML = 'Welcome back, <strong>Alex</strong>!';
This time, the browser will render the <strong> tag, and the output will be: "Welcome back, Alex!".
This is very powerful, as it allows you to dynamically construct and insert complex HTML structures using JavaScript. However, this power comes with a significant responsibility.
3. Comparing the Methods and Understanding the Risks
To see these concepts in action and to get an introduction to the security implications, let's watch a short video.
Learn DOM Manipulation In 18 Minutes
This video from Web Dev Simplified clearly demonstrates the differences between textContent and innerHTML. It also introduces the security problem with innerHTML and shows a safer alternative for building HTML programmatically.
Watch from 03:59 to 09:38. Pay close attention to: The difference in output when setting content with textContent vs. innerHTML. The security warning about user-generated content. The alternative method shown at the end using createElement and append.
4. A Deeper Look at innerHTML and Security
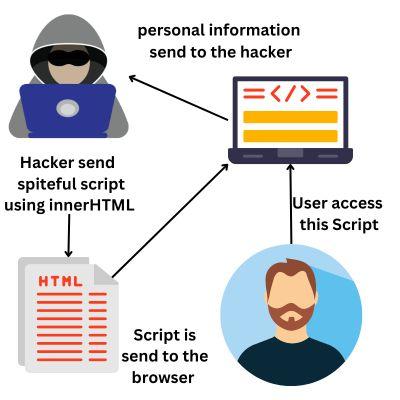
As the video mentioned, using innerHTML with content you don't trust is a major security risk. This is because if a user can input text that you then place into innerHTML, they can inject their own HTML, including <script> tags. This is called a Cross-Site Scripting (XSS) attack.
Imagine a comment section on a website. A malicious user could submit a comment like this:<script>/* code to steal other users' data */</script>
If your application takes this comment and inserts it into the page using innerHTML, the browser will execute that script.
The diagram below illustrates how an attacker can exploit this vulnerability to steal a user's personal information.
A more subtle attack could use an image tag's onerror event, which runs JavaScript if the image fails to load:<img src="x" onerror="alert('You have been hacked!');">
If this string is set via innerHTML, the browser will try to load an image from "x", fail, and then run the malicious code in the onerror attribute.
The Golden Rule:
Never use innerHTML to set content that originates from a user or any untrusted source. Always use textContent for user-provided strings. If you need to build HTML structures based on user input, use the safer createElement method shown in the video, which we will explore more in a future lesson.
For a solid textual summary of these concepts, you can review the following article.
innerHTML vs innerText vs textContent
This freeCodeCamp article, "innerHTML vs innerText vs textContent", provides a clear, written explanation of the properties we've discussed. It's a great reference to reinforce your understanding.
Read the sections titled "What is the innerHTML Property?", "What is the textContent Property?", "How to Update Content...", and especially "Security Concerns When Using innerHTML". This will solidify the differences and the critical security points.
5. Your Turn: Updating a User Profile
Let's put this into practice. Imagine you're building a feature to update a user's profile information on the screen.
Here is the starting HTML for a simple profile display:
<!DOCTYPE html>
<html lang="en">
<head>
    <meta charset="UTF-8">
    <title>Dynamic Profile</title>
</head>
<body>

    <h1>User Profile</h1>
    <div id="profile">
        <p>Name: <span id="user-name">Alex</span></p>
        <p>Status: <span id="user-status">Inactive</span></p>
    </div>

    <button id="update-button">Mark as Active</button>

    <script>
        // Your JavaScript code will go here
    </script>

</body>
</html>
Your Task:
- Copy the HTML above into a file and open it in your browser.
- Inside the
<script>tag, write JavaScript code to perform the following updates when the "Mark as Active" button is notionally clicked (for now, you can just write the code to run immediately).
a. Select thespanwith the IDuser-name. Change its content to your own name usingtextContent.
b. Select thespanwith the IDuser-status. Change its content to display the word "Active" in bold green text. You will need to useinnerHTMLfor this. The HTML string should be<strong style="color: green;">Active</strong>. - Use
console.log()to inspect thetextContentandinnerHTMLof the#profilediv after you've made the changes. Notice the difference.
Bonus Question: Why would it be a bad idea to create a text field where a user can type their own status, and then display that status using innerHTML?
Click here to see the solution
// Select the elements
const nameSpan = document.querySelector('#user-name');
const statusSpan = document.querySelector('#user-status');
const profileDiv = document.querySelector('#profile');

// a. Update the name using textContent
nameSpan.textContent = 'Your Name'; // Replace with your actual name

// b. Update the status using innerHTML to render HTML tags
statusSpan.innerHTML = '<strong style="color: green;">Active</strong>';

// 3. Log the results to the console
console.log('Profile div textContent:', profileDiv.textContent);
console.log('Profile div innerHTML:', profileDiv.innerHTML);

/*
Bonus Question Answer:
It would be a bad idea because a user could type malicious code into the text field.
For example, they could type `<script>alert('xss')</script>`. If you then set
statusSpan.innerHTML to this user-provided string, the browser would execute
the script, creating a security vulnerability.
*/
Conclusion
Great job! You've now learned how to dynamically change the content of your web pages, a core skill in front-end development.
Key Takeaways:
- Use
textContentto safely insert or modify plain text. It treats all input as literal text. - Use
innerHTMLwhen you, the developer, need to insert content that includes HTML tags. - Never use
innerHTMLwith content from untrusted sources (like user input) to prevent Cross-Site Scripting (XSS) attacks. - The safe way to build complex HTML from dynamic data is to create elements programmatically, which we'll cover in more detail soon.
In our next lesson, we will learn how to "Dynamically alter element attributes". Now that we can select elements and change their content, we'll see how to modify their attributes, such as changing an image's source (src), a link's destination (href), or toggling a button's disabled state.