Recommended resources
The freely available resources this lesson will direct you to.
- Visual Studio Code (Mac) - Setting up a Python Development Environment and Complete Overviewwww.youtube.com
- How To Create & Activate A Virtual Environment In Visual Studio Code (Python 3.12)www.youtube.com
- Getting Started with Python in VS Codecode.visualstudio.com
- Python environments in VS Codecode.visualstudio.com
Hello! This first week is about getting comfortable writing and running small Python programs. By the end of the week, you’ll put those skills together in a command-line unit converter. Today’s goal is narrower: set up a working Python project on your Mac, run a file in VS Code, and confirm that it uses a project-specific virtual environment.
Allow roughly 40–50 minutes. Downloads may add time if VS Code or Python is not installed yet. Everything needed for this lesson is free.
The three pieces you need
VS Code is where you edit files. Its Python extension adds features for working with Python, but it does not install Python itself. A Python interpreter is the program that executes your code. Keeping those roles separate makes setup problems much easier to diagnose.
For a visual introduction, watch these short portions of Corey Schafer’s Visual Studio Code (Mac) — Setting up a Python Development Environment and Complete Overview. The interface in the video is older than today’s VS Code, so follow the current instructions below when buttons or menus differ.
Visual Studio Code (Mac) - Setting up a Python Development Environment and Complete Overview
Corey Schafer demonstrates installing VS Code and its Python extension on a Mac, then opening a folder and running a Python file.
Watch installing VS Code to identify the correct application. Then watch the Python extension and a first run. Focus on the distinction between opening a project folder, editing a .py file, and seeing its output in the terminal. You do not need to reproduce the video's sample program.
Next, use the macOS instructions in VS Code’s Getting Started with Python in VS Code to check your interpreter. In particular, the guide recommends an installation separate from the Python supplied with macOS.
Getting Started with Python in VS Code
Read the official VS Code guide’s macOS installation advice so you can distinguish an installed interpreter from the editor.
Under “Install a Python interpreter,” find the “macOS” subsection. Read the macOS guidance. Then, below “Other options,” find the note beginning “To verify that you've installed Python successfully” and read the version check. Focus only on the macOS command.
Open Terminal on your Mac and enter:
python3 --version
If it reports a Python 3 version you installed separately, you can continue. If Python is unavailable, the guide recommends Homebrew: check whether brew --version works, and, if it does, run brew install python3. If Homebrew is not installed, use the Homebrew link in the guide’s macOS subsection for its installation instructions first. After installing Python, open a fresh terminal and repeat python3 --version.
Install the Python extension in VS Code if it is not already installed: open the Extensions view, search for Python, and choose the extension published by Microsoft. You do not need a separate “run code” extension.
Give the project its own environment
A project begins with a folder, which VS Code calls a workspace when you open it. Create a folder called python-first-project somewhere convenient, then use File > Open Folder… in VS Code to open that folder. Check that its name appears in the Explorer sidebar before continuing.
A virtual environment is a Python installation associated with this project. Later, when projects need different packages, their environments will keep those packages separate. The folder commonly named .venv holds this environment; it is not where you write your own program.
Read the workspace and environment instructions in the same VS Code guide:
Getting Started with Python in VS Code
These sections show how to open a project folder and create a virtual environment inside it using VS Code.
Read “Start VS Code in a workspace folder,” from the workspace explanation through the File > Open Folder alternative. Then read “Create a virtual environment,” from the environment explanation. Continue to the sentence beginning “Ensure your new environment is selected” immediately after it. Use the folder-opening option rather than the guide’s code terminal command if that is simpler.
With your project folder open:
- Press Shift–Command–P to open VS Code’s Command Palette.
- Search for Python: Create Environment. Choose Venv, then choose the Python 3 interpreter you installed. If prompted for a name, use
.venv. - Wait for a
.venvfolder to appear in the project Explorer. - Run Python: Select Interpreter from the Command Palette and choose the interpreter whose path contains your project’s
.venvfolder. Depending on your VS Code layout, you may also be able to select it using the Python version shown in the Status Bar.
If Python: Create Environment is unavailable, first confirm that the Python extension is installed and that the folder, not just an individual file, is open. As an alternative, open VS Code’s integrated terminal with Terminal > New Terminal and run python3 -m venv .venv from the project folder. Then use Python: Select Interpreter to choose the new .venv interpreter.
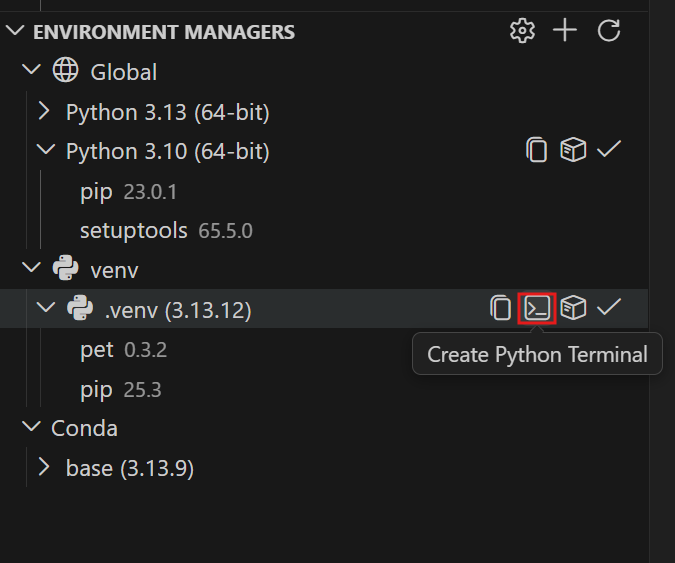
Some VS Code installations also show an Environment Managers panel. The highlighted terminal button in the image below opens a terminal using an environment that already exists; it does not create the environment.
Write, run, and verify your first program
In the Explorer sidebar, create a new file inside python-first-project named hello.py. The .py ending tells VS Code it is a Python source file. Enter this code exactly, with each statement on its own line:
import sys

print("Hello from my Python project!")
print("Interpreter:", sys.executable)
print displays text in the terminal. The second line of output will show the path of the interpreter that actually ran the file; you do not need to understand import yet.
The VS Code guide shows where to create a file and how to run it:
Getting Started with Python in VS Code
Use the official guide to locate VS Code’s New File control and Run Python File button. Use the program printed in this lesson rather than copying the guide’s example.
In “Create a Python source code file,” read from the file creation instructions through the explanation of the .py extension. In “Run Python code,” find the paragraph beginning “Click the Run Python File play button”; read how the run works. Focus on where the program’s output appears.
Save with Command–S, then click Run Python File near the top right of the editor. You should see a greeting and an interpreter path in the terminal panel. Your key success check: that path should include python-first-project/.venv/bin/python (possibly with additional characters after python). Your own folder path and Python version will differ.
If the greeting appears but the path does not contain .venv, the program ran, but not with the intended interpreter. Select the .venv interpreter again, open a new terminal if necessary, and rerun the file. You can also run it explicitly from the project folder in the integrated terminal:
./.venv/bin/python hello.py
That command names the environment’s interpreter directly, so it does not depend on terminal activation. If you change the greeting to “Hello, unit converter project!”, save and rerun; seeing the new text confirms that you are executing your latest saved file.
If something does not work
Most first-run issues come down to three checks:
- “Python not found” or no interpreter listed: repeat
python3 --versionin a fresh terminal. The VS Code extension alone does not supply Python. - No
.venvin the project folder: verify you opened the intended folder, then retry Python: Create Environment. Creating the environment and selecting it are separate checks. - Output is missing or unchanged: save
hello.py, make sure that file is the active editor tab, and look in the terminal panel, not the editor, for its output.
You are finished when you have a saved hello.py, can rerun it in VS Code, and can see .venv in the reported interpreter path. That gives you a reliable starting point for the rest of the course: in the next lesson, you’ll replace the fixed greeting with calculations using Python values and operators.