Recommended resources
The freely available resources this lesson will direct you to.

Hello! Welcome to the final lesson in our "Prototyping and Fit Refinement" module.
In our last session, you conducted a fitting with your muslin top, meticulously pinning and marking all the adjustments needed for a perfect fit. You now have a three-dimensional prototype that captures your unique shape and design preferences. This lesson is about translating that information back into the two-dimensional world of your paper pattern. It's the critical step where your prototype informs the final blueprint, ensuring all your hard work during the fitting is permanently recorded.
By the end of this lesson, you will have transferred all the fit adjustments from your muslin back to your paper pattern pieces, creating a finalized, custom-fit pattern that is ready for your fashion fabric.
1. Preparation: Documenting and Deconstructing Your Muslin
Before you can transfer any changes, you need to make sure your pinned adjustments are clearly and permanently marked. Think of this as documenting the results of your user testing before iterating on a design. Once you start removing pins, it's easy to lose track of the precise changes.
First, grab a fine-tip permanent marker.

On your pinned muslin, carefully draw along the new seamlines that the pins have created. If you've pinched out a dart or fullness, mark the fold line and where the excess fabric meets. This creates a clear visual guide that will remain after you remove the pins.
The video below provides a good demonstration of this process.
How to Transfer Fit Adjustments to the Pattern
Watch this segment from J Stern Designs' video, "How to Transfer Fit Adjustments to the Pattern."
Focus on the part from marking the pinned lines, where the presenter uses a marker to draw along the pin lines before taking them out. This is the first essential step.
Once everything is marked, carefully remove all the pins and deconstruct your muslin by taking apart the seams. Press each piece flat. You now have a set of marked-up fabric pieces that represent your perfected pattern.
2. The Transfer: From Muslin to Paper
Now it's time to transfer these new lines from your muslin pieces to your original paper pattern pieces. The most straightforward method is to lay the fabric piece directly onto the corresponding paper piece, align them carefully, and trace the new lines.
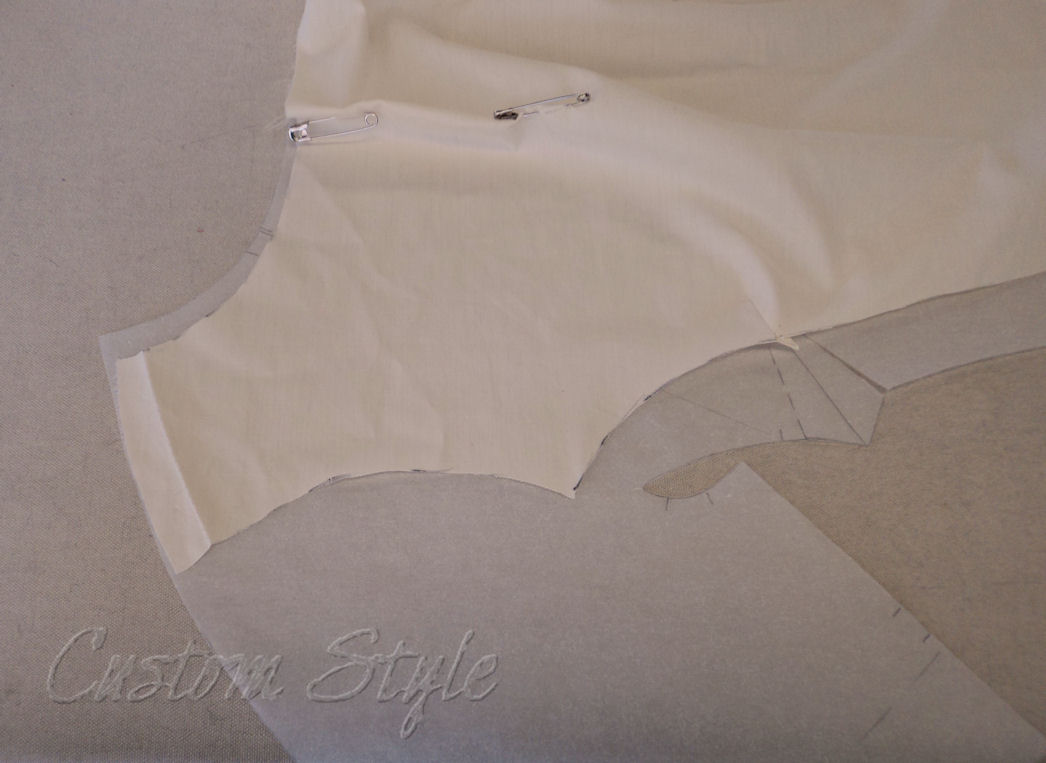
The process involves aligning key points—like the center front/back, grainline, and any unchanged notches—and then transferring the new lines you drew. A great walkthrough of this process is available in an article from Threads Magazine.
From Muslin to Pattern, Step by Step - Threads Magazine
This article provides a comprehensive, step-by-step guide to transferring your adjustments.
Read the section "Transfer muslin changes to the pattern," starting from step 1 through the beginning of step 6. This covers marking, disassembling the muslin, aligning it with the pattern, and marking all the changes. Pay close attention to the list of items to mark in step 4.
For a visual demonstration, particularly relevant for your princess seams, the J Stern Designs video shows this process in action.
How to Transfer Fit Adjustments to the Pattern
This video demonstrates the tracing method clearly.
Watch the segment from tracing the side front to see how the presenter aligns the muslin over the paper and traces the new curve. Then, watch the next segment from tracing the center front for another example.
3. Refining the Lines: Truing the Pattern
After tracing from the muslin, your new lines on the paper pattern might be a bit wobbly or made of disconnected marks. The next step is to "true" these lines, turning them into smooth, elegant curves and crisp straight lines. This is where patternmaking rulers, like a French curve, are invaluable. You are essentially refining the raw data into a polished, functional design.
The goal is to connect the dots you've transferred in a way that creates a smooth, continuous line, averaging out any minor inconsistencies.
From Muslin to Pattern, Step by Step - Threads Magazine
The Threads Magazine article has excellent visual examples of this process.
Focus on the sections "Complete the front changes" and "Complete the back changes." You don't need to follow the specific dart rotations shown, but observe steps 11-16, which demonstrate how to use a ruler to connect tick marks and create smooth, symmetrical dart legs and side seams. The principle is the same for your princess seams.
When refining your princess seam curves, ensure the curve is a continuous, flowing line. There should be no sharp angles or abrupt changes in direction, except at intentional design points.
4. Verification: Walking the Seams
This is the crucial quality control step. Before you declare the pattern final, you must ensure that the seams that will be sewn together are the same length. This is called "walking the seams."
You will need to check:
- The front side seam against the back side seam.
- The Center Front panel's princess seam against the Side Front panel's princess seam.
- The Center Back panel's princess seam against the Side Back panel's princess seam.
- The front strap/shoulder seam against the back strap/shoulder seam.
To do this, you place the pattern pieces next to each other and "walk" them, pivoting at key points to follow the curves.
From Muslin to Pattern, Step by Step - Threads Magazine
Let's return to the Threads Magazine article for a clear explanation of this verification step.
Read the section "Walk and true the seamlines." Pay attention to how the pattern pieces are aligned at a starting point (like the hem or a notch) and pivoted to check for length discrepancies, as shown in steps 31-34.
If you find a discrepancy:
- For small differences (e.g., less than 0.5 cm), you can often split the difference or slightly shorten the longer piece.
- For larger differences, you'll need to re-evaluate your tracing and truing to find the error.
This step prevents surprises during construction, like finding out your side front panel is 2 cm longer than your center front panel where they are supposed to join.
5. Finalizing Your Master Pattern
Once you have transferred, trued, and verified all your pattern pieces, you are ready for the final steps:
- Redraw Seam Allowances: Your adjustments were made to the stitching lines. Now, you must accurately add your chosen seam allowance (e.g., 1.5 cm) outside of your new, final stitching lines to create the new cutting lines.
- Add Notches: Add notches to your princess seams (especially at the bust point) and side seams. This will be critical for aligning the pieces correctly when you sew. Ensure the notches on corresponding pieces match perfectly.
- Label Everything: Clearly label each piece (e.g., "Center Front," "Side Back"), add the grainline, and mark any "cut on fold" instructions. Add your name and the date—this is your custom block!
- Cut Out: Carefully cut out your final paper pattern pieces along the new cutting lines.
You can get a sense of this final verification and adjustment process in the video below. While the example is complex, focus on the principle of checking and re-checking.
Garment Fitting Explained: A Complete Guide To Correcting Your Pattern!
This video from Susan Elias Couture demonstrates the rigorous process of checking and finalizing a pattern.
Watch the segment on checking shoulder and side seams from checking the pieces. Then, see how measurements are verified against the body from checking measurements. This gives you an idea of the level of precision involved in final pattern checks.
Finally, trust your work. As the Custom Style blog post wisely notes, altered patterns can look "strangely curving" on paper but will hang correctly on your body. You've used a prototype to create a pattern customized perfectly for you.
Conclusion
Congratulations! You have successfully completed the crucial feedback loop of prototyping. You've taken the abstract concept of "fit," captured it in a physical muslin, and translated it back into a precise, repeatable paper pattern. This finalized pattern is no longer a generic template; it's a blueprint tailored to you.
Key Takeaways:
- Mark First: Always create permanent markings on your muslin before removing pins.
- Transfer Accurately: Use your muslin pieces as templates to trace new lines onto your paper pattern.
- True the Lines: Refine your traced lines into smooth, sewable curves and straight edges using rulers.
- Walk to Verify: Check that adjoining seam lengths match by "walking" your pattern pieces against each other.
- Finalize and Label: Add seam allowances, notches, and clear labels to complete your master pattern.
In our next lesson, we will move on to the exciting and slightly nerve-wracking part: laying out your perfected pattern and cutting into your final fashion fabric.