Recommended resources
The freely available resources this lesson will direct you to.
Hello! Last lesson, you saw that Kubernetes controllers can keep working toward a desired state after the command that set it has finished. Now you need a cluster where you can observe that behavior. In this lesson, you’ll create a local, single-node Kubernetes cluster with kind and verify that kubectl can reach it. This will be the lab environment for the rest of the course.
Plan on roughly 40 minutes, including downloads and hands-on checks. The commands below assume a Linux shell, which fits your RHEL experience; kind’s guide also provides installation instructions for macOS and Windows.
What kind puts on your machine
kind stands for Kubernetes in Docker. It uses a Docker container as a Kubernetes node. For today’s single-node cluster, expect one node container; the applications you deploy in later lessons will run inside Kubernetes, not as containers you start with docker run.
Watch these two short portions of Kubernetes in Docker (KIND) Tutorial by Abhishek.Veeramalla. The first establishes what kind creates; the second shows the basic create-and-check workflow. Follow the commands in this lesson rather than copying the video’s cluster name.
Kubernetes in Docker (KIND) Tutorial
Watch “Kubernetes in Docker (KIND) Tutorial” by Abhishek.Veeramalla to connect your Docker experience to a local Kubernetes node.
Watch the kind model for the distinction between a Docker node container and a Kubernetes cluster. Then watch cluster creation for the kind create cluster, kind get clusters, and current-context checks. Stop before the application-deployment demonstration.
Docker is already installed on your PC, but kind needs the Docker daemon to be running and accessible. In your terminal, check:
docker info
docker ps
If these fail, start Docker or resolve your user’s access to its daemon before continuing. Run the subsequent kind and kubectl commands as your normal user, not with sudo: doing otherwise can put cluster configuration under a different home directory.
Install the two command-line tools
There are two distinct tools here. kind creates and manages the local cluster. kubectl talks to the Kubernetes API of a cluster. Installing either tool alone does not prove that you have a reachable cluster.
First, consult kind’s official Quick Start. In Installation → Installing From Release Binaries, read the introductory guidance and the command for your operating system. On Linux, choose the download matching your CPU architecture; installing a release binary does not require you to install Go.
Read the kind project’s Quick Start for its binary installation method and platform choices.
In “Installation,” go to “Installing From Release Binaries.” Read the binary guidance, then use the Linux, macOS, or Windows commands immediately below it as appropriate. For Linux, distinguish the AMD64 and ARM64 downloads; you can skip “Installing From Source.”
For example, on Linux x86-64 (uname -m reports x86_64), the release shown in the supplied Quick Start can be installed with:
curl -fLo ./kind https://kind.sigs.k8s.io/dl/v0.32.0/kind-linux-amd64
sudo install -m 0755 ./kind /usr/local/bin/kind
kind version
If uname -m reports aarch64, use the guide’s kind-linux-arm64 download instead. If the live Quick Start shows a newer stable release, use its version in place of the example above.
Next, check whether kubectl is already present:
kubectl version --client
If it is missing on Linux, use the official Install and Set Up kubectl on Linux guide. Read its version-compatibility note and Install kubectl binary with curl on Linux, numbered steps 1–4. Its Verify kubectl configuration section explains why installing the client and connecting it to a cluster are separate checks.
Install and Set Up kubectl on Linux | Kubernetes
Read the Kubernetes documentation for a Linux kubectl installation and the checks you will perform after kind creates your cluster.
Start at “Before you begin” and note the version rule. Under “Install kubectl on Linux → Install kubectl binary with curl on Linux,” follow numbered steps 1–4, from download through client check; select the AMD64 or ARM64 commands for your machine. Finally, under “Verify kubectl configuration,” read the connection check. You can skip the package-manager alternatives and optional shell configuration.
Use the guide’s checksum step before installing a downloaded kubectl binary. If the checksum fails, do not install that file. Once installed, kubectl version --client should print a client version even though no cluster has been created yet.
Create your cluster
The kind Quick Start’s Creating a Cluster section explains the default cluster name, the --name option, and the optional --wait flag. Its Interacting With Your Cluster section explains where kind puts the access configuration that kubectl uses.
Return to kind’s Quick Start for the creation command and the connection it establishes for kubectl.
In “Creating a Cluster,” read from creation through provider choice; focus on --name and --wait rather than selecting a custom node image. In “Interacting With Your Cluster,” read the kubeconfig explanation beginning with the default location. Continue through the named-context examples. You do not need “Loading an Image Into Your Cluster” yet.
Create a cluster named kcna:
kind create cluster --name kcna --wait 5m
The first run may take longer than later runs because Docker may need to download the node image. The --wait 5m option asks kind to wait up to five minutes for its control plane to become ready; it is not a promise that every future workload will be healthy.
The names in the next checks are deliberately different:
kcnais the kind cluster name you supplied.kind-kcnais the kubectl context name kind creates for it.kcna-control-planeis the expected node name in this single-node cluster.
These are names for different things, not three clusters.
Verify both the cluster and your access
Start by asking kind what it manages, then check which context kubectl will use:
kind get clusters
kubectl config current-context
kubectl config get-contexts
kind get clusters should include kcna. The current context should normally be kind-kcna. A context tells kubectl which cluster connection and credentials to use; seeing its name is a configuration check, not yet proof that the API server responds.
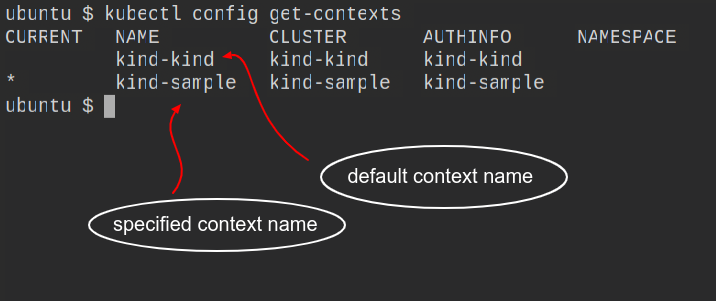
The screenshot below shows a different machine with two contexts. Its asterisk identifies kind-sample as the current context. The label pointing to kind-kind refers to a cluster created with kind’s default name; “default” does not mean it is currently selected.
Now make two requests that must reach the cluster:
kubectl cluster-info --context kind-kcna
kubectl get nodes --context kind-kcna
cluster-info should show a control-plane address. get nodes should list one node, usually kcna-control-plane, with STATUS of Ready. The address and port shown by cluster-info can vary; do not try to match someone else’s output character for character.
Why use --context kind-kcna explicitly? It makes the intended target clear even if another cluster is current. For the remaining labs, you can select this context as the default for subsequent commands:
kubectl config use-context kind-kcna
kubectl config current-context
kubectl get nodes
use-context changes your local selection; get nodes is the check that actually contacts Kubernetes. This distinction matters whenever you have multiple clusters: a command can be syntactically correct and still inspect the wrong one.
Finally, connect the two views of your lab:
docker ps --filter name=kcna-control-plane
You should see the Docker container kind uses as the node. Seeing that container and receiving a Ready node from kubectl confirms more than either observation alone: Docker is hosting the local node, and your client can query the Kubernetes cluster running there.
If a check fails
Keep the failure near the layer it tests:
| Observation | First place to check |
|---|---|
docker info cannot reach the daemon |
Start Docker or fix access to its daemon. |
kind create cluster fails |
Check docker info, available machine resources, and the error printed by kind. |
kind get clusters lists kcna, but kubectl selects another context |
Run kubectl config use-context kind-kcna, or use --context kind-kcna on a query. |
The context exists, but cluster-info reports a refused connection |
Check that Docker is still running and retry the explicit --context kind-kcna query. A saved context alone does not mean its cluster is running. |
kubectl reports no usable configuration |
Check whether you ran kind under a different user or set KUBECONFIG to another file. Without that variable, the usual location is ~/.kube/config. |
If client and server versions differ, compare their minor versions against the compatibility rule in the kubectl installation guide. Do not assume that installing the newest client guarantees compatibility with an older kind node image.
Keep the cluster rather than deleting it: subsequent lessons will use it. If you ever intentionally start over, kind delete cluster --name kcna removes this lab cluster and its contents.
Key takeaways
You created a local Kubernetes cluster with kind, identified its kind-kcna context, and tested access with kubectl cluster-info and kubectl get nodes. Remember the three levels of evidence: a Docker node container exists; a kubectl context names a connection; a successful API query proves the connection works.
Next, you’ll examine how the control plane, node, and workloads relate to one another. Your new cluster will make those components concrete rather than merely diagrammatic.