Recommended resources
The freely available resources this lesson will direct you to.
Hello! Your local API client can now tell a usable response from a timeout, an HTTP error, or malformed data. Before adding more services to the project, it is worth making its current state recoverable. In this lesson, you’ll create a local Git repository, inspect changes, make focused commits, and restore an earlier file version. No GitHub account or AWS access is needed. Allow about 40 minutes.
Git saves chosen versions, not every keystroke
Git records project history in commits. Your files on disk are your working files; staging selects what the next commit will contain. A commit then saves that selection in the repository’s local history. This distinction lets you edit several files but commit only the ones that belong together.
For a quick introduction to why that history matters, watch the opening of Kevin Stratvert’s Git and GitHub Tutorial for Beginners. Focus on Git’s ability to inspect and recover versions; you will not need its GitHub or branching material today.
Git and GitHub Tutorial for Beginners
Kevin Stratvert introduces Git as a way to track file changes and return to earlier versions.
Watch the introduction, especially the example of changing a file and later needing an earlier version. GitHub is a separate hosting service; this lesson stays on your computer.
A useful habit is to ask two questions before each commit: What changed? and Which of those changes should this commit preserve?
Initialize your project safely
Open your existing research-decision-api folder in VS Code. In the integrated PowerShell terminal, confirm that you are in that folder:
Get-Location
git --version
git status
At this point, git status may say that this is not a Git repository. That is expected. Read the local-folder path in VS Code’s Quickstart: use source control in VS Code before initializing it:
Quickstart: use source control in VS Code
Read Microsoft's VS Code guide for the repository setup, change review, staging, and commit controls you will use.
Start at "Option B: Initialize a repository in a local folder" and read the local workflow through "Step 2: Make changes and review" and "Step 3: Stage and commit." Stop before "Step 4: Sync with the server": publishing is not needed here.
In VS Code, open Source Control with Ctrl+Shift+G and choose Initialize Repository. Alternatively, run git init in the project’s terminal. Do one, not both. Then run:
git status
Before staging anything, create a .gitignore file at the project root with these lines:
.venv/
__pycache__/
*.pyc
.env
.env.*
*.log
Your virtual environment is reproducible from requirements.txt; it does not belong in a commit. Environment files may hold credentials, and logs may contain request data. Keep requirements.txt and any safe, intentionally prepared sample data under review rather than ignoring every text or JSON file.
Check what Git sees:
git status --short
git status --short --ignored
The second command helps confirm that .venv and any environment files are ignored. Ignoring a file is not a security guarantee: it does not remove a file already tracked or a secret already committed. Inspect the contents of every file you plan to stage. In particular, do not commit real API keys, sandbox credentials, or secret-bearing sample output.
Make a first, inspectable commit
The Source Control panel separates unstaged Changes from Staged Changes. The illustration shows that division, the commit-message field, and a diff open beside the file list:
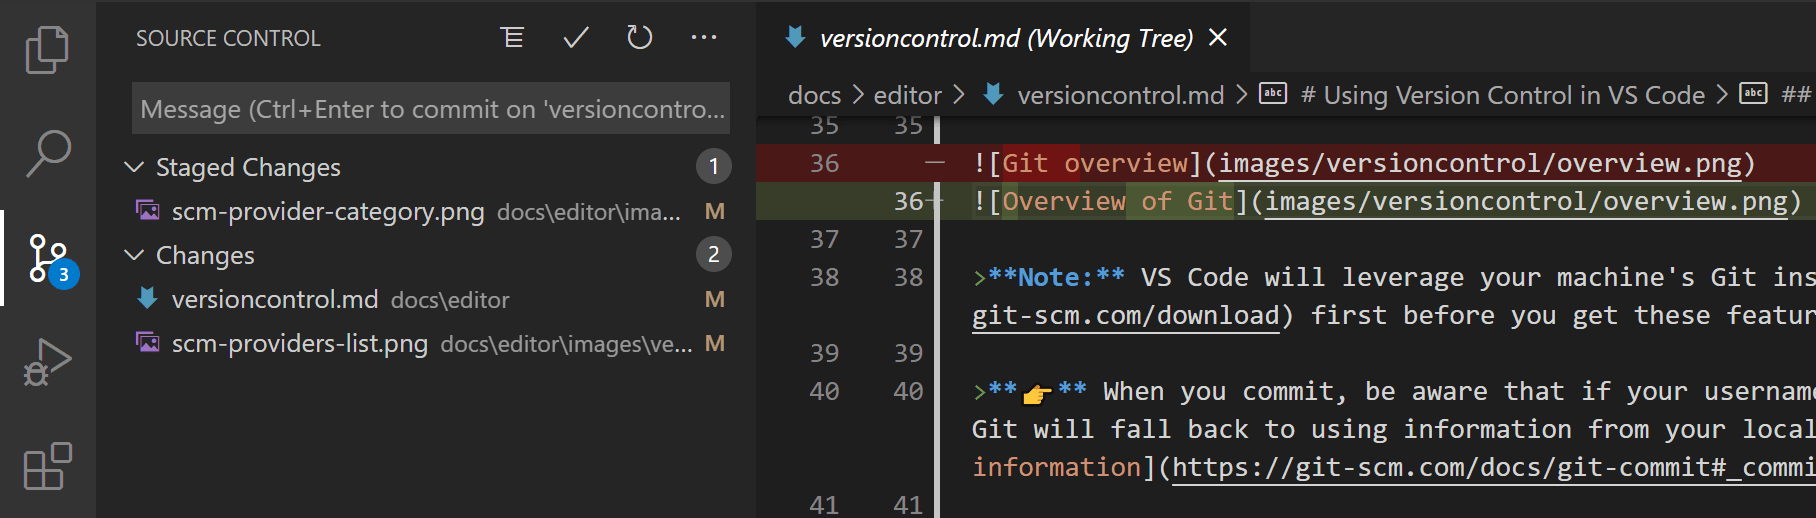
For your first commit, select the project files that are safe to preserve: .gitignore, your Python scripts, requirements.txt, and other files you have inspected. Hover over each file under Changes and use + to stage it. Avoid Stage All until you have checked the entire list.
Now review the selection in the terminal:
git status
git diff --cached
git status identifies what is staged. git diff --cached shows the content selected for the commit; for a new file, it shows the added content. If you spot a file that should not be included, use − beside it under Staged Changes, or run git restore --staged -- path-to-file. Unstaging leaves the file on disk.
Enter a message such as Add local Python API prototype in VS Code’s Source Control message field and select Commit. If Git requests an author identity, set it in the terminal using your own name and email, then try the commit again:
git config user.name "Your Name"
git config user.email "you@example.com"
These commands set the identity for this repository. Finally, verify the result:
git status
git log --oneline -3
A clean status means your tracked files match the new commit. The short log shows the commit you just made. A commit is local: it has not uploaded the project anywhere.
Review a change before saving it
Create or open README.md in the project root. Give it a short description of what currently works—for example, that the project contains a local API-client demonstration and handles several failure cases. If README.md was not in your first commit, create and commit that initial description now with the message Describe local API prototype. You need a committed starting version for the comparison below.
Next, add one sentence to README.md about what the project will build next, and save the file. In Source Control, select README.md under Changes to open its diff. Added lines appear on the new-version side; the original shows what was in the last committed version. In the terminal, you can inspect the same unstaged change with:
git diff -- README.md
Read the VS Code guidance for this review and for discarding an unwanted uncommitted edit:
Staging and committing changes - Visual Studio Code
Use Microsoft's VS Code guide to connect the diff editor with the safe, limited meaning of "Discard Changes."
In "Discard changes," begin with the sentence about reverting a file to its last committed state. Read discard and diff guidance through the opening of "Review changes with the diff editor." Notice that discarding is for work you no longer want to keep.
Stage only README.md, then compare these commands:
git diff -- README.md
git diff --cached -- README.md
git status
After staging, the first diff should show no unstaged README edit, while the cached diff shows what the next commit will include. Commit it with Describe next project step. You have now preserved a second README version without changing your Python code.
Restore deliberately
There are two different recovery situations:
- Uncommitted edit: You changed a tracked file and want to discard that change.
git restore -- README.mdrestores the last committed version in your working files. The discarded edit is not saved by this command, so inspect the diff first. - Earlier committed version: The current file is committed, but you want content from an older commit. Select that earlier version, inspect the resulting change, and commit the restoration if it is the version you want going forward.
Try the second case now. Because you just committed the new README sentence, HEAD means your latest commit and HEAD~1 means the commit immediately before it. Restore only the README working file from that earlier commit:
git restore --source=HEAD~1 -- README.md
git diff -- README.md
git status
The new sentence should disappear, and the diff should show that removal relative to your latest commit. Your latest commit still exists in history: restoring the file has not deleted or rewound it. If you changed your mind, git restore -- README.md would return the working file to the latest committed version. Otherwise, preserve your chosen restoration:
git add README.md
git diff --cached -- README.md
git commit -m "Restore previous README description"
git status
git log --oneline -4
You should finish with a clean status and a log showing the new restoration commit above the earlier commits. Avoid broad commands that reset the entire project while learning: restoring one named file makes the effect easier to predict and review.
What you can now do
You have a local repository for the growing project, a .gitignore for generated and sensitive files, and a repeatable workflow: inspect files, stage a deliberate selection, review its diff, and commit it. You also know the difference between discarding an uncommitted edit and bringing an older committed file version back into your working files.
Next, you’ll begin the local AI research-and-decision API. Your Git history gives you a reliable checkpoint before that larger build starts.