Recommended resources
The freely available resources this lesson will direct you to.
- How to upload the Android app for Internal testing in Google Play Console. Setup Internal Testing.www.youtube.com
- How to Publish an Android App to Google Play | Updated 2024www.youtube.com
- Building And Releasing Your Capacitor Android App - Ionic Blogionic.io
- Capacitor App Store Publishing | Ski... · LobeHublobehub.com
Hello! In our previous lessons, we navigated the iOS distribution process, culminating in distributing your app to both internal and external testers via TestFlight. We'll now shift our focus to the Android ecosystem and replicate that initial testing loop using the Google Play Console.
This lesson will guide you through uploading your signed Android App Bundle (AAB) to an internal testing track. This is the direct equivalent of TestFlight's internal testing and serves as the first crucial step in getting your app into the hands of a small, trusted group for rapid feedback on the Android platform. By the end of this lesson, you'll have a live internal test running on Google Play.
1. Understanding Google Play's Testing Tracks
Just like App Store Connect, the Google Play Console provides several "tracks" to manage your app's release lifecycle. Each track serves a distinct purpose, moving from a small, trusted circle to the general public. Before we dive into the process, it's essential to understand these options.
The LobeHub guide provides a concise summary of the available tracks.
Capacitor App Store Publishing | Ski... · LobeHub
This document provides a great overview of app store publishing. We'll use its summary of release tracks.
Find the table under the heading "Release Tracks". Pay attention to the "Purpose" and "Testers" count for each track.
As you can see, Internal testing is the ideal starting point. Its key advantages are:
- Speed: New builds are available to testers almost instantly (within minutes), bypassing the lengthy review process required for other tracks.
- Control: You limit access to a small group of up to 100 testers that you explicitly define.
- Safety: It's a completely private distribution. The app is not discoverable on the Play Store by the general public.
This makes it perfect for initial quality assurance, developer testing, and ensuring the core functionality works on a range of real Android devices before a wider release.
2. Setting Up Your Internal Test
Before you can upload a build, you must configure the internal testing track by defining who is allowed to test your app. This involves creating one or more email lists.
The video below from iRekha Tech Solutions provides an excellent walkthrough of this entire process. We will refer to it throughout this lesson.
How to upload the Android app for Internal testing in Google Play Console. Setup Internal Testing.
This video focuses specifically on the internal testing workflow in the Google Play Console.
First, watch the segment from go to your Google Play console. This will show you exactly where to navigate and how to create your first email list for testers.
To summarize the steps shown in the video:
- In the Google Play Console, navigate to your app.
- In the left-hand menu, scroll down to the "Release" section and select Testing > Internal testing.
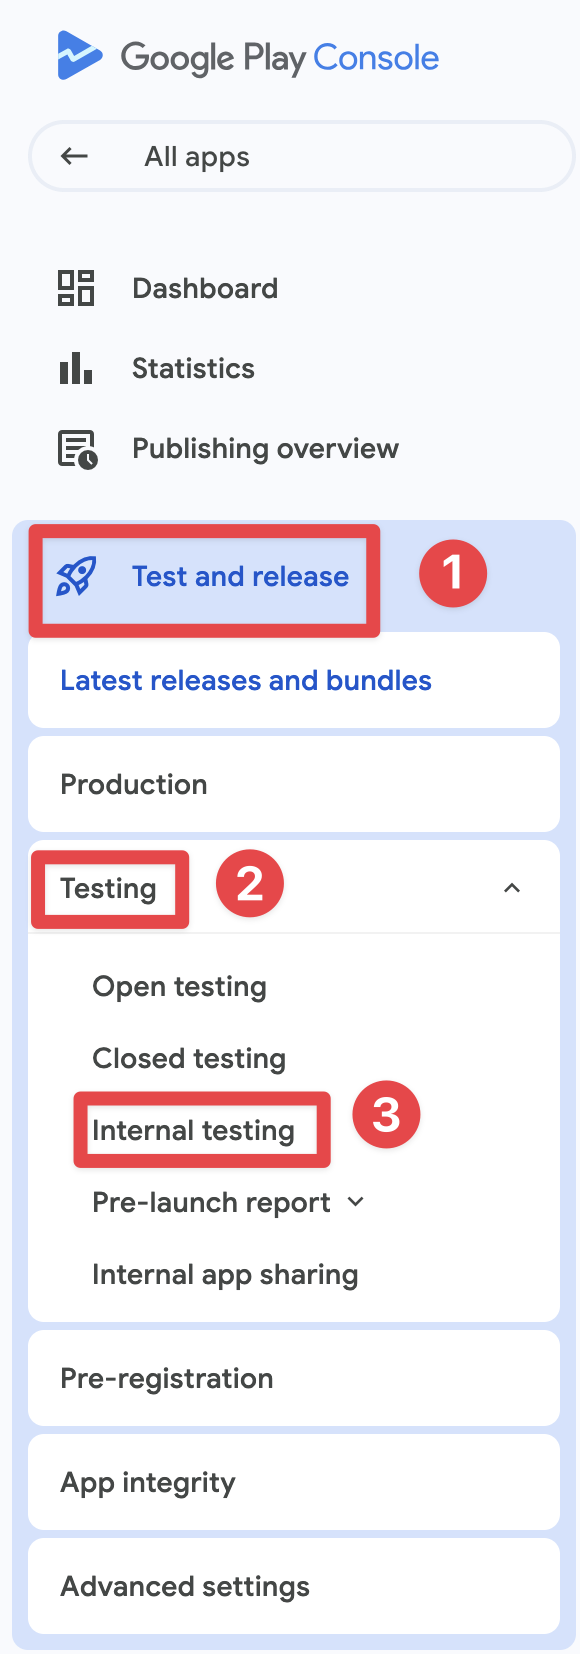
- If you haven't used this track before, you'll first be prompted to select testers. Go to the Testers tab.
- Click Create email list to define a new group of testers. Give the list a name (e.g., "Dev Team," "QA") and add the Google account email addresses of your testers, separated by commas. You can also upload a
.csvfile. - Save the list. You must check the box next to your newly created list to make it active for this track.
3. Creating a Release and Uploading the AAB
With your tester list in place, you are now ready to create a release and upload the signed AAB file that you configured in our previous Android module.
Let's continue with the iRekha Tech Solutions video, which demonstrates this step clearly.
How to upload the Android app for Internal testing in Google Play Console. Setup Internal Testing.
This next segment of the video shows the core action of creating the release.
Watch from the next step is creating. This part covers clicking "Create new release", uploading the AAB file, adding release notes, and starting the rollout.
This is the main screen for managing your internal release.
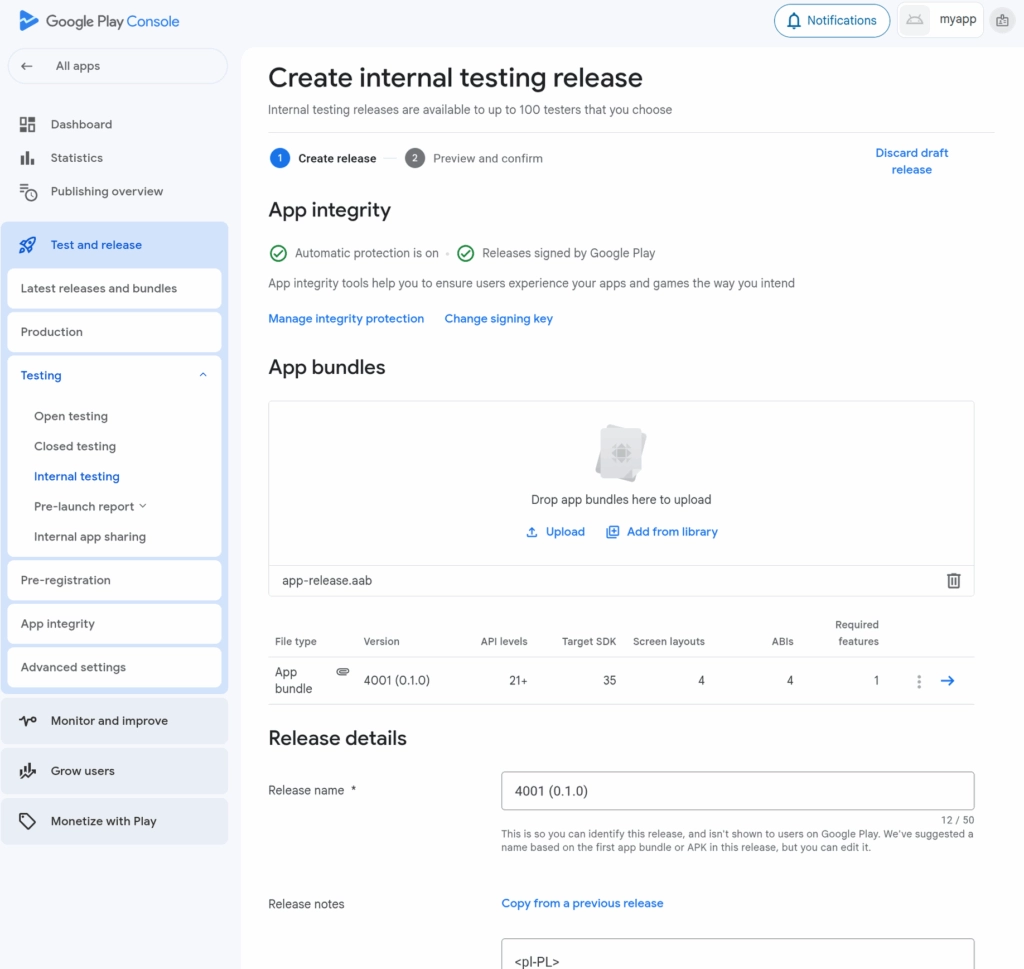
The process is as follows:
- Navigate to the Releases tab within the Internal Testing section.
- Click Create new release.
- In the "App bundles" section, drag-and-drop your signed
app-release.aabfile. This is the file generated by thecd android && ./gradlew bundleReleasecommand. - Google will upload and process the AAB, automatically extracting information like the
versionCode,versionName, and SDK level. - While it uploads, set a Release name. This is for your own reference (e.g., "1.0.1-internal"). It often defaults to the version name.
- Fill in the Release notes. This is the equivalent of TestFlight's "What to Test" field. Describe the changes in this build for your testers.
- Once the upload is complete, click Save, then Review release, and finally Start rollout to internal testing.
Because this is the internal track, the build will become available to your testers almost immediately.
4. The Tester Experience and the Opt-In Link
Once the build is rolled out, your testers won't automatically get a notification. You need to provide them with a special opt-in link.
- In the Internal testing > Testers tab, you will find a Copy link button. This is the master link for your internal test.
- Share this link with the testers on your email list.
When a tester opens the link, they will be guided through accepting the invitation. However, there's a common "gotcha" that can confuse even experienced developers. Let's watch the final segment of the video to understand it and its solution.
How to upload the Android app for Internal testing in Google Play Console. Setup Internal Testing.
This final clip is crucial as it demonstrates the process from the tester's perspective and highlights a common issue.
Watch from now the last step. Pay close attention to the part where the production version is shown initially and how clearing the Google Play Store's cache is used to solve it.
As the video shows, after accepting the invite, the tester clicks the "Download it on Google Play" link. Sometimes, the Play Store app will show the publicly available version of the app (if one exists) or an older version, not the new internal build. This is due to caching.
The most reliable fix for your testers is to have them:
- Close the Play Store app.
- Go to their device's Settings > Apps > Google Play Store > Storage & cache.
- Tap Clear cache.
- Re-open the opt-in link to get to the correct internal version.
This is a critical piece of information to provide to your testers to avoid confusion.
A Note on New Google Play Developer Requirements
It is important to be aware of a recent policy change from Google. For personal developer accounts created after November 13, 2023, there is a new mandatory testing requirement.
How to Publish an Android App to Google Play | Updated 2024
This video on publishing an app highlights a critical new requirement for developers.
Watch the segment from so if you created. This explains the new rule about needing 20 testers for 14 days.
To be clear: this requirement applies to closed testing, not the internal testing we are doing today. You must run a closed test with at least 20 opted-in testers for 14 consecutive days before you can apply to release your app to production.
The internal testing track we've just set up is the perfect precursor to this. You can use it to ensure your app is stable and ready for that larger, mandatory closed test.
Conclusion
Congratulations! You have successfully uploaded your first Android build to a private, internal testing track. This is a fundamental skill in the Android release workflow, enabling you to get rapid feedback from your core team.
Here are the key takeaways:
- The Internal testing track in Google Play is designed for fast, review-free distribution to up to 100 trusted testers.
- The process involves creating an email list of testers, creating a new release, uploading your signed AAB, and starting the rollout.
- Testers must use a special opt-in link to access the build, and may need to clear their Play Store cache to see the correct version.
- This internal testing step is a prerequisite for preparing for Google's mandatory closed testing requirements for new developer accounts.
In our next lesson, we will build on this foundation. We will learn how to promote a build from the internal track to the closed and open testing tracks, which involves a formal app review and allows you to gather feedback from a much wider audience.