Recommended resources
The freely available resources this lesson will direct you to.

Welcome back. In the previous lesson, we transformed Serum's macro knobs from simple controls into powerful, purpose-driven performance tools. You learned to group related parameters to create expressive transformations like "Energy" or "Grit," a key technique for adding life to a static patch.
Today, we'll dive into another fundamental technique for expressive performance: pitch modulation. Specifically, we will focus on configuring portamento, or "glide," to create the smooth, energetic, and often vocal-like slides between notes that are a hallmark of artists you're interested in, like Fox Stevenson. Mastering this will allow you to break free from rigid, quantized melodies and inject a fluid, dynamic character into your leads.
1. The Foundation: Monophonic Voicing and Legato
Before we can make notes slide, we need to tell Serum how to handle multiple notes being played. For portamento to work as we intend, the synthesizer must be in a monophonic state, meaning it can only play one note at a time. This is the absolute prerequisite for creating classic glide effects.
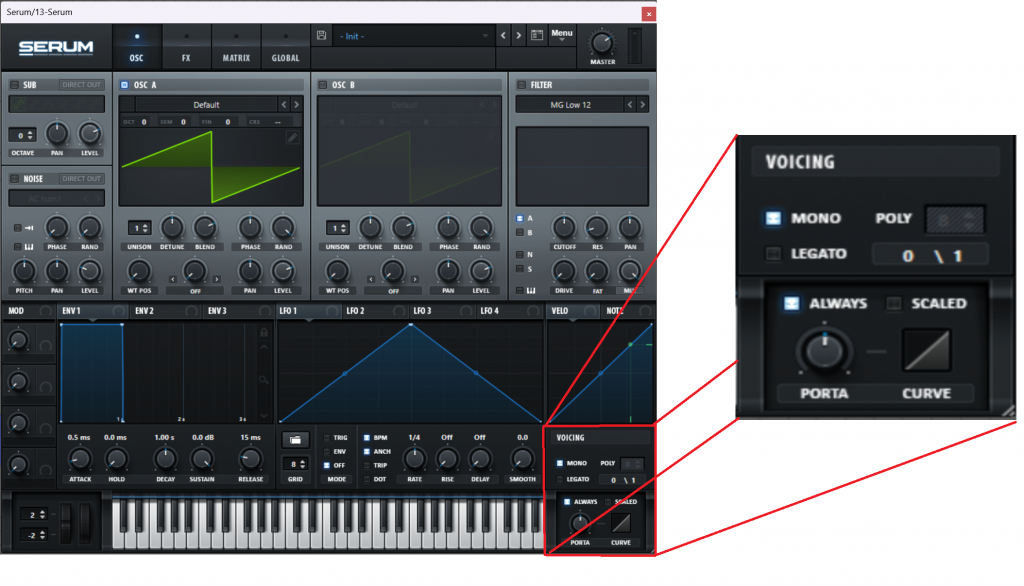
When a patch is monophonic, playing a new note while another is held forces the synth to re-pitch the existing voice to the new note. This is where the concept of a smooth "glide" comes from. There are two key settings here:
- Mono: This switch enables monophonic mode.
- Legato: This switch is only active in Mono mode. When enabled, it prevents the envelopes and LFOs from re-triggering when you play a new, overlapping note. This is crucial for a smooth slide. Without Legato, each new note would restart the amplitude and filter envelopes, creating a "machine gun" effect instead of a seamless glide. For the expressive leads we're aiming for, you will almost always want
MonoandLegatoenabled.
The brief article from Production Music Live, "10 Xfer Serum Tips," provides a concise summary of this setup.
10 Xfer Serum Tips - Making Custom LFO Shapes
Read section 6, "Lead Voicing Controls," for a quick-start guide to setting up a gliding lead.
This section reinforces the roles of the MONO, LEGATO, and ALWAYS controls as the foundational setup for creating portamento effects.
2. Configuring the Glide: Time, Curve, and Behavior
With the voicing set correctly, we can now shape the glide itself using the Portamento controls. These settings determine the speed, character, and trigger conditions of the pitch slide.
The Core Parameters: Time and Triggering
First, you need to decide how long the glide should take and when it should happen. A quick demonstration from the producer Acolyte shows a simple, practical application of setting the portamento time and using overlapping MIDI notes to trigger it.
How To: OOKAY Xfer Serum Lead | Acolyte
This video, "How To: OOKAY Xfer Serum Lead," shows a very direct use of portamento to add energy to a lead.
Watch from the voicing tab. Notice how the producer sets a very short portamento time (22ms) and uses overlapping notes in the piano roll to create a quick, punchy "scoop" into the target note.
This demonstrates the most fundamental aspect of portamento: the Porta (Time) knob controls the duration of the slide. However, Serum offers much deeper control over the glide's behavior.
The following video from Icon Collective provides an excellent, in-depth explanation of all of Serum's portamento features. It's the most comprehensive guide to understanding not just what the controls do, but why you would use them for musical expression.
Xfer Serum | Voice and Portamento (7/12)
This video, "Xfer Serum | Voice and Portamento," is a detailed masterclass on the subject.
Watch the following segments carefully: Portamento Time (portamento section): This covers the basic function of the time knob. The Curve (curve feature): This is crucial. Pay close attention to how a convex curve (pulling the slider up) creates a more "organic" feel by starting the pitch slide fast and slowing down as it nears the destination. This is a key ingredient for expressive, non-linear glides. The 'Scaled' Switch (scaled switch): This is another vital tool for musicality. It makes the glide time relative to the musical interval. A small jump (e.g., a semitone) will be quick, while a large jump (an octave) will be slower, making the glide feel more consistent and natural across a melody. The 'Always' Switch (always switch): This explains the difference between needing overlapping notes to trigger a glide versus having it happen on every new note. For precise DnB lead programming, Always is usually left off.
To consolidate this knowledge, you can also refer to the official Serum manual, which provides a clear textual description of these controls.
[PDF] Serum Manual - Amazon S3
Read the subsection "Portamento Settings" for a technical reference on each control.
You can find this on page 38, just below the main "Voicing Settings." Focus on the descriptions for the Porta time Knob, Porta Curve Control, 'Always' switch, and 'Scaled' switch to solidify your understanding from the video.
3. Practical Synthesis: Crafting an Expressive Glide
Now, let's connect these controls to the goal: creating smooth, energetic slides like those heard in Fox Stevenson's music. The signature sound is not just about turning on portamento; it's a combination of specific settings and intentional MIDI programming.
Here’s a practical approach to dial in this style:
- Initialize a Patch: Start with a basic saw wave.
- Set Voicing: Enable
MonoandLegato. - Set Initial Portamento: Start with
Porta Timearound 80-150ms. This is slow enough to be clearly audible for tweaking. - Enable 'Scaled': Turn on the
Scaledswitch. This is almost always desirable for melodic leads, as it ensures glides feel natural regardless of the interval. - Shape the Curve: Adjust the
Porta Curveto be slightly convex (drag the handle up). This will give you that characteristic of starting the slide quickly and then easing into the final note, which sounds more organic and less robotic. - Program MIDI: In your DAW's piano roll, write a simple melody. Now, create an overlap: drag the end of one note so it extends past the beginning of the next. Play it back. You should hear a smooth glide.
- Refine Time: Now, adjust the
Porta Timeto fit the tempo and energy of your track. For high-energy DnB, shorter times (e.g., 30-80ms) often work best. They provide the "swoop" effect without making the melody sound sluggish or out of tune.
By manipulating these four key elements—Time, Scaled, Curve, and MIDI note overlap—you have complete control over the energy and character of your lead's pitch slides.
Conclusion
You have now mastered one of the most important tools for creating expressive, modern synthesizer leads. You understand not only how to enable glide, but how to meticulously shape its behavior to serve a musical purpose.
Key Takeaways:
- Foundation First: Portamento in Serum requires setting the voicing to
Monoand usually enablingLegatofor a smooth effect. - Time is Speed: The
Portaknob sets the duration of the glide. This must be tailored to the tempo and melodic context. - Musicality through Scaling: The
Scaledswitch makes glide time proportional to the pitch interval, resulting in more natural-sounding melodic performance. - Character through Curve: The
Porta Curveis your tool for adding expression. A convex curve creates an organic, "easing" effect that is highly desirable for vocal-like leads. - Control via MIDI: Ultimately, glide is triggered by overlapping notes in your piano roll. Your performance is defined by where you choose to create these overlaps.
In the next lesson, we will continue exploring expressive pitch modulation by focusing on vibrato. You'll learn how to use an LFO, assigned via the Mod Matrix, to add subtle or dramatic pitch movement to sustained notes, further enhancing the human, performative quality of your leads.