Recommended resources
The freely available resources this lesson will direct you to.
Hello! This is the first lesson in a course that begins with Go’s language and tools, then builds toward applications and services. Today’s goal is to get a small module working end to end: create it, build and run it, format it, check it with go vet, and test it. You do not need to know Go syntax beforehand; we will use only enough code to make each tool’s job visible.
Allow about 40 minutes, including time to type and run the examples.
A module is the workspace; a package is the code inside it
Every Go source file belongs to a package. A module groups one or more packages under a module path and records their Go version and dependencies in go.mod. For now, your module will contain just one package. Later, you will split larger programs into packages when there is a reason to do so.
Watch the setup portion of Learn GO Fast: Full Tutorial by Alex Mux. Focus on the relationship between go.mod, package main, and the commands used to build and run a program. We will use a simpler directory layout than the video.
Watch the setup portion of Learn GO Fast: Full Tutorial by Alex Mux for a visual walkthrough of a first Go module.
Watch module setup, from checking the Go installation through building and running the first program. Notice that go mod init creates go.mod, while a main function in package main provides the program's entry point.
The official Tutorial: Create a Go module makes the module/package distinction precise and explains what the initialization command records.
Read the opening of “Start a module that others can use” in the Go documentation to connect the directory you create with its module path.
In “Start a module that others can use,” read module setup: begin with the explanation before step 1 and stop at the end of step 3, after the explanation of go.mod. Focus on why a module path is more than a nickname. You can leave the tutorial's greetings.go example for another time; we will build a small executable below.
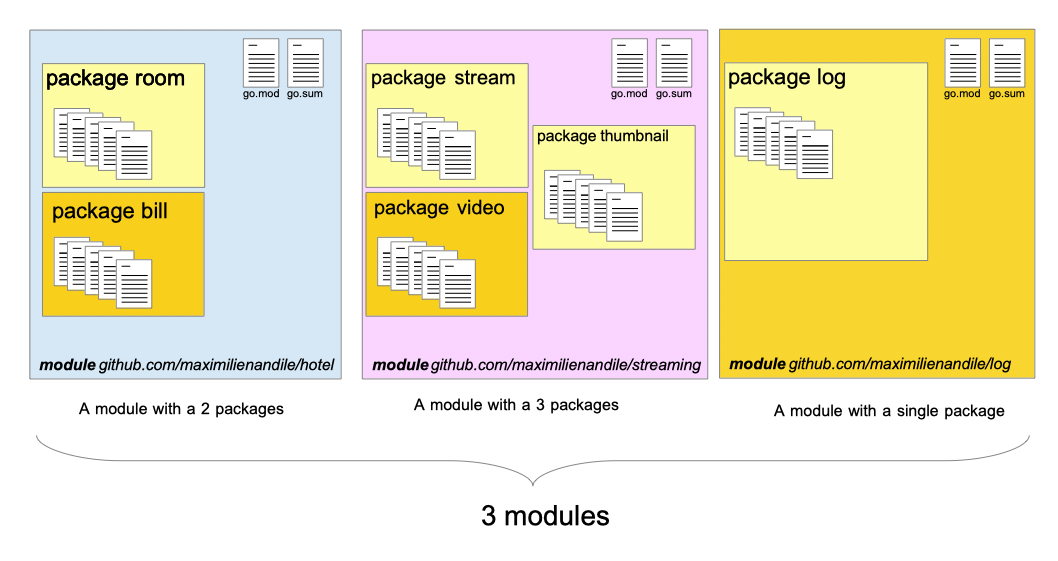
A path such as example.com/greeter is suitable for this local learning example. If you later publish a module, its path should correspond to a location from which Go users can obtain it.
Create and run your first module
First, open a terminal and check that Go is available:
go version
If that command is unavailable, install Go before continuing. Then create a directory and initialize a module inside it:
mkdir greeter
cd greeter
go mod init example.com/greeter
You should now have a go.mod file. It declares the module path and a Go version; it does not contain your program. Create a file named main.go in the same directory:
package main

import "fmt"

func greet(name string) string {
	return "Hello, " + name + "!"
}

func main() {
	fmt.Println(greet("Go"))
}
The first line assigns the file to package main. The main function is where this executable starts. fmt is a standard-library package used here to print a line; greet is an ordinary function that returns a string. We will examine function declarations more closely in a later lesson.
From the directory containing go.mod, run:
go run .
The . means “the package in the current directory.” You should see:
Hello, Go!
go run . builds and runs the program without leaving an executable in your project directory. To build an executable you can run again, use:
go build .
Because the directory is named greeter, this creates a greeter executable (or greeter.exe on Windows). Run it with ./greeter on macOS or Linux, or .\greeter.exe on Windows. The output should be the same.
That distinction is useful: go run . runs the program; go build . produces an executable. Neither command runs your tests.
Format and inspect the code
Go has a standard source format, so you do not need to make many spacing decisions by hand. From the module directory, run:
go fmt ./...
The pattern ./... selects packages in the current directory and its subdirectories. At present there is only one package. If your editor saved main.go in a different layout, this command reformats it; if it was already formatted, there may be nothing to report.
Next run:
go vet ./...
go vet examines packages for suspicious constructs that may be mistakes, such as certain mismatches between formatting verbs and values passed to printing functions. It is not a proof that the program is correct. A successful vet check may produce no output; an error message is a prompt to inspect the reported file and line.
These tools answer different questions. Formatting makes source layout consistent. Building checks whether the program compiles. Vetting looks for selected likely mistakes. To check whether the program behaves as intended, you need a test.
Add and run a test
Go recognizes tests by convention: put them in files ending in _test.go, and write functions whose names begin with Test and that accept *testing.T. Read the conventions and command walkthrough in Add a test before creating your own.
Read Add a test in the Go documentation to see how a test file, a test function, and go test fit together.
In “Add a test,” read test-file conventions through step 1. Skim the pasted code in step 2, then read test execution through step 3. The tutorial's Hello function has a different signature from our greet function, so use the test below rather than copying its sample test.
Create main_test.go beside main.go:
package main

import "testing"

func TestGreet(t *testing.T) {
	got := greet("Go")
	want := "Hello, Go!"

	if got != want {
		t.Errorf("greet(%q) = %q; want %q", "Go", got, want)
	}
}
The test calls greet, compares the result with the expected string, and reports a failure through t.Errorf if they differ. Both files declare package main, so the test can call the unexported greet function directly. The %q formatting verb prints quoted strings, making differences easier to spot in a failure message.
Run all tests in the module’s packages:
go test ./...
You should see a line ending in ok for example.com/greeter. For a more detailed view that names each test, run go test -v ./....
You now have a short routine you can repeat after a change:
go fmt ./...
go vet ./...
go test ./...
go build .
If a command fails, read its file and line number before moving on. A failed build points to code Go cannot compile; a failed test means code compiled but did not meet a checked expectation. You will not see a go.sum file in this example unless dependencies that require checksums are added later.
Takeaways
You created a module with go mod init, placed an executable main package inside it, and used the standard toolchain to run, build, format, vet, and test it. The important habit is to treat these as complementary checks, not interchangeable commands.
Next, we will look inside Go source code more closely: declarations, constants, zero values, and conversions. That will give you more control over what programs like this one can express.