Recommended resources
The freely available resources this lesson will direct you to.
- Setup Python Using Visual Studio Code On Mac | VSCode Python | Python Mac | Python 3www.youtube.com
- How to Run Python in Visual Studio Code on Mac OS Big Sur Apple Macbook M1www.youtube.com
- Getting Started with Python in VS Codecode.visualstudio.com
- Running Python code in Visual Studio Codecode.visualstudio.com
Hello. In the previous lesson, you learned to establish your location with pwd, inspect folders with ls, and move through paths with cd. You will use exactly those skills now to make a small, real Python project folder.
By the end of this lesson, you will be able to create a Python file in VS Code, edit its contents, save it, and run it from a terminal. This is the basic development loop behind every later automation: change the program, run it, inspect what happened, then change it again.
The three tools that work together
A Python script is a plain-text file containing Python instructions. Its filename ends in .py, such as hello_agent.py.
Three separate tools collaborate:
- VS Code is where you create and edit the file.
- The Python extension in VS Code adds Python-aware features, including syntax coloring and convenient Run commands.
- The Python interpreter is the program that actually reads and executes your
.pyfile.
VS Code does not itself “understand” how to execute Python without an interpreter. The extension helps VS Code locate and use that interpreter.
Getting Started with Python in VS Code
Read Microsoft’s overview before setting up your first script. It clarifies which part is the editor, which part provides Python support in VS Code, and which part truly runs your code.
In “Understand the Python setup,” read the tool overview. Then, in “Install a Python interpreter,” read the macOS guidance and verification note, from the macOS installation guidance. Focus on the distinction between an editor and an interpreter.
Readiness check
Open the macOS Terminal app and run:
python3 --version
A successful result looks broadly like this:
Python 3.x.x
The exact version number is not important yet. What matters is that the command begins with Python 3.
Next, open VS Code and check the Extensions view in the left sidebar. Search for Python and ensure the extension is installed from the publisher Microsoft.
If python3 is not found and you already have Homebrew installed, the Microsoft guide’s macOS command is:
brew install python3
After installing Python, close and reopen Terminal before repeating:
python3 --version
Your M1 MacBook Air has more than enough capacity for VS Code and ordinary Python scripts. Later, when working with language models, you will be more deliberate about memory use; for now, this setup is lightweight.
Create a project folder from Terminal
Rather than scattering scripts around the Desktop, keep them in a project folder. This small organizational habit pays off when a project eventually contains data files, configuration, tests, and documentation.
In Terminal, enter these commands one at a time:
cd ~
mkdir -p agent_builder/first_script
cd agent_builder/first_script
pwd
You should see a path similar to:
/Users/your-short-username/agent_builder/first_script
Here is what the unfamiliar command did:
mkdirmeans “make directory.”-ppermits Terminal to create the missing parent folders,agent_builderandfirst_script, in one command.- Running the same command again is safe: it does not erase or overwrite existing files.
cdmoved you into the folder where this first script will live.
Confirm that it is currently empty:
ls
No output is normal for a new, empty directory.
Open the folder as a VS Code workspace
A workspace is the folder VS Code has opened as the home for a project. Opening a folder rather than a random untitled file helps VS Code, the terminal, and you agree on where the project lives.
Use either method:
- In VS Code, choose File > Open Folder..., then select
agent_builder/first_scriptin your home folder. - Or, if the
codecommand has already been configured on your Mac, run this from thefirst_scriptfolder:
code .
The dot means “the current directory,” exactly as in the navigation lesson. If code . reports that the command is not found, simply use File > Open Folder.... Nothing is wrong with Python.
Once the folder is open, look at VS Code’s Explorer panel on the left. It should show the folder name first_script.
Create and edit your first script
In the Explorer panel, select the New File icon. Name the file:
hello_agent.py
The .py ending is important. It tells VS Code that the file contains Python, so it can enable Python-specific support.
Type this code into the editor:
print("Hello from my first Python script.")
print("I am learning to build dependable automations.")
Then save it with Command-S.
For now, read each print(...) line as an instruction that tells Python to display the text between the quotation marks. We will examine text, variables, and Python data types carefully in the next lessons; this lesson is about the edit-and-run workflow.
Before running anything, check the Python interpreter selection in VS Code:
- Look at the bottom status bar, usually toward the right.
- If you see a Python version, VS Code has selected an interpreter.
- If it says Select Interpreter, click it and choose the current Python 3 installation.
A selected interpreter makes VS Code’s Run command predictable. You can always bypass the VS Code button and call python3 yourself in a terminal, but having both point to the same interpreter avoids confusion.
Run the script in the integrated terminal
Open VS Code’s integrated terminal through Terminal > New Terminal. A panel appears at the bottom of VS Code. This is a normal shell terminal, just embedded inside the editor.
First, verify that it opened in the project folder:
pwd
ls
You should see the path ending in agent_builder/first_script and a listing containing:
hello_agent.py
Now run your script explicitly:
python3 hello_agent.py
The terminal should print:
Hello from my first Python script.
I am learning to build dependable automations.
This command has two parts:
| Part | Meaning |
|---|---|
python3 |
Start the Python 3 interpreter. |
hello_agent.py |
Give Python the file it should execute. |
The terminal output is not being written into your script. It is the result of Python executing the instructions in the saved file.
This explicit command is worth learning even though VS Code offers buttons. It works in Terminal, VS Code’s integrated terminal, and later in automated workflows.
Make one edit, save, and run again
Add a third line to hello_agent.py:
print("Each run starts again at the top of the file.")
Save with Command-S, then run the same terminal command again:
python3 hello_agent.py
You should now see all three messages. Python runs a script from top to bottom each time you execute it. The earlier terminal output does not mean the file has “kept running”; it is simply the record of the previous run.
This is the essential loop:
- Edit the saved
.pyfile in VS Code. - Save the file.
- Run the file with
python3 filename.py. - Read the terminal output.
- Make the next deliberate change.
Use VS Code’s Python Run command
VS Code can issue the terminal command for you. With hello_agent.py open, look for the Run Python File play button near the top-right of the editor.
You can also right-click inside the editor and choose the command named something like:
Run Python > Run Python File in Terminal
The exact menu wording can vary slightly across VS Code versions, but it will include Python File in Terminal.
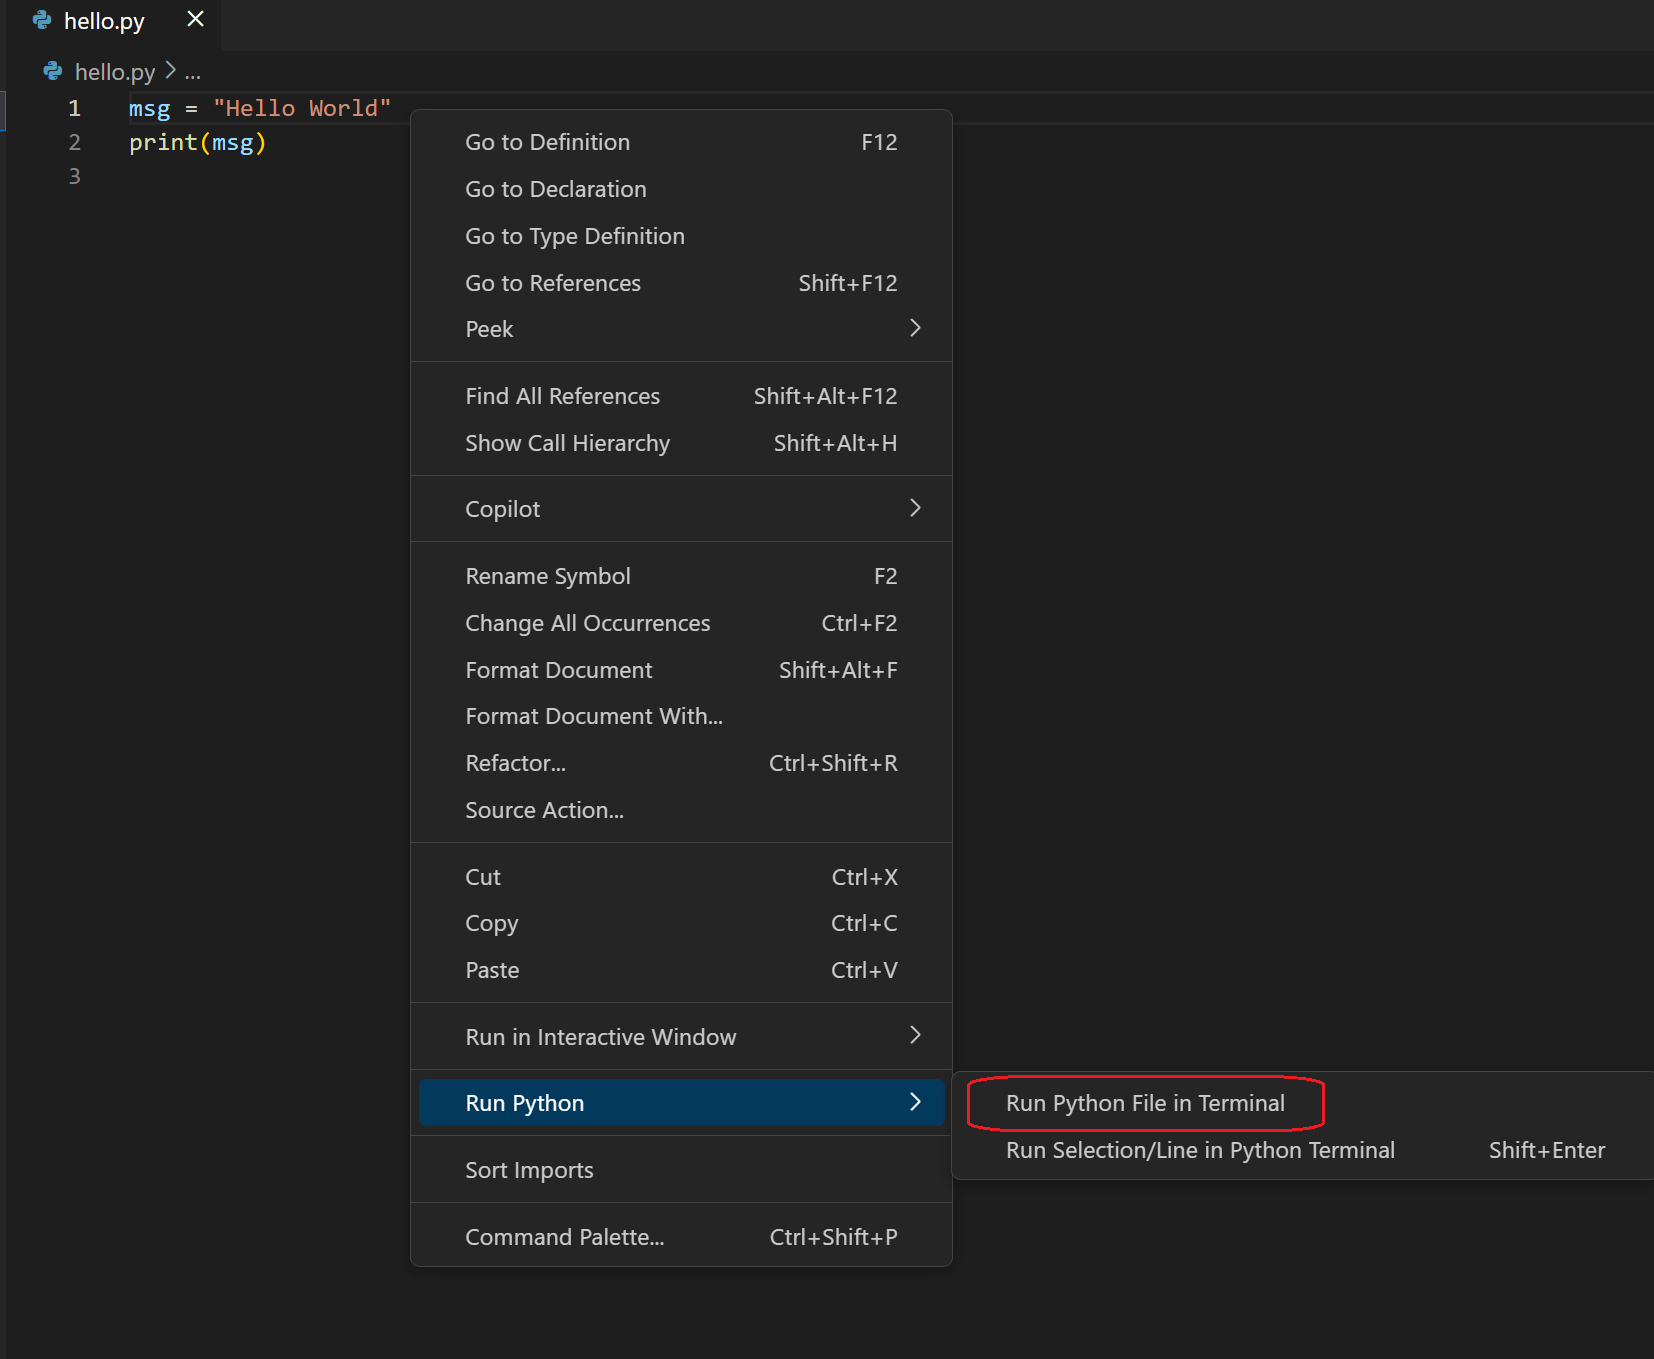
When you use this command, VS Code opens or reuses an integrated terminal and runs a command equivalent to:
python3 hello_agent.py
The button is convenient, but it is not a different kind of execution. It is still Python executing a saved file in a terminal.
Running Python code in Visual Studio Code
Read Microsoft’s short guide to the supported ways of executing a Python file from VS Code. It will help you recognize the Run button and right-click option when the interface changes slightly in a future version.
In “Run Python code,” read the execution options. Prioritize the full-file commands, Run Python File in Terminal and the editor’s right-click command. The selection and REPL options are useful for experimentation, but a full script run is the reliable default for this course.
For the next few lessons, prefer either the explicit terminal command:
python3 hello_agent.py
or Run Python File in Terminal. Both execute the whole saved program, which reduces surprises.
Resolve common first-run problems
Problems at this stage are usually setup or path issues, not evidence that you are “bad at programming.” Diagnose the message literally and check one layer at a time.
zsh: command not found: python3
Terminal cannot find a Python 3 interpreter. Re-run:
python3 --version
If it still fails, complete the Python installation step, then close and reopen Terminal. A newly opened terminal reads the latest system configuration.
can't open file 'hello_agent.py'
Python is installed, but Terminal is not currently in the folder containing your file. Check:
pwd
ls
If hello_agent.py is not listed, return to the project folder:
cd ~/agent_builder/first_script
Then run:
python3 hello_agent.py
This is a direct use of relative and home-directory paths from the previous lesson.
VS Code has no Python Run button
Check these three things:
- The file is saved with the exact
.pyextension. - The Microsoft Python extension is installed and enabled.
- A Python interpreter is selected in the VS Code status bar.
Even while you solve the VS Code configuration, you can still run the script manually from Terminal with python3 hello_agent.py.
You edit the file but see the old output
Save before running. In VS Code, Command-S is the deliberate way to ensure that what you see in the editor is what Python reads from disk.
The output text differs from the lesson
That is fine if you intentionally changed the text. Python prints exactly the characters inside your quotation marks. Check for a missing quotation mark, parenthesis, or a typo in print if the terminal displays an error instead.
What you should now be able to do
You have achieved this outcome when you can independently:
- Navigate to
~/agent_builder/first_scriptin Terminal. - Open that folder in VS Code as a workspace.
- Create a file ending in
.py. - Type and save a small Python script.
- Verify that
python3 --versionworks. - Run the script with
python3 hello_agent.py. - Run the same script with VS Code’s Run Python File in Terminal command.
- Edit one line, save, rerun, and identify the changed output.
You now have a working Python development loop: Terminal locates and runs the program, VS Code is where you edit it, and the Python interpreter executes it. Keep the agent_builder/first_script folder; it is the beginning of an organized set of hands-on projects.
Next, you will make scripts store and work with information by using Python variables and the basic types for text, numbers, and true-or-false values.