Recommended resources
The freely available resources this lesson will direct you to.
Welcome to our new module on linked lists. In the previous module, we mastered several powerful patterns for arrays and strings, like sliding windows and two-pointers, which primarily rely on manipulating indices. Now, we shift our focus to a new data structure where relationships are defined by explicit pointers or references rather than sequential positions in memory.
This lesson marks our first step into linked list algorithms. Our goal is to reverse a singly linked list iteratively. This is a fundamental skill in its own right and a building block for solving more complex list-based problems. We'll focus on the precise pointer manipulations required to perform this operation efficiently and correctly.
From Array Indices to Node Pointers
In arrays, a "pointer" is often an integer index. To get to the next element, you simply increment the index. Linked lists are different. Each node contains data and a next pointer that holds the memory address of the subsequent node. To traverse, you must follow this chain of pointers.
Reversing a list, therefore, isn't about swapping data values. It's about methodically rewiring these next pointers to point backward.
The following video provides an excellent visual introduction to this concept. It clearly defines the problem and introduces the high-level iterative strategy.
Reverse a linked list - Iterative method
This classic video from mycodeschool offers a clear, foundational walkthrough of reversing a linked list.
First, watch the section that defines the problem, from the problem definition. Notice the emphasis on changing the links, not the data. Next, watch the segment introducing the iterative method, which explains the core idea of visiting each node and reversing its next pointer.
The Three-Pointer Dance
As the video hints, a critical problem arises as soon as we reverse the first node's next pointer: we break the chain and lose our path to the rest of the list. If node1.next now points to null instead of node2, how do we get to node2?
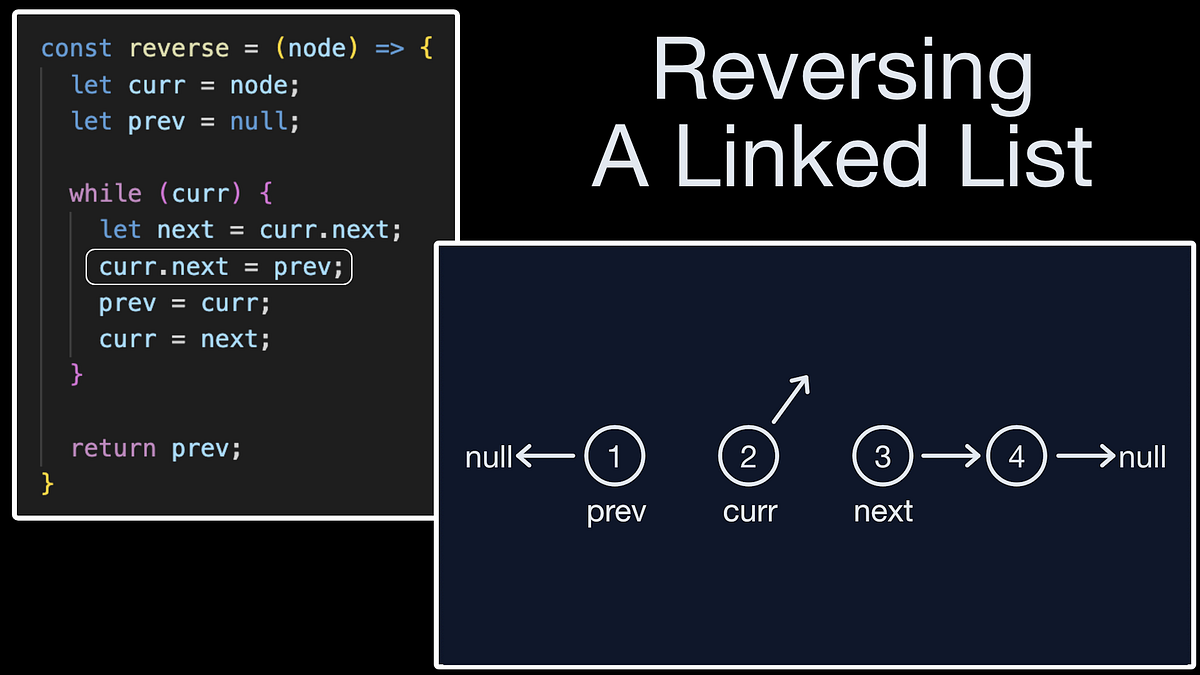
The solution is to use a "three-pointer" technique to keep track of everything we need at each step of the traversal. We'll use:
- A
prevpointer to track the node that came before the current one. This will be whatcurr.nextshould point to. - A
currpointer for the node we are currently visiting. - A temporary
nextpointer to save a reference to the next node in the original list before we overwritecurr.next.
This setup allows us to safely rewire the curr node's pointer without losing the rest of the list.

The following segment from the same video walks through this pointer manipulation in detail. It's one of the clearest explanations of this algorithm.
Reverse a linked list - Iterative method
This part of the mycodeschool video masterfully illustrates the solution to the "lost link" problem.
First, watch the explanation of why simply reversing the pointer is problematic from losing the link. Then, watch the detailed walkthrough of the three-pointer solution from the pointer logic. Pay close attention to the four key actions inside the loop: Save the next node. Reverse the current node's pointer. Move the previous pointer forward. Move the current pointer forward.
To summarize the logic inside the while loop that runs as long as curr is not null:
next_temp = curr.next: We first store the next node in the original sequence before we change any pointers. This is the most crucial step.curr.next = prev: We reverse the current node's pointer, making it point to the node that came before it.prev = curr: We updateprevto be our current node, as it will be the "previous" node for the next iteration.curr = next_temp: We move to the next node in the original list, which we safely stored in step 1.
After the loop finishes, curr will be null, and prev will be pointing to the last node of the original list, which is now the new head of the reversed list.
Implementation and Complexity
Now that you have a solid grasp of the algorithm's logic, let's look at how it translates into code. Since you have a broad CS background, it's useful to see this pattern across different languages.
Reverse a Linked List - Tutorial
This article from takeuforward provides a concise summary and clean code implementations.
First, read the algorithm description under the Optimal Approach heading. This will reinforce the steps we just discussed. Then, review the code provided for the language of your choice (C++, Java, Python, and JavaScript are all available). Notice how the four-step logic from our discussion maps directly to the body of the while loop. Finally, read the Complexity Analysis at the end of the iterative section.
As the article notes, this iterative solution is highly efficient:
- Time Complexity: O(N), because we traverse the list exactly once.
- Space Complexity: O(1), because we only use a few extra pointers, regardless of the list's size. All modifications are done in-place.
For someone focused on interview preparation, being aware of common mistakes is as important as knowing the correct solution. One of the most common errors in this specific problem is exactly what we've been highlighting.
206. Reverse Linked List - Solution & Explanation
This short excerpt from NeetCode's solution guide pinpoints the #1 error developers make when first implementing this algorithm.
Please read the brief section titled Losing the Reference. Internalizing this will help you avoid a frustrating bug during implementation.
Conclusion
In this lesson, we transitioned from array-based thinking to pointer-based manipulation in linked lists. You've learned the most fundamental linked list operation: iterative reversal. This pattern is not just a common interview question but also a sub-routine in more advanced list problems.
Key Takeaways:
- Reversing a linked list involves rewiring
nextpointers, not moving data. - The iterative solution uses a "three-pointer" approach (
prev,curr,next_temp) to traverse the list while reversing the links. - The essential step is to save
curr.nextin a temporary variable before reassigning it, to avoid losing the rest of the list. - The algorithm runs in optimal O(N) time and O(1) space.
In our next lesson, we will continue exploring pointer manipulation techniques by learning the fast and slow pointer pattern. This powerful technique allows you to solve a different class of problems, such as finding the middle of a linked list in a single pass, without needing to know its length beforehand.