Recommended resources
The freely available resources this lesson will direct you to.
- The Daguerreotype - Photographic Processes Series - Chapter 2 of 12www.youtube.com
- A Private Tour Of The George Eastman Museum Technology Vaultwww.youtube.com
- A brief guide to photographs on glass – National Science and Media Museum blogblog.scienceandmediamuseum.org.uk
- Appendix R: Curatorial Care of Photographic Collectionswww.nps.gov
Hello. Last lesson showed why emulsion speed, grain, and resolving power cannot be reduced to one trade-off. This lesson asks a different engineering question: what must hold the light-sensitive material, and when must that material be prepared and processed? The answers shaped not just image quality but camera size, field equipment, factory production, and who could make photographs.
We will compare four arrangements—daguerreotypes, wet plates, gelatin dry plates, and flexible roll film—by separating three things that are easy to conflate: the support that gives the material its shape, the light-sensitive layer that records exposure, and the workflow needed to turn that exposure into a usable image. Allow about 40 minutes, including the selected viewing and reading.
A polished metal surface: the daguerreotype
A daguerreotype begins with a copper sheet bearing a polished silver surface. Iodine vapour form a light-sensitive silver-halide layer on that surface. After exposure, mercury vapour develops the image; fixing removes remaining light-sensitive material. Unlike a film negative, the finished plate is the photograph itself. Its appearance changes with illumination and viewing angle: image highlights can appear bright against the dark reflection of the polished silver.
Watch the George Eastman Museum’s The Daguerreotype for the physical sequence and the appearance of the finished object.
The Daguerreotype - Photographic Processes Series - Chapter 2 of 12
The George Eastman Museum demonstrates how a silver-coated copper plate becomes a finished daguerreotype. Watch for the preparation demanded by a reflective image-bearing surface.
Watch plate to image for polishing, sensitization, exposure, mercury development, fixing, and enclosure. Then watch the finished plate for its positive-and-negative viewing behaviour and the consequence of having no intermediate negative.
The materials imposed several constraints. A plate needed a sufficiently smooth, clean silver surface; surface defects would be part of the final object, not hidden behind a later printing step. Copper provided mechanical support, while silver supplied the reactive and reflective surface. Preparation and mercury development required specialized handling, and the exposed image needed protection from tarnish. Mercury vapour also posed a serious health hazard.
The absence of a negative matters as much as the chemistry. A single exposure produced a single plate; making another photograph of the same scene required another exposure, or photographing the finished plate as a separate copying operation. The museum presenter’s description of “endless resolution” conveys the impression of fine detail, but it is not a literal optical property: the lens, exposure, surface, and viewing conditions still limit recorded detail.
Glass and a working clock: the wet plate
A negative on transparent glass solved the reproduction problem: light could pass through it to make multiple positive prints. Glass also offered a rigid, relatively flat surface on which to record detail. The difficulty was keeping a light-sensitive layer attached to that surface while allowing processing solutions to reach it.
In the wet-collodion process, the photographer coated glass with collodion containing halide salts and sensitized it in a silver-nitrate bath. Collodion is a nitrocellulose-based binder dissolved in volatile solvents. The plate had to be exposed and developed while still wet; as it dried, processing solutions could no longer act on it effectively. Formulations varied, so do not treat one specified silver halide as defining every wet plate.
Read the National Science and Media Museum’s account of the process with particular attention to where preparation and processing had to take place.
A brief guide to photographs on glass – National Science and Media Museum blog
The National Science and Media Museum connects the wet plate’s materials to its field workflow. Read this section to see why a glass negative could be both capable and inconvenient.
In “Collodion negatives,” read the coating and timing account, beginning with the introduction of the process and ending at the explanation of why the plate had to remain wet. Continue through the field-work discussion, ending just before the paragraph describing how collodion negatives look.
“Portable camera” meant something different under these conditions. The camera, unexposed plates, chemicals, water, and a light-protected place to coat and develop a plate formed one working system. The image below makes that system visible: the darkroom was part of the field equipment, even though it was not part of the camera body.

Wet plates could capture fine detail and, once developed, supply negatives for repeated printing. Their penalty was not simply weight. It was a time-coupled workflow: preparation, exposure, and development could not be separated by an extended journey or a convenient return to the workshop.
Dry plates: moving preparation into the factory
The gelatin dry plate retained glass as the support but changed the binder and, with it, the schedule. A factory could coat and package light-sensitive plates in advance. A photographer could buy them ready to expose, carry them to a location, and develop them later. The critical break with wet collodion was therefore not that glass became lighter—it did not—but that exposure no longer had to be bracketed immediately by coating and development.
Return to the same museum guide for the transition.
A brief guide to photographs on glass – National Science and Media Museum blog
Return to “A brief guide to photographs on glass” to see how pre-prepared gelatin plates changed both storage and manufacture.
Under “Gelatin dry plate,” begin with the storage transition. Then read from the sentence beginning “When first introduced” through the sensitivity and coating account. Focus on the distinction between the earliest dry plates and later improved ones.
This shift transferred work from the photographer to the manufacturer. A reliable dry plate required controlled emulsion preparation, even coating, drying, light-tight packaging, and sufficiently consistent performance from plate to plate. Machine coating reduced the variation inherent in hand preparation, but it also made defects or poor process control consequential across many plates. Gelatin had to hold the silver-halide crystals and permit aqueous processing later; it could not be merely a layer that stuck firmly to glass.
Dry did not automatically mean fast. Early gelatin dry plates could be slower than wet collodion. Subsequent emulsion improvements made short exposures practical. That distinction connects directly to the previous lesson: the speed of the recording layer depends on its photographic chemistry and grain engineering, not on whether its support is glass or plastic.
Glass remained attractive when flatness and dimensional stability mattered. It also remained heavy, bulky, and breakable. Pre-preparation removed the wet plate’s immediate processing deadline without removing the burden of carrying individual rigid sheets.
Flexible film: changing the support without losing the emulsion
A roll needs a support that bends around a spool. But flexibility alone is insufficient. The support must carry an even light-sensitive coating, survive wet processing, and be transparent enough to print through if it will remain attached to the negative. It must also keep the image in a usable geometry after winding, exposure, and development.
The transition was not instantaneous. Early paper-supported stripping film used paper for handling during exposure, then separated the image-bearing layer for printing. This reduced the burden of glass but introduced a difficult transfer step. A flexible, transparent plastic base removed the need to strip an opaque paper support. Gelatin could remain the image-bearing emulsion binder: “film” changed the support, not the fundamental silver-halide recording principle.
The museum-vault tour explains this intermediate paper solution and why transparent-base film was such an important manufacturing target.
A Private Tour Of The George Eastman Museum Technology Vault
In A Private Tour Of The George Eastman Museum Technology Vault, Chris Marquardt and a museum specialist use early film and camera objects to trace the move from glass plates through paper-supported stripping film to transparent roll film.
Watch paper to rolls for the stripping-film workflow, the difficulty of attaching an emulsion to a flexible base, and the option of having processing performed for the camera user. Then watch transparent base for the introduction of nitrate-supported film. Treat the tour’s broader historical claims as context; the engineering distinction here is whether printing requires removal of an opaque support.
The historical production scene below shows why replacing individual plates with roll film was also a factory-engineering problem. Forming a long, flexible base is one operation; adding a controlled photographic emulsion is another. Across the roll, variation in thickness, adhesion, or cleanliness could affect many successive exposures.
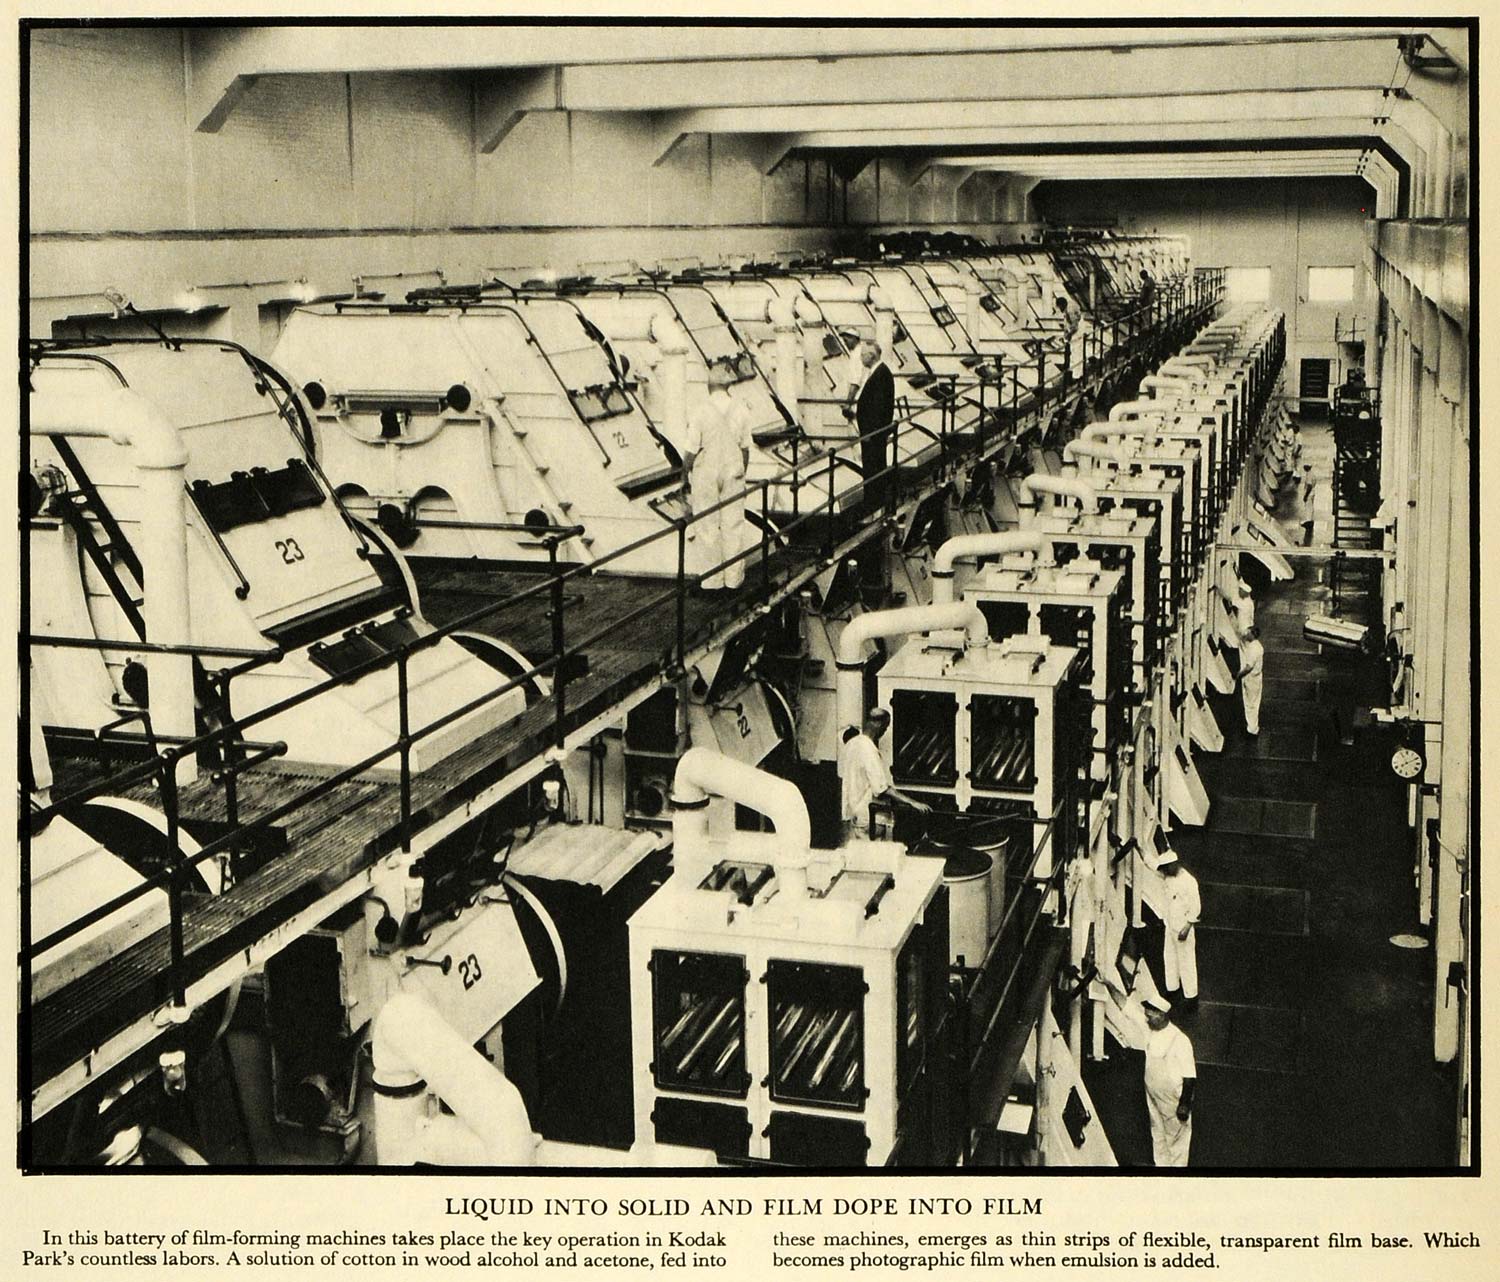
Early transparent roll film used cellulose nitrate support. Its flexibility and transparency came with a severe materials cost: nitrate film is highly flammable. Later cellulose acetate supports reduced that fire hazard but could deteriorate by hydrolysis, with shrinkage and deformation. Polyester subsequently offered another support choice. Read the National Park Service handbook for these support-level limitations, keeping them distinct from the sensitivity of the emulsion coated on top.
Appendix R: Curatorial Care of Photographic Collections
The National Park Service museum handbook describes how binders and supports behave over time. Its preservation perspective provides a useful test of the engineering bargain made by each material.
In Section B, “The Nature of Photographic Materials,” find question 4, “What are the various types of binder layers?” (p. R:3). Read the gelatin discussion, from its sensitivity to moisture through its biological vulnerability. Then find question 5, “What are examples of primary supports?” (p. R:4). Starting with the paragraph on glass and continuing into the discussion of cellulose films, read the support comparison. Stop before the following sentence about additives in acetate film. Note how film can fail mechanically even when the image-bearing emulsion is a separate layer.
A flexible roll changed the camera-system constraints. Many exposures could be stored on a compact spool rather than in separate plate holders, but the camera now had to hold each portion of film sufficiently flat at the image plane and advance it without damage. We will examine those registration mechanisms later. For now, the important comparison is that film exchanged glass’s rigidity and flatness for compact storage and a continuous manufacturing format; careful camera and film design had to recover the geometry that glass supplied almost by default.
The four approaches can be summarized without treating them as a simple ranking:
| Process | Support and recording layer | Principal manufacturing or use constraint |
|---|---|---|
| Daguerreotype | Silver surface on copper; finished plate is the image | Prepare a clean reflective surface; one original per exposure |
| Wet collodion negative | Collodion-bound layer on glass | Coat, expose, and develop before the plate dries |
| Gelatin dry-plate negative | Factory-coated gelatin emulsion on glass | Control coating and storage; carry rigid individual plates |
| Flexible roll-film negative | Gelatin emulsion on a flexible support | Make uniform, adherent rolls; manage flatness, handling, and support stability |
Conclusion
These formats redistributed engineering work. The daguerreotype demanded preparation of each finished metal plate. Wet collodion made reproducible glass negatives but tied photography to an on-site darkroom and a short processing window. Gelatin dry plates moved sensitization and coating into the factory while retaining glass’s weight and flatness. Flexible roll film made many exposures compact and practical, provided manufacturers could make a uniform transparent support and cameras could position it accurately.
None of those changes alone determines photographic speed or image quality; the emulsion, optics, processing, and support work together. Next, we will turn to color photography and ask how a material that records incident light can distinguish—and reproduce—its spectral composition.