Recommended resources
The freely available resources this lesson will direct you to.
Hello. Last time, we established why three color-selective records can support a photographic reproduction, and why cyan, magenta, and yellow dyes control transmitted light. One question remained: how does a single piece of film make three records at the same image location, then turn them into either a negative or a positive?
This lesson follows the light through a multilayer emulsion and the chemistry through processing. The decisive distinction is when dye forms: at grains exposed in the camera for a chromogenic negative, but at grains left unexposed in the camera for a reversal transparency. Allow about 40 minutes, including the selected reading and video.
Three records at one image position
A multilayer film stacks its color records through the film’s thickness. Light from one image point encounters a blue-sensitive emulsion near the surface, then a green-sensitive record, then a red-sensitive record nearer the base. These are not three laterally displaced pictures: their corresponding positions are registered by being coated on the same support. Within a record, practical films may use multiple emulsions of different sensitivities rather than just one layer.
The arrangement solves a spectral problem as well as a registration problem. Silver halide is inherently sensitive to blue light. Sensitizing dyes extend selected emulsions’ response into green or red, but those emulsions can still respond to blue. The top record collects blue exposure; a yellow filter layer beneath it absorbs blue light that would otherwise contaminate the lower records. Green and red light pass onward to their respective sensitized emulsions. Gelatin interlayers also help limit unwanted chemical interaction between records during processing.
Read the multilayer-film discussion in Kodak’s Exploring the Color Image for the physical arrangement and the distinction between sensitizing a grain and filtering light before it reaches another layer. Treat it as a technical account of film construction, not as a source for comparative product-performance claims.
Kodak’s cross-sectional account shows why the three records can occupy the same image area without all recording the same colors.
In “MULTILAYER FILMS” and the discussion of the film stack around printed pp. 30–31, read the layer rationale. Then, in “COLOR SENSITIVITY” immediately following the cross-sectional illustrations, read the exposure account. Track separately what each emulsion can detect and what light actually reaches it.
At a position , each record thus acquires its own local population of latent-image-bearing grains. In an idealized notation, let , , and denote the fractions of developable grains in the respective records after camera exposure. These fractions stand for spatially varying responses, not a claim that film response is linear in exposure. The three latent images are initially invisible; their color information lies in which grains can be developed in which layer.
Couplers turn silver development into dye
Recall that an exposed silver-halide grain contains a developable latent image. During development, a reducing agent converts silver halide to metallic silver and is itself oxidized. In color development, the oxidized developer reacts with a nearby color coupler to form dye. The coupler chemistry determines which dye a record produces: the blue record forms yellow, the green record magenta, and the red record cyan. Each dye primarily controls transmission of the light that exposed its corresponding record.
The dye must form locally if the three images are to retain spatial detail. In many chromogenic films, couplers are incorporated into the appropriate emulsions during manufacture and held in dispersed droplets so they do not simply wander between layers. Oxidized developer produced near a developing grain can reach a coupler, creating a local dye deposit or “dye cloud.” This is a chemical means of linking a spectral measurement to an image position—not a coating that was already yellow, magenta, or cyan in the pattern of the finished picture.
The following excerpt from The Chemistry of Kodak Film on Smarter Every Day 2 shows a film chemist explaining that local reaction. Watch through the removal of silver: metallic silver is an intermediate, not the finished color image.
The Chemistry of Kodak Film - Smarter Every Day 275-C
In “The Chemistry of Kodak Film,” Smarter Every Day 2 visits a film chemist who describes couplers, dye clouds, and why the final image can be dark without retaining black metallic silver.
Watch local dye formation, focusing on what oxidizes the developer and where the coupler reacts. Continue with silver removal to distinguish the temporary silver image from darkness produced by overlapping dyes.
Bleaching converts developed metallic silver into a removable silver salt; fixing removes silver salts, including remaining undeveloped silver halide. The processed film retains its dye images. In an idealized black area of a positive transparency, strong cyan, magenta, and yellow absorption leaves little transmitted light—no separate black-silver image is required.
So far, this chemistry says how dye can form near a developing grain. It does not yet say whether that grain was exposed or unexposed in the camera. Processing order determines the answer.
Negative film: dye where camera exposure occurred
In a chromogenic color negative, color development acts on the grains made developable by camera exposure. Where the scene supplied much red light, the red-sensitive record develops strongly and produces much cyan dye. Strong green exposure similarly yields much magenta; strong blue yields much yellow. Bleaching and fixing remove silver, leaving three registered negative dye images.
In a simplified three-band description, the relationship is:
| Camera exposure at a location | Negative’s corresponding dye density |
|---|---|
| More blue | More yellow |
| More green | More magenta |
| More red | More cyan |
The word negative matters. Imagine a red subject patch: it strongly exposes the red record but weakly exposes the green and blue records. An ideal, unmasked negative therefore has substantial cyan dye and little magenta or yellow at that location. Viewed directly, it does not look red. When used to expose color print material, the dense cyan region restricts red printing light; the later printing process supplies the necessary tonal and color inversion. A negative is an intermediate for printing or scanning, not a failed transparency.
Real dyes do not absorb exclusively in their intended spectral bands. In particular, unwanted absorption by one dye can interfere with the printing-light channel another dye is meant to control. Some color negatives therefore use colored couplers as integral masks: unreacted coupler contributes a compensating absorption where image dye did not form. The resulting overall orange appearance is part of an engineered intermediate, not a color cast intended to be viewed as the final photograph.
Read Kodak’s account from negative formation into its explanation of masking. The masking mechanism is useful here chiefly because it shows why the appearance of a processed negative cannot be read as a simple, ideal cyan-magenta-yellow complement of the scene.
These sections distinguish the direct color-development route for negatives from the correction built into many negative films for subsequent printing.
In “COLOR NEGATIVE FILMS,” around printed p. 40, read negative formation, beginning with the paragraph that identifies the three dye-forming records. Then, under “MASKING BY COLORED COUPLERS,” around printed pp. 41–43, start at the paragraph beginning “For correct color reproduction” and read the masking mechanism. Focus on why equalizing unwanted absorption across a layer helps another record independently control its printing-light channel.

Reversal film: use the silver halide that camera exposure spared
A reversal film must produce a positive transparency on the original film. If ordinary color development immediately made cyan dye wherever the red-sensitive layer had seen red light, it would produce the negative relationship just described. Reversal processing changes which grains participate in dye formation.
- A first, black-and-white development reduces camera-exposed grains to metallic silver without producing image dye. This uses up those grains’ silver halide.
- The silver halide still remaining is made developable—for example, by a controlled re-exposure or chemical fogging—and undergoes color development. Dye now forms where the corresponding record received little camera exposure.
- Bleaching and fixing remove silver and silver salts from both development stages, leaving registered positive dye images.
In the earlier notation, a deliberately simplified model is that negative-film dye amount tracks , whereas reversal-film dye amount tracks the grains remaining after first development, approximately . Real characteristic curves, incomplete reactions, and process controls make this an account of the sign of the relationship, not a formula for predicting dye density from exposure.
Check that sign against a red subject patch. Camera red exposure consumes much of the red record’s developable halide in the first development, so little cyan dye forms there later. The weakly exposed green and blue records retain halide and subsequently form magenta and yellow dye. Those dyes suppress green and blue transmission while allowing principally red light through. White subject areas consume much halide in all three records and become relatively clear; black subject areas leave halide for all three dye-forming reactions and become dark.
Read the reversal account and its diagram in Exploring the Color Image. It makes visible the otherwise easy-to-miss point that the first silver image and the later dye images occupy complementary locations within each record.
Kodak’s reversal-film explanation follows the first silver image, subsequent dye formation, and final removal of silver in a single spatial example.
In “REPRODUCTION OF COLORS BY REVERSAL FILMS,” around printed pp. 37–39, begin with the paragraph starting “First development produces a silver image in each layer.” Read the processing account, then inspect the labeled sequence of cross sections on printed p. 39. For each subject-color patch, locate the first-developed silver before deciding where the final dye must appear.
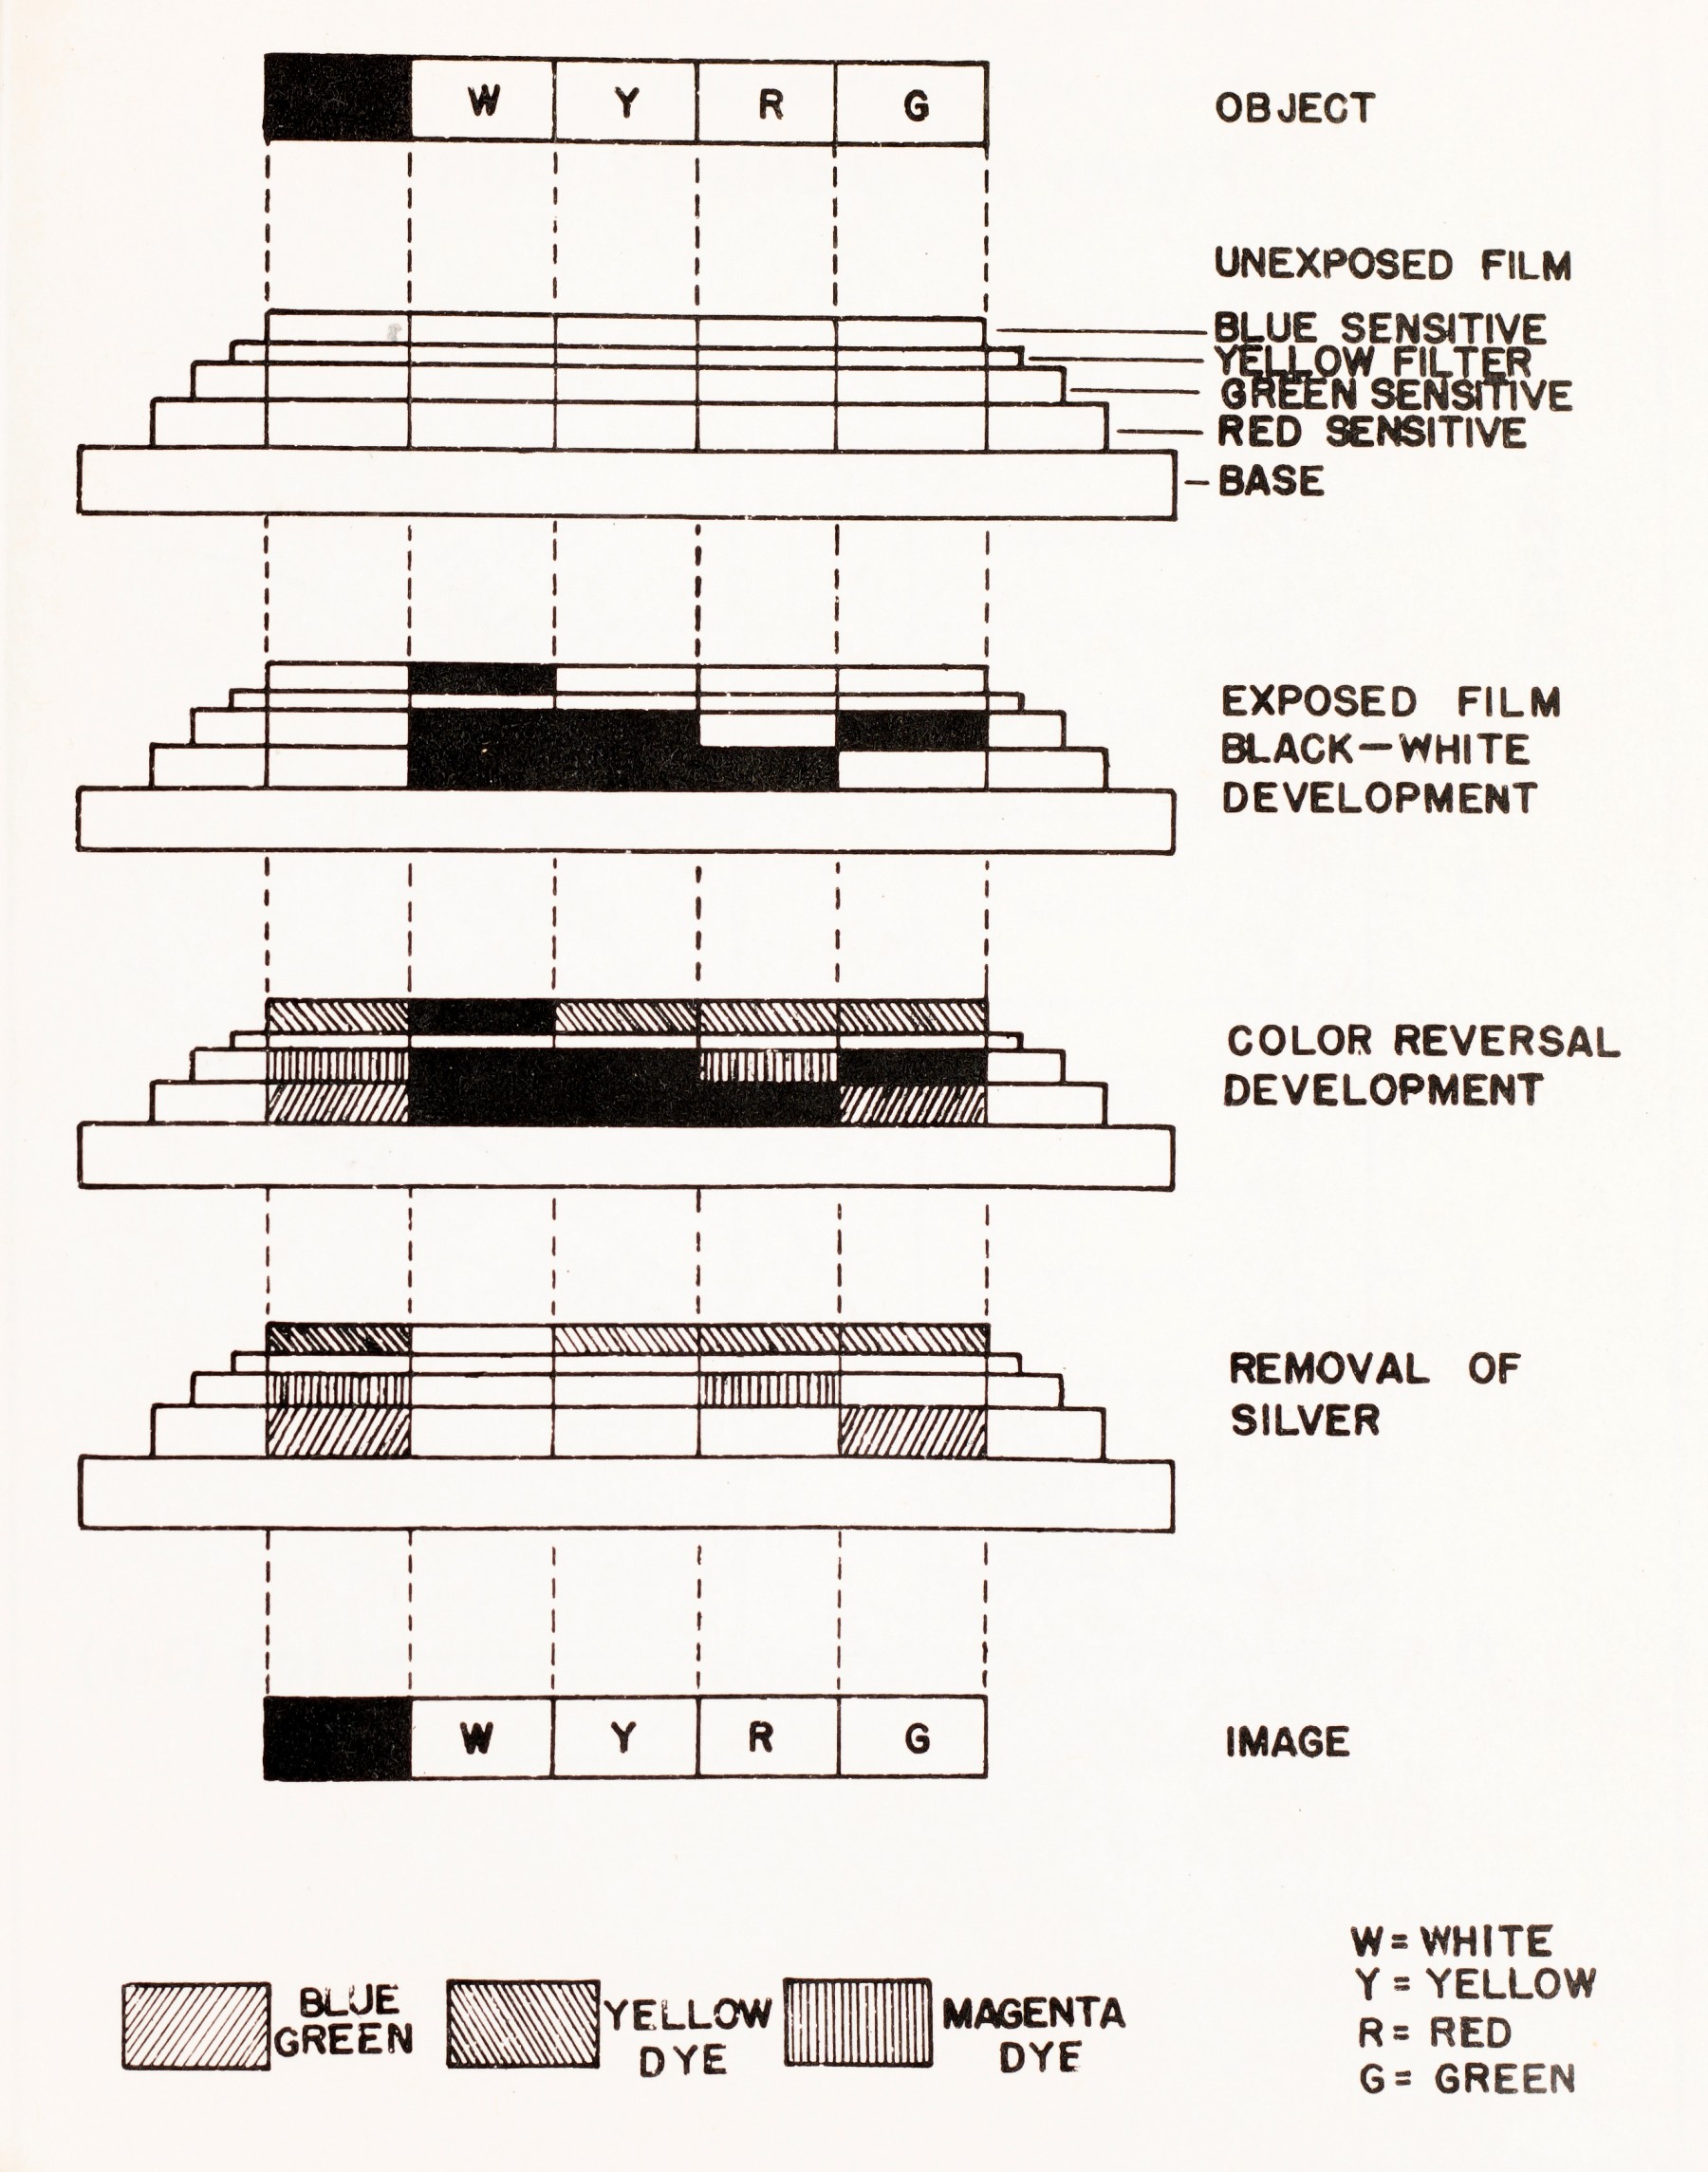
Some historical reversal systems differed in how couplers reached the emulsions. Films with couplers incorporated in the layers could form the different dyes using one color developer. In Kodachrome processing, couplers were supplied in processing solutions, requiring separate, selectively controlled color-development operations. Both implement the same central reversal logic: the first development prevents camera-exposed grains from being the ones that form the final dye.
Conclusion
Multilayer film stores three spatially registered color records as latent images in spectrally differentiated silver-halide emulsions. Yellow filtering protects the lower records from blue exposure; sensitization gives them useful green and red responses. Color development then couples local silver reduction to local cyan, magenta, or yellow dye formation, and subsequent processing removes the silver.
Negative and reversal films differ principally in processing order. Negative film forms dye from camera-exposed grains. Reversal film first develops those grains without dye, then forms dye from the halide left behind. That distinction explains why the same red exposure ultimately gives a cyan-dense negative but a cyan-light positive transparency.
The next lesson moves from the chemistry inside film to the camera-film system as a whole: how instant photography coordinates exposure, chemical transport, timing, and stabilization to deliver a viewable image without a separate processing laboratory.