Recommended resources
The freely available resources this lesson will direct you to.
- How to Sew a Narrow Hemwww.youtube.com
- 5 STEPS: How to HEM CHIFFON: The secret to STRAIGHT, ACCURATE, PROFESSIONAL HEM OF SHEER FABRICSwww.youtube.com
- Sew Narrow Hems by Machine - Threads Magazinewww.threadsmagazine.com
- Tutorial: How to sew a hem in a woven fabric using a thread guide - Infectious Stitchesinfectiousstitches.com
Welcome to the final lesson for your V-neck top project! We've reached the last, finishing touch: the hem. A well-executed hem is the signature of a thoughtfully made garment, providing a clean, durable, and professional-looking edge.
In this lesson, we will focus on creating a narrow hem. You'll learn how to mark your hemline accurately, then press, stitch, and finish it to complement the weight and style of your top. This technique is not only elegant but also versatile, especially for garments with curved edges, ensuring a result that is both beautiful and functional.
By the end of this lesson, you will have completed your V-neck princess seam top, transforming your pattern, fabric, and hard work into a finished, wearable piece.
Why a Narrow Hem?
For a top like the one you've designed—fitted to semi-fitted and likely made from a light- to medium-weight woven fabric—a narrow hem is an excellent choice. Unlike a deep, heavy hem that might be used on a skirt or trousers, a narrow hem is lightweight and discreet. It provides a clean finish without adding bulk or altering the drape of the fabric at the lower edge.
The technique we'll cover is particularly effective for curved hemlines, which can be tricky to finish smoothly. By stitching, trimming, and then folding, you gain a high degree of control, preventing the ripples or puckers that can occur with simpler methods.

Preparation: Setting the Stage for Success
Before you even touch your iron or sewing machine, there's one crucial preparatory step: let the garment hang.
Especially in garments with curved seams or panels cut on a slight bias (which is common in princess seams), the fabric can stretch or "drop" unevenly under its own weight.
- Hang It Up: Place your assembled top on a hanger and let it hang for at least 24 hours. This allows the fabric to settle into its final shape.
- Mark the Hemline: After the garment has settled, put it on or place it on a dress form. Ask a helper to mark the final hemline for you, measuring an even distance from the floor up to ensure it hangs level. If you're working alone, you can use a chalk puffer or a yardstick to mark the line consistently. This is the single most important step for achieving a level hem.
The Technique: A Double-Stitched Narrow Hem
The most reliable method for a professional-quality narrow hem involves two lines of stitching. It gives you maximum control and neatly encases the raw edge. The process is: fold and press, stitch, trim, fold and press again, and stitch the final hem.
The following article from Threads Magazine provides an excellent, detailed guide with clear photographs for this technique.
Sew Narrow Hems by Machine - Threads Magazine
This article by Pamela Leggett is a masterclass in the machine-sewn narrow hem. It breaks down the process into clear, manageable steps.
Please read the entire article, paying close attention to the five core steps. Focus on how each step builds on the last: the initial fold, stitch, trim, and second fold, and finally, the crucial tip for steaming out any waviness at the end.
Deconstructing the Process
Let's recap the steps from the article and structure them into an action plan for your top.
- First Fold & Press: After marking your final hemline, fold the raw edge up to the wrong side by about 1/4 inch (6mm) and press it. This first fold is what will be enclosed inside the hem.
- First Stitch Line: Stitch 1/8 inch (3mm) from the folded edge. This line of stitching stabilizes the hem and acts as a guide for trimming.
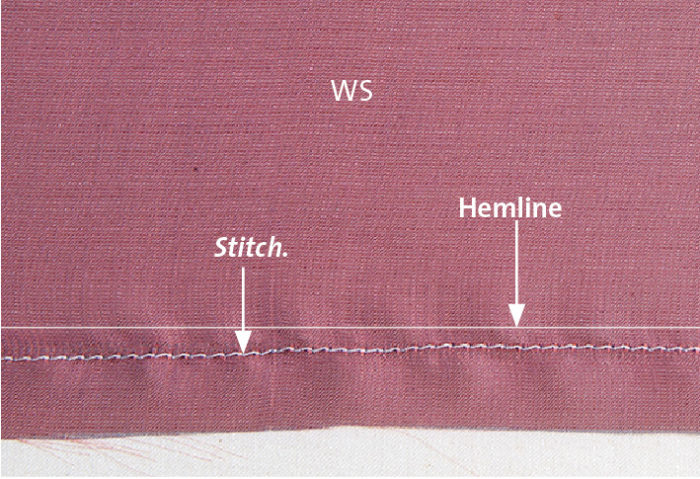
- Trim: Using small, sharp scissors (appliqué scissors are excellent for this), carefully trim the excess fabric as close to your stitching line as possible. The stitching prevents the fabric from fraying and gives you a clear trimming guide.
- Second Fold & Press: Now, fold the hem up again, this time along your marked hemline. The trimmed, stitched edge will be neatly tucked inside. Press this new fold firmly.
- Final Stitch Line: Topstitch the hem from the right side of the garment, sewing very close to the inner folded edge. This final line of stitching secures the hem.
- Final Press: Your hem may appear slightly wavy, especially around curves. This is normal. Lay the hem on your ironing board, steam it generously without pressing down, and use your fingers or a tailor's clapper to flatten it. Let it cool completely.
A Tip for Ultimate Precision: The Thread Guide
For designers and creators who value absolute precision, there's a variation you might appreciate. Instead of simply pressing the first fold by eye, you can use a temporary line of stitches as a perfect guide. This is especially useful for ensuring your hem allowance is perfectly even all the way around before you begin folding.
Tutorial: How to sew a hem in a woven fabric using a thread guide - Infectious Stitches
This tutorial from Infectious Stitches demonstrates a clever trick for achieving a perfectly accurate fold using a temporary basting stitch.
Read the tutorial to understand the concept. Focus on how to create the guide stitch and how it's used to create a crisp, accurate fold. Note that this tutorial shows a standard double-fold hem, but you can apply the guide-stitch principle to the first step of the Threads method we are using.
To incorporate this "power-up" into our primary method, you would:
- Instead of folding and pressing the first 1/4 inch by eye, you would machine-baste a line 1/4 inch from the raw edge.
- Then, you would use that line as an infallible guide to fold and press against, before proceeding with the rest of the steps from the Threads method.
Conclusion
You've now learned a robust and professional technique for creating a narrow hem. The key takeaways are:
- Preparation is paramount: Allow the fabric to hang and settle before marking.
- A two-step process yields control: The "stitch-and-trim" method ensures a clean, flat finish, especially on curves.
- Pressing is not just for seams: A final steam press is essential for removing any waviness and setting the hem perfectly.
With this final step, your V-neck princess seam top is complete. You have taken a design from concept to a finished garment, navigating pattern drafting, prototyping, precision cutting, and advanced construction techniques. This project has been a significant undertaking, and you should be incredibly proud of the result.
As this course concludes, take a moment to reflect on the process. Think about what you enjoyed, what challenged you, and what new skills you feel confident in. This project has built a strong foundation, preparing you for even more ambitious undertakings—perhaps even that wedding dress. Congratulations on your beautiful new top