Recommended resources
The freely available resources this lesson will direct you to.
Hello! Let's dive into the final lesson of the "Digital DJ Toolkit" module.
In our last session, we mastered Hot Cues, learning how to set and trigger them to gain non-linear control over a track's structure. This allows for instant jumps to key points, enabling creative remixes and precise cueing.
Today, we'll explore a complementary feature: looping. The learning outcome for this lesson is to create a 4 or 8-beat loop on the CDJ-3000 and use it to extend a track's intro or outro for mixing. Where Hot Cues are about jumping to a point, loops are about staying at a point, repeating it seamlessly to give you the time and stability needed for a smooth blend.
1. The Concept of Looping in DJing
In programming, a for or while loop executes a block of code repeatedly. In DJing, a loop does the same for a block of audio. It captures a segment of a track—typically a clean, rhythmic section—and plays it over and over without any audible break.
For a DnB DJ, this is an indispensable tool. Why?
- Extending Mixable Sections: DnB intros and outros can be short and dynamic. A track might only have 8 or 16 bars of clean drums before melodic elements come in. Looping these sections creates a stable, extended "runway" for you to beatmatch and transition into the next track.
- Creating a Mixing "Bed": A looped drum break acts as a neutral rhythmic foundation. You can layer basslines, vocals, or melodies from the incoming track over this loop before you execute the full transition.
- Building Tension: Looping a pre-drop vocal or synth stab can build anticipation on the dancefloor before you release the loop and let the track's main drop hit.
2. The Mechanics of Auto Looping
While you can set loops manually with IN/OUT buttons, the fastest and most common method is using the Auto Beat Loop feature. With the QUANTIZE feature enabled (which we discussed in the beat grid lesson), the CDJ will automatically create a perfectly timed loop for you.
Let's look at the controls. The CDJ-3000 has a dedicated section for this.
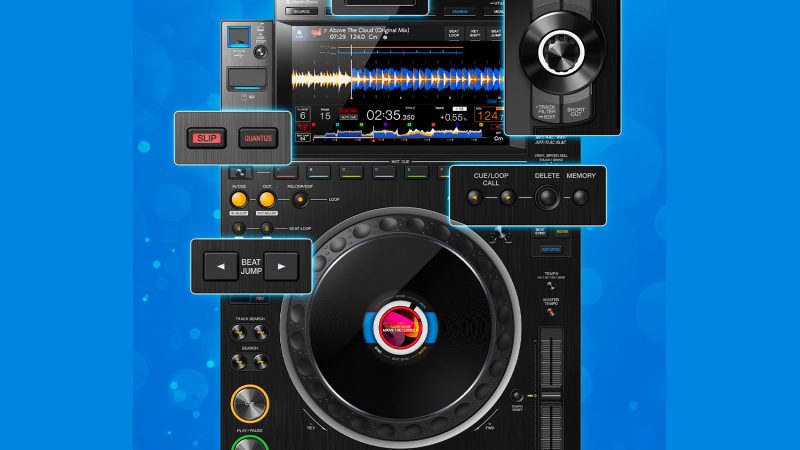
The two most important buttons for our purpose today are the 4 and 8 beat loop buttons.
What do all of these buttons do?
The following resource from the Pioneer DJ blog explains the Auto Loop function. It's a great, concise overview of how to create and manipulate loops.
Please read the section titled 'BEAT LOOP (1/2X), 8 BEAT LOOP (2X)'. Focus on how to create a loop and then how to change its length.
As the reading explains, the functionality is very direct. Let's combine that with information specific to the CDJ-3000's layout.
- To Create a Loop: While a track is playing, simply press the
4button for a 4-beat loop or the8button for an 8-beat loop. The CDJ will capture the next 4 or 8 beats and begin looping them. The button you pressed will light up to indicate the loop is active. - To Exit a Loop: Press the
RELOOP/EXITbutton. The loop will disengage, and the track will continue playing from where it would have been if the loop had never been activated. - To Halve or Double a Loop: This is where the buttons take on a dual purpose.
- When a loop is active, pressing the
4button will halve the loop's length (e.g., an 8-beat loop becomes a 4-beat loop, then 2, 1, 1/2, etc.). - When a loop is active, pressing the
8button will double the loop's length (e.g., a 4-beat loop becomes an 8-beat loop, then 16, etc.).
- When a loop is active, pressing the
The Importance of Quantize
For Auto Loop to work perfectly, QUANTIZE must be enabled.
What do all of these buttons do?
Let's briefly revisit the concept of Quantize. This feature is the 'magic' that ensures your loops start and end precisely on the beat.
Read the section titled 'QUANTIZE'. It explains how this feature snaps your actions to the track's beat grid, which is essential for perfect loops.
In short, Quantize uses the track's pre-analyzed beat grid data to correct your timing. When you press a loop button, it snaps the loop's start and end points to the nearest beat, ensuring it's rhythmically perfect. For a DnB DJ, it's best practice to leave Quantize on for most tasks, including looping.
3. Practical Application: Extending Intros and Outros
Now, let's apply this to the most common use case: creating space to mix.
Practice Session (20 minutes)
For this drill, you'll need two DnB tracks you've analyzed in Rekordbox.
Part A: Extending an Intro
- Load Track A. Find a clean, percussive intro that is 8 or 16 beats long.
- Play Track A from the beginning.
- Just before the intro section ends and the main musical elements begin, press the
8 BEATloop button. - You should now have a stable 8-beat drum loop playing. This is your mixing platform.
- Now, load and play Track B. You have plenty of time to beatmatch it perfectly to the looping Track A.
- Once they are synchronized, use your EQs and channel faders to perform a transition, blending Track B in over the loop from Track A.
- At the right moment (e.g., after 16 or 32 beats of mixing), you can either fade out the looping Track A or press its
RELOOP/EXITbutton to see where it would have landed in the track. In most cases, you'll simply mix out of it.
Part B: Extending an Outro (Creating a "Loop Out")
- Let Track B play through. As it approaches its outro, listen for a clean, repetitive drum pattern.
- As soon as that clean section begins, press the
4 BEATor8 BEATloop button. - Track B is now in a "loop out," which will play indefinitely without losing energy, giving you a perfect foundation to mix in the next track (which could be Track A again for this practice).
- Beatmatch Track A to the looping outro of Track B.
- Perform your transition. Once Track A is playing on its own, simply use the channel fader to cut the sound from Track B. You don't even need to press play/pause on it.
By mastering this technique, you liberate yourself from the fixed structure of a track. A 16-beat intro can become a 64-beat mixing runway. You are no longer racing against the clock.
Conclusion
Congratulations on completing the "Digital DJ Toolkit" module! You've moved from basic playback to actively manipulating tracks with beat grids, sync, Hot Cues, and now, loops. Looping is a cornerstone of modern DJing that provides control, stability, and creative freedom.
Key Takeaways:
- A loop is a seamlessly repeating segment of a track.
- The
4 BEATand8 BEATAuto Loop buttons are the quickest way to create rhythmically perfect loops, providedQUANTIZEis active. - When a loop is active, the
4button halves its length, and the8button doubles it. - The primary function of looping in a mix is to extend intros and outros, creating a stable platform and giving you sufficient time to execute a smooth transition.
Next Lesson Preview:
We are now ready to move on to Module 5: Advanced Mixing Techniques. In our next lesson, we will introduce the concept of Harmonic Mixing. We'll explore how to use the Camelot Wheel to select tracks that are in compatible musical keys, moving beyond just rhythmic alignment to create mixes that are tonally and musically seamless. This will tap into your background with music production and elevate the quality of your sets significantly.