Recommended resources
The freely available resources this lesson will direct you to.
Welcome back! In our previous lesson, we demystified API keys and the crucial importance of keeping them secret using environment variables. You now understand the "why" behind your LLM assistant's instructions to create a .env file and never share it publicly.
So far, our exploration of APIs has been conceptual. In this lesson, we'll bridge the gap from theory to practice. We're going to make our first live API request without writing a single line of code. To do this, we'll use a powerful tool called Postman. Think of it as a prototyping tool, like Figma, but for APIs instead of user interfaces. It provides a visual "workbench" where you can build, test, and experiment with API requests to see exactly how they work.
By the end of this lesson, you will be able to use Postman to send a request to a public API and understand the response you get back. This is a fundamental skill that will empower you to debug issues and better guide your LLM when connecting your app to external services.
Your API Prototyping Tool: An Introduction to Postman
When you're building an app, you'll often need to interact with various APIs—for payments, user data, AI models, and more. Before you write (or generate) the code to integrate these services, it's incredibly helpful to test them in isolation. Postman is the industry-standard tool for this. It lets you play the role of the "client" application, sending requests and inspecting the server's responses in a clean, visual interface.
Let's start by getting familiar with the Postman workspace. You don't need to memorize every button, but understanding the main areas will make the next steps much clearer.
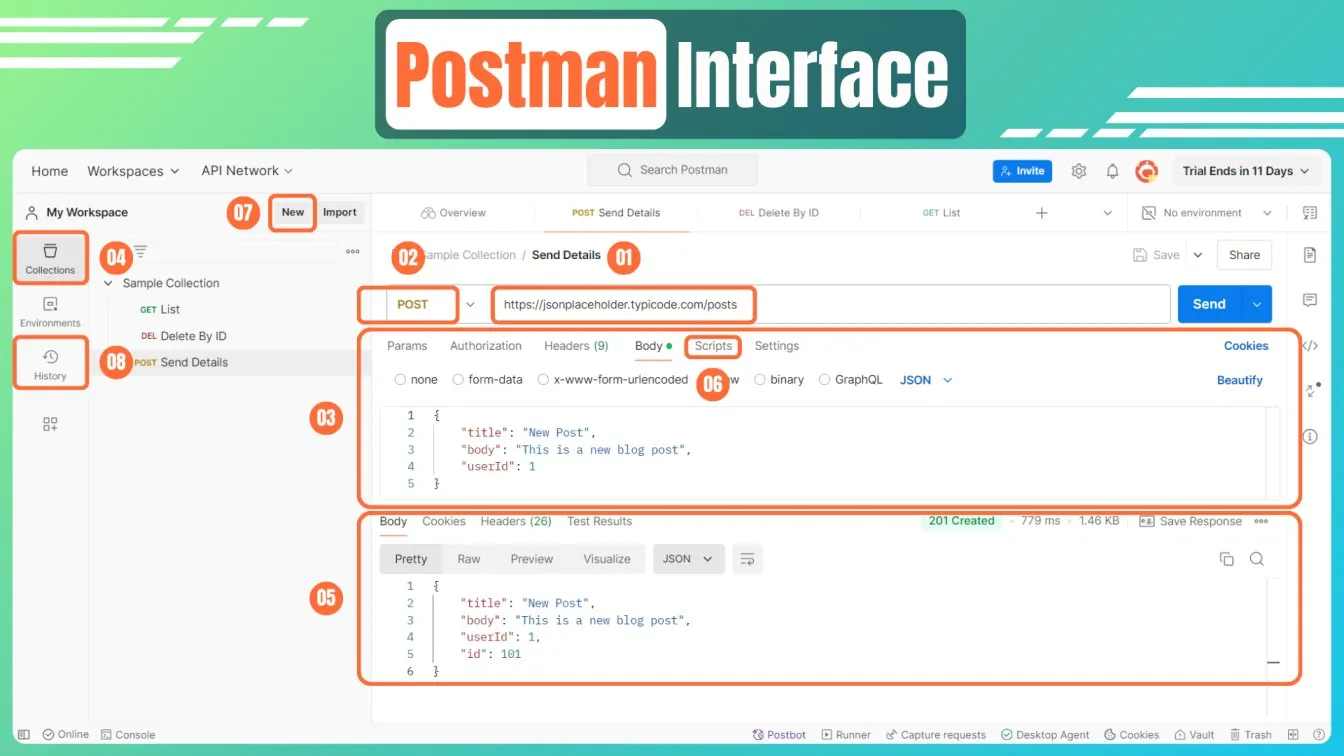
This interface gives you a structured way to build a request, piece by piece, and see the raw response from the server, which is exactly what we're about to do.
Making Your First API Request
It's time to roll up our sleeves. We're going to use Postman to query a real API. The best way to learn this is by doing, so we'll follow a guided video from the creators of Postman themselves.
If you don't have Postman yet, you can download the desktop app or use it directly in your browser by signing up at postman.com. Both have a very similar interface.
How to Send Your First API Request in Postman
This video from the official Postman YouTube channel provides a perfect walkthrough of sending your first request and then customizing it with filters.
First, watch the section that covers making a basic request. The presenter uses an API that lists job openings. Pay attention to how the GET method, the API URL, and the "Send" button work together to produce a response with a 200 OK status and a body full of JSON data. Next, watch the segment on using query parameters. This is a critical concept. See how adding a location parameter in the "Query Params" tab filters the results. The key takeaway is that you don't have to manually edit the long URL; Postman's UI builds it for you, which is much less error-prone.
Excellent. You've now seen the entire request-response cycle in action. You provided a URL, specified you wanted to GET data, added a filter (a query parameter), and received a JSON response from the server.
Let's solidify this with a second, slightly different example from a text-based tutorial. Repetition with variation is a great way to build confidence.
A 6-Minute Introduction to API Testing with Postman
This article from Prismic's blog provides another step-by-step walkthrough, this time using an API for a fictitious coffee shop. It's a great reference with clear screenshots.
Follow the instructions under the heading "Make your first request". This will guide you to: Paste a new API endpoint URL. Use the Params tab to add a ref (a reference ID specific to this API). Click "Send" and inspect the JSON response in the Body tab.
Deconstructing the Response
After you click "Send," the bottom half of the Postman window comes to life with the server's response. This section is your window into what the API is actually giving you. Understanding it is just as important as building the request.
Let's look at a detailed breakdown of the response pane.
POSTMAN BEGINNER TUTORIAL 3 💡 How to create First API Request
This tutorial from Automation Step by Step does an excellent job of dissecting the different parts of the API response in Postman.
Watch the portion from "let us understand the response". The key things to note are: Body: This is the main content, usually in JSON format. The "Pretty" view makes it readable. Status Code: Here, it's 200 OK, which means success. This is the first thing you should check. Time: How long the server took to respond. This is useful for checking performance. Size: The amount of data downloaded.
Pro-Tip: Avoiding Beginner Mistakes
When you're starting out, it's common for API requests to fail for reasons that aren't immediately obvious. Your LLM might give you a code snippet that looks correct, but it fails when you try it. Often, the issue is a tiny, almost invisible detail.
The Postman video we watched earlier concludes with some invaluable advice on this.
How to Send Your First API Request in Postman
Listen carefully to these common pitfalls. Knowing them can save you hours of frustration.
Watch this final clip covering mistakes beginners tend to make. The two most important rules are: Case-sensitivity matters: location is different from Location. You must match the API's documentation exactly. Beware of extra spaces: When you copy-paste an API key, URL, or parameter, make sure you don't accidentally include a leading or trailing space. The API server won't know how to handle it.
Conclusion
Congratulations! You've moved from API theory to hands-on practice. You now have a powerful tool in your design and development arsenal. When your LLM suggests using an API, you no longer have to treat it as a black box. You can open Postman, test the API endpoints yourself, see the exact data structure it returns, and understand its parameters. This knowledge will make your "vibe coding" sessions far more productive and less mysterious.
Key Takeaways:
- Postman is a visual tool for testing and interacting with APIs without writing code.
- You make a request by specifying an HTTP Method (like
GET) and an Endpoint URL. - Query Parameters are used to filter or customize
GETrequests. - The server's response contains a Status Code (like
200 OK), a Body (the data, usually JSON), and other useful metadata. - Attention to detail is critical: API requests are often case-sensitive and intolerant of extra spaces.
In our next lesson, we'll focus on what happens when things go wrong. We'll take a closer look at the common error codes you'll encounter—like 401 Unauthorized, 404 Not Found, and 500 Server Error—so you can quickly diagnose and fix problems with your API connections.