Recommended resources
The freely available resources this lesson will direct you to.
Hello! In the last lesson, you distinguished the operational database that records an order from the lake or warehouse used to retain and analyze its data. Now you will set up the environment in which you can begin building those kinds of pipelines.
By the end of this lesson, you should have Ubuntu running under WSL2 on Windows and be able to open a Linux project folder in Visual Studio Code (VS Code), with its integrated terminal running Ubuntu commands. The setup itself may take longer than the study time if Windows needs to download components or restart.
Understand the two sides of your development environment
WSL, the Windows Subsystem for Linux, lets you run a Linux distribution alongside Windows. Ubuntu is the distribution you will install; WSL2 is the version of WSL you want it to use. VS Code’s window runs on Windows, but its WSL extension can connect that window to Ubuntu. When connected, the terminal and development tools operate in the Linux environment.
Watch these two portions of How To Run Linux Code on Windows with WSL 2 & VS Code from TypeScript with Benny Code. The second portion shows why a VS Code window that merely looks the same can behave differently once it is connected to Ubuntu.
How To Run Linux Code on Windows with WSL 2 & VS Code
Watch how WSL supplies Linux tools on a Windows computer, then how VS Code connects its Windows interface to an Ubuntu environment.
Watch the overview for the purpose of WSL. Then watch the connection, from the initially Windows-based VS Code terminal through the Ubuntu-connected terminal. The video calls the extension “Remote WSL”; look for the WSL extension when you install it.
Keep one distinction in mind throughout the setup: PowerShell commands configure WSL from Windows; Ubuntu commands run inside Linux. If a command fails, first check which terminal you entered it in.
Install Ubuntu under WSL2
Microsoft’s Set up a WSL development environment gives the installation sequence, including the restart and the first Ubuntu login. Read the specified parts before carrying them out; you do not need its later sections on other distributions or databases.
Set up a WSL development environment
Read Microsoft's setup guide for the installation command, the separate Ubuntu account, and the initial package update.
In Get started, read the install steps. In Set up your Linux username and password, read the account setup; stop before the password-reset instructions. Finally, in Update and upgrade packages, read the update guidance.
The documented wsl --install route requires Windows 11 or a supported Windows 10 build (version 2004, build 19041 or later). To perform the setup:
-
Open PowerShell as Administrator on Windows and run:
wsl --installFollow any prompts and restart Windows when requested. This command normally installs Ubuntu as the default distribution.
-
Open Ubuntu from the Windows Start menu. At its first launch, create a Linux username and password. These are separate from your Windows credentials. Nothing appears while you type the password—not even dots—which is normal.
-
Back in PowerShell, check the installed distribution and WSL version:
wsl --list --verboseLook for an Ubuntu entry with
VERSIONequal to2. ItsSTATEmay sayRunningorStopped; either is fine. If Ubuntu is listed as version1, runwsl --set-version Ubuntu 2in PowerShell, then check again. If the listed distribution has a different name, use that exact name in place ofUbuntu. -
In the Ubuntu terminal, update its package information and installed packages:
sudo apt update && sudo apt upgradeEnter the Linux password if prompted and confirm an upgrade if asked. This step can take time, depending on how many packages need updating.
You now have a Linux account and package environment. Windows software and Ubuntu software are not automatically the same installations, even though both run on your computer.
Connect VS Code to Ubuntu
Install Visual Studio Code on Windows if it is not already installed. Open VS Code, go to Extensions, find the Microsoft WSL extension, and install it. The extension connects the Windows editor to your Ubuntu environment; you do not need to install a second VS Code desktop application inside Ubuntu.
The Remote development in WSL guide explains what happens when you open a folder through this connection. Read its short setup and terminal passages before trying them.
Read VS Code's guide to the WSL extension, opening a folder with code ., and recognizing the connected terminal.
Under Prerequisites, read Install the extension and Prerequisite check, including the status indicator. Then go to Run in WSL and continue through Integrated Terminal: read the folder and terminal setup. Focus on what the period in code . means and how to tell that the terminal belongs to WSL.
For a first working folder, open the Ubuntu terminal and enter:
mkdir -p ~/projects/de-foundations
cd ~/projects/de-foundations
code .
For now, the first two commands simply give you a folder to open; the next lesson will teach Linux file and directory commands systematically. In code ., the space and final period matter: the period means “open the current folder.” On the first launch, VS Code may install its server component inside Ubuntu; allow it time to finish.
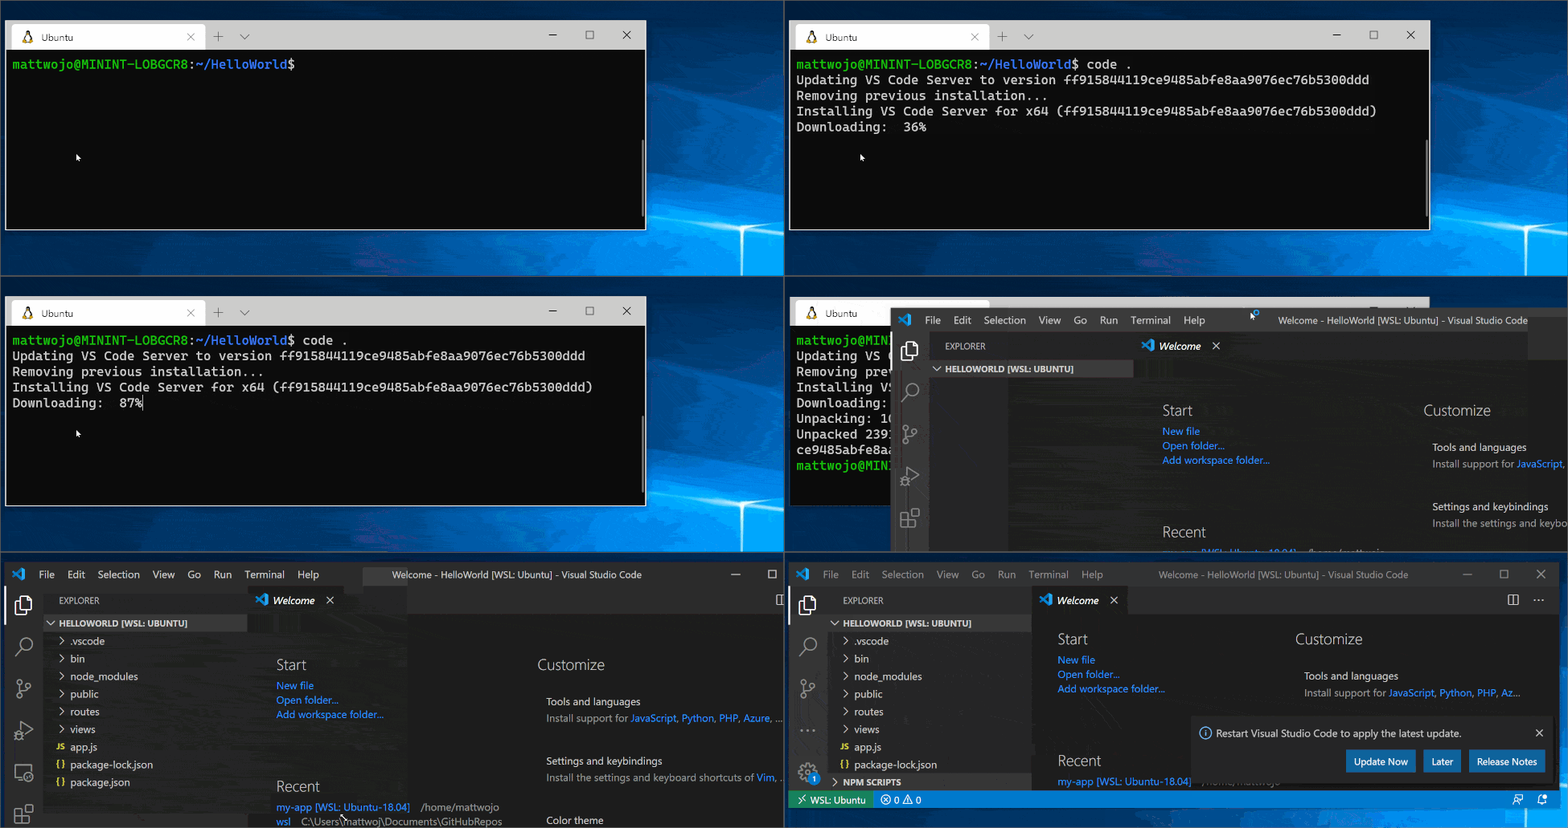
In the resulting VS Code window, look at the lower-left status area for a connection label such as WSL: Ubuntu. Then choose Terminal > New Terminal from the menu. This is the integrated terminal you will use for subsequent lessons.
Run these checks inside that VS Code terminal:
pwd
uname -s
whoami
pwd should show a Linux path ending in /projects/de-foundations; uname -s should print Linux; and whoami should print the Ubuntu username you created. The status label and these results together confirm both that VS Code opened your Linux folder and that its terminal is running in Ubuntu.
If code . is not recognized, close and reopen the Ubuntu terminal after installing VS Code, then try again. If VS Code opens but its status area does not show a WSL connection, use the WSL extension’s connection command from the lower-left status area and reopen your Ubuntu folder. Do not treat a PowerShell terminal in an ordinary Windows VS Code window as equivalent to the connected Ubuntu terminal.
Key takeaways
You installed Ubuntu under WSL2, created a Linux account, updated Ubuntu, and connected Windows-based VS Code to a Linux folder. Your reliable check is a WSL: Ubuntu connection indicator plus an integrated terminal that reports a Linux path and Linux as its system.
Next, you will use that terminal to navigate and manage files and directories—the basic workspace skills needed before writing pipeline code.