Recommended resources
The freely available resources this lesson will direct you to.
- Build a Solidity Crowdsale App (Presale) | Mint and sell ERC20 tokens | Solidity & Reactwww.youtube.com
- Transfer ERC20 token from your Solidity smart contractwww.youtube.com
- Code Your Own Cryptocurrency on Ethereum (How to ...www.dappuniversity.com
- Build a Real World ICO - The Complete Walkthroughwww.dappuniversity.com
Hello! Welcome back to our journey in building your own cryptocurrency.
In the last lesson, we built the entryway to our crowdsale: a payable function that accepts Ether from investors and calculates how many tokens they should receive. However, that's where we left off. The tokens haven't actually been moved, and the Ether is still sitting inside the crowdsale contract.
Today, we'll connect the plumbing. Your goal is to integrate the crowdsale with your ERC-20 token to distribute tokens upon purchase. This involves making your crowdsale contract "talk" to your token contract to trigger a token transfer, and then securely forwarding the investor's ETH to your project's wallet.
Given your background as a backend developer, you can think of this as one microservice (the crowdsale contract) making a secure, authenticated API call to another microservice (the ERC-20 token contract) to execute a transaction. The ERC-20 standard itself acts as the API specification.
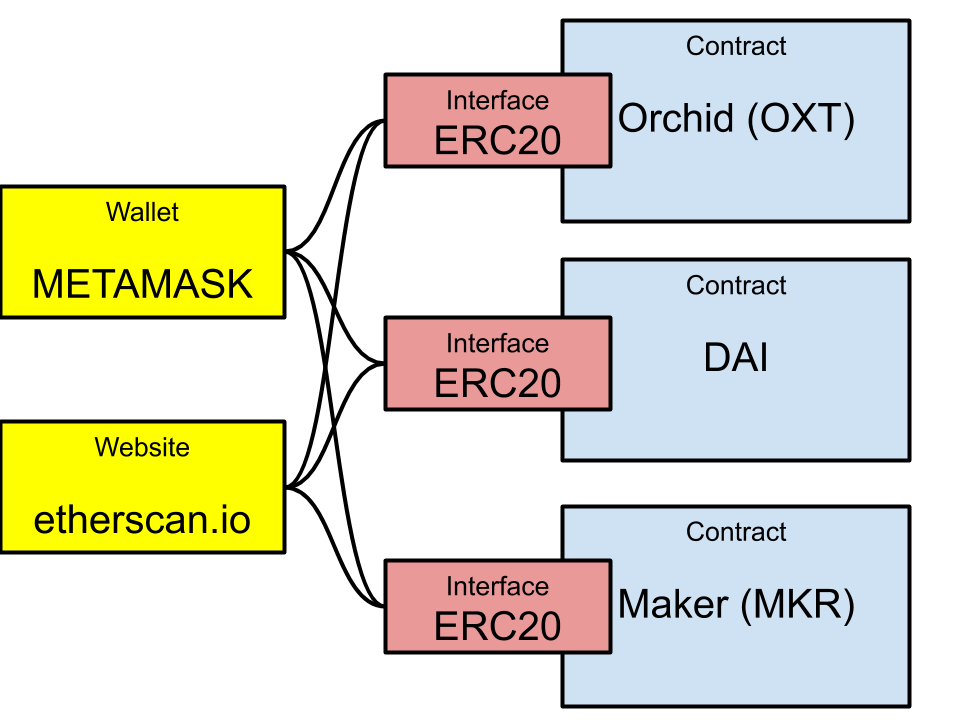
1. Enabling Communication Between Contracts
For one smart contract to call functions on another, it needs two crucial pieces of information:
- The address of the target contract.
- The interface (or ABI) of the target contract, which defines the functions that can be called.
In Solidity, we achieve this by creating an interface or importing the contract code directly. A common and recommended practice is to use the IERC20 interface provided by libraries like OpenZeppelin.
Let's see a practical demonstration of how to make one contract aware of and able to interact with an ERC-20 token.
Transfer ERC20 token from your Solidity smart contract
The video "Transfer ERC20 token from your Solidity smart contract" by Artur Chmaro clearly demonstrates the exact mechanism we need. It shows how to import the ERC-20 interface and use it to call the transfer function on a token contract.
Watch the video from the beginning until 3:17. Focus on how the IERC20 interface is imported and then used to create a variable (token) that can call functions like balanceOf and transfer on an external token contract.
In our crowdsale contract, this looks something like this:
import "@openzeppelin/contracts/token/ERC20/IERC20.sol";

contract Crowdsale {
    IERC20 public token;
    address payable public wallet; // The wallet where funds will be collected
    uint256 public rate; // How many token units a buyer gets per wei

    constructor(uint256 _rate, address payable _wallet, address _tokenAddress) {
        rate = _rate;
        wallet = _wallet;
        token = IERC20(_tokenAddress);
    }

    // ... buyTokens and other functions will go here
}
By passing the token's address to the constructor and casting it to the IERC20 type, we've equipped our crowdsale contract with a "remote control" to manage the token.
2. Two Models for Token Distribution
Now that our contracts can communicate, how should the tokens be distributed? There are two primary models, and the one you choose affects the design of both your token and crowdsale contracts.
Model A: The Transfer Model (Vendor)
This is the most straightforward model.
- Minting: When the ERC-20 token contract is deployed, the entire supply (or a very large portion of it) is minted to you, the owner.
- Funding: You then call the token's
transferfunction to send a specific amount of tokens to the crowdsale contract's address. - Selling: The crowdsale contract now holds a stock of tokens. When an investor buys, the crowdsale contract transfers tokens from its own balance to the investor.
This is like stocking a vending machine. You fill it up, and it dispenses items until it's empty.
Code Your Own Cryptocurrency on Ethereum (How to ...
The article "Code Your Own Cryptocurrency on Ethereum" from DappUniversity provides a classic example of this transfer-based model. Let's examine the code for the crowdsale contract.
In the provided code, find the DappTokenSale contract and look closely at the buyTokens function. Notice this line: require(tokenContract.transfer(msg.sender, _numberOfTokens));. This is the core of the transfer model in action.
The key line is tokenContract.transfer(msg.sender, _numberOfTokens). This instructs the token contract to send tokens from the DappTokenSale contract's balance to the buyer (msg.sender).
Model B: The Minting Model (On-Demand)
This model is more dynamic and is common in modern token sales.
- Ownership/Role: Your ERC-20 token contract is created with a
mintfunction, which is protected. Usually, only an account with a specific role (e.g.,MINTER_ROLE) can call it. - Granting Permission: After deploying both contracts, you configure the token contract to grant the
MINTER_ROLEto the crowdsale contract's address. - Mint-to-Order: When an investor buys tokens, the crowdsale contract doesn't transfer from its own balance. Instead, it directly calls the
mintfunction on the token contract, creating new tokens on the fly and assigning them to the investor.
This is like a 3D printer. It doesn't hold stock; it creates the item only when an order is placed. The token's totalSupply grows with each purchase.
Build a Real World ICO - The Complete Walkthrough
DappUniversity's more advanced tutorial, "Build a Real World ICO," introduces this exact concept using OpenZeppelin's MintedCrowdsale contract. This shows a more sophisticated implementation of the same idea.
Read section 4, "Minted Crowdsale". Notice how the contract inherits from MintedCrowdsale. The test it('mints tokens after purchase', ...) confirms that the totalSupply of the token increases after a purchase, which is the defining characteristic of this model.
3. Completing the buyTokens Function
Let's now update the buyTokens function from our last lesson to include the token distribution and fund forwarding logic. We'll use the Transfer Model for our main example.
The logical flow inside buyTokens() should be:
- Validate the input (e.g.,
msg.value > 0). - Calculate the
amountOfTokens. - Check that the crowdsale contract has enough tokens to fulfill the order.
- Transfer the tokens to the buyer (
msg.sender). - Forward the received Ether (
msg.value) to the project wallet. - Emit an event.
Build a Solidity Crowdsale App (Presale) | Mint and sell ERC20 tokens | Solidity & React
The "Build a Solidity Crowdsale App" video walks through a full crowdsale contract, including the functions that handle token delivery and fund forwarding. This provides a great end-to-end view.
Watch from 8:33 to 11:38. The video explains the internal functions of the buyTokens lifecycle. Pay attention to _deliverTokens (which calls token.transfer) and _forwardFunds. This shows a well-structured way to organize the logic.
Forwarding the Funds Securely
A naive way to send the ETH is wallet.transfer(msg.value). This is no longer recommended. The .transfer() method has a fixed gas limit of 2300, which can cause transactions to fail if the recipient wallet is a contract with complex logic in its receive function.
The modern, robust method is to use .call():
(bool success, ) = wallet.call{value: msg.value}("");
require(success, "Failed to send ETH");
This forwards all available gas and is the current best practice for sending Ether.
The Final Code
Here is the complete buyTokens function using the Transfer Model:
// In your Crowdsale contract...
function buyTokens() external payable {
    // 1. Validation
    require(msg.value > 0, "Must send some ETH");

    // 2. Calculation (from previous lesson)
    uint256 amountOfTokens = msg.value * rate;

    // 3. Check contract's token balance
    require(token.balanceOf(address(this)) >= amountOfTokens, "Not enough tokens in stock");

    // 4. Transfer tokens to the buyer
    // Note: It's good practice to check the boolean return value
    bool sent = token.transfer(msg.sender, amountOfTokens);
    require(sent, "Token transfer failed");

    // 5. Forward the ETH to the project wallet
    (bool success, ) = wallet.call{value: msg.value}("");
    require(success, "Failed to forward ETH");

    // 6. Emit an event
    emit TokensPurchased(msg.sender, msg.value, amountOfTokens);
}

// Don't forget the receive function from last lesson
receive() external payable {
    buyTokens();
}
Test your understanding!
You have decided to use the Minting Model instead of the Transfer Model for your crowdsale. What are the two critical setup steps you must perform after deploying your token and crowdsale contracts to make the system work?
Show answer
- On your ERC-20 token contract, you must call the function that grants the minting permission (e.g.,
grantRole(MINTER_ROLE, address(crowdsaleContract))). This authorizes the crowdsale contract to create new tokens. - In your
buyTokensfunction, you must replacetoken.transfer(...)withtoken.mint(msg.sender, amountOfTokens).
Conclusion
Excellent work! You have now fully connected your crowdsale contract to your ERC-20 token. Your buyTokens function is no longer just a calculator; it's a complete vending machine that accepts payment, delivers the product, and secures the revenue.
Key Takeaways:
- Contracts interact using an address and an interface (
IERC20). - You can choose between two main distribution models:
- Transfer Model: Pre-fund the crowdsale contract with tokens, which it then transfers to buyers.
- Minting Model: Grant the crowdsale contract permission to mint new tokens directly to buyers on demand.
- The
token.transfer()function is used in the Transfer Model, whiletoken.mint()is used in the Minting Model. - Always use the
(bool success, ) = address.call{value: amount}("")pattern to securely forward Ether from your contract.
Preview of the Next Lesson:
Our crowdsale works, but it's a free-for-all! An investor could buy all the tokens in one go, or the sale could run forever. In the next lesson, we will learn how to add a funding cap to limit the total investment amount, bringing our crowdsale one step closer to a real-world, controlled offering.