Recommended resources
The freely available resources this lesson will direct you to.
- How to test legacy code with characterization tests (JavaScript)www.youtube.com
- How to Test Legacy Code (Emily Bache)www.youtube.com
- Characterization testing - refactoring legacy code with confidence - Cloudamitecloudamite.com
- Golden master testing aka Characterization test: a powerful tool to win your fight against legacy codewww.fabrizioduroni.it
Introduction
In our previous lesson, we explored behavioral design patterns like Strategy and Observer, identifying how they can help refactor complex logic and create more flexible systems. However, undertaking such refactoring in a real-world legacy codebase is fraught with risk. How can you be certain your changes haven't unintentionally broken existing functionality, especially when there are no tests?
This lesson introduces the crucial technique that provides the answer: characterization testing. You will learn how to write tests that act as a safety net, not by defining what the code should do, but by capturing and preserving what it currently does, bugs and all. This approach, also known as Golden Master or Approval Testing, is the first and most critical step in safely refactoring and modernizing legacy systems. By mastering this, you gain the confidence to make architectural improvements without fear of introducing regressions.
1. What is Legacy Code?
The term "legacy code" often brings to mind old, messy, and complex systems. While that's often true, the most precise and actionable definition comes from Michael Feathers, a leading voice in software design and refactoring.

This definition is powerful because it's not about age; it's about safety. Without tests, any change is a gamble. Characterization testing is the technique designed specifically to get legacy code under test, transforming it from a fragile liability into a maintainable asset.
So, what exactly is a characterization test?
This article provides an excellent introduction to the concept from the perspective of a Java and Spring Boot developer, which aligns perfectly with your experience.
Please read the introduction, starting from the beginning and continuing to the formal definition. Pay close attention to how it distinguishes this from traditional testing. Then, read the paragraph that follows, which summarizes the core benefit: gaining the confidence to refactor.
The key idea is that instead of writing assertions based on a specification (which might be outdated or non-existent), you run the code with a set of inputs, capture the output, and then assert that future runs produce the exact same output. This captured output becomes the "golden master," a perfect snapshot of the system's current behavior.
2. The Process of Characterization Testing
Creating a characterization test involves a systematic process. Let's walk through the steps, using a combination of conceptual explanations and practical examples.
Step 1: Make the Code Deterministic
Before you can capture a reliable "golden master," you must ensure the code is deterministic. This means for the same input, it must always produce the same output. Legacy code is often riddled with non-deterministic elements:
- Accessing the system clock (
new Date(),System.currentTimeMillis()) - Using random number generators
- Calling external services (APIs, databases) that might be unavailable or return varying data
Attempting to test such code directly will result in flaky tests that fail for reasons unrelated to your changes. The solution is to perform a minimal, safe refactoring to introduce "seams"—places where you can replace the non-deterministic component with a predictable test double (a fake or mock).
Characterization testing - refactoring legacy code with confidence - Cloudamite
This article from Cloudamite provides a clear, practical guide for this crucial first step.
Read the section Preparations – some determinism. It demonstrates a powerful technique in object-oriented languages like Java: extracting a dependency call into a protected method. This allows your test class to inherit from the production class and override the method to return a predictable value (like a fixed timestamp or a mock dependency) without changing the public API.
This is a subtle but critical technique. You are making a tiny, controlled change to enable testing, which is a much safer starting point than trying to refactor the business logic itself.
Step 2: Identify Critical Inputs
With the code now deterministic, you need to decide which inputs to test. You cannot test every possible input, so you must strategically select a representative set. The code itself is your best guide.
To do this, you analyze the method you are testing and look for the variables and conditions that control its execution flow.
How to test legacy code with characterization tests (JavaScript)
This video uses JavaScript, but the process of analyzing the code for inputs is universal and demonstrated very clearly.
Watch the segment from where the presenter inspects the code. Notice how he isn't trying to understand the business logic deeply. Instead, he's just searching for where input variables like name, sellIn, and quality are used in if statements. He uses these conditions (e.g., sellIn < 11, sellIn < 6, quality < 50) to identify the important boundary values he needs to include in his tests.
This "white-box" approach allows you to quickly build a set of inputs that are likely to exercise different code paths, giving you meaningful coverage without needing to understand every nuance of the requirements.
Step 3: Capture the Golden Master and Automate with Approval Testing
Now for the core activity. You write a test that calls the code with one of your chosen inputs, captures the output, and uses that output as the expected result.
The manual process is described well in the fabrizioduroni.it article we looked at earlier.
This article gives a concrete Java example of manually creating a characterization test.
First, look at the messy TravelsAdapter class in the section presenting the problem. Next, see how a toString() method is added to the Travel class to make the output easy to compare. Finally, examine the test code in the section goldenMaster. The author runs the code, captures the resulting string, and pastes it directly into the assertThat assertion. This hardcoded string is the "golden master."
While this manual process works, it can be cumbersome. A more powerful approach is to use an Approval Testing library. These tools automate the process of managing the golden master. When a test is run for the first time, the library saves the output to a *.received.txt file. A diff tool then opens, showing the received output alongside an empty *.approved.txt file.
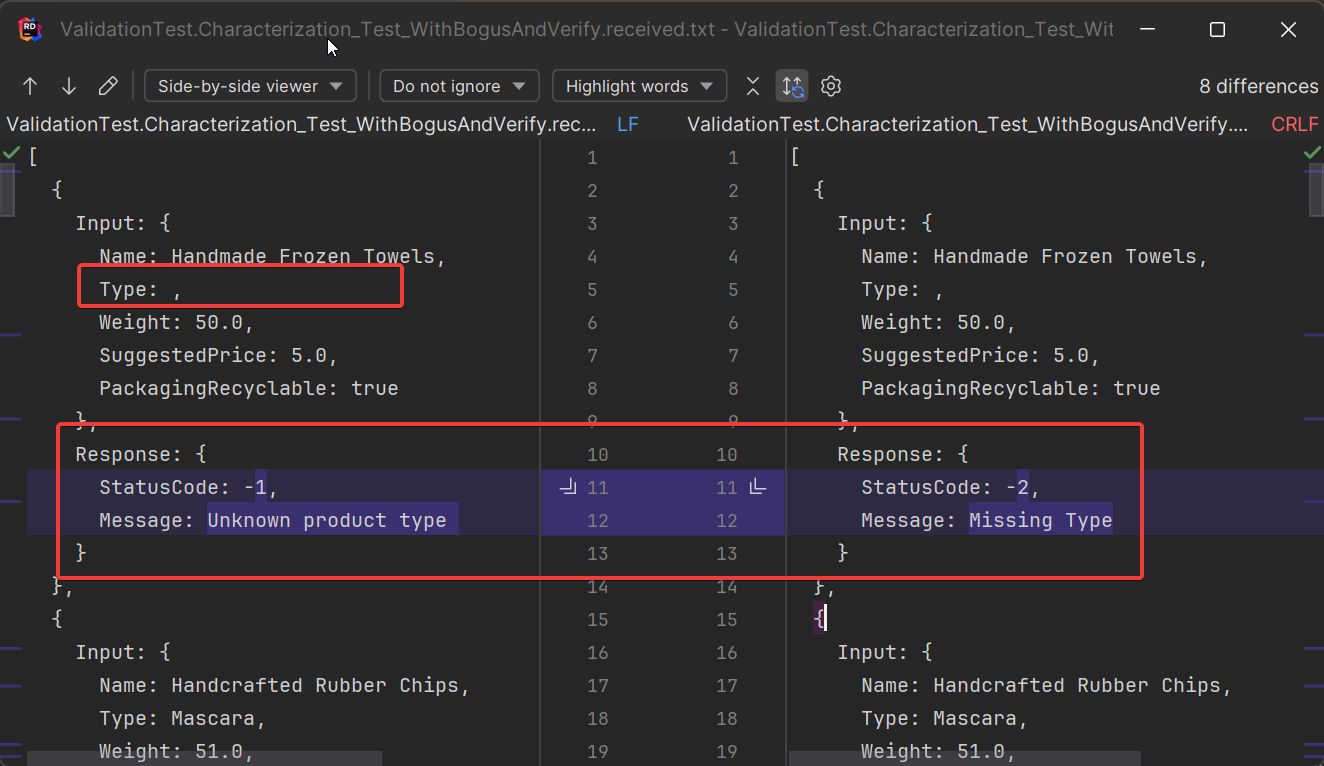
You simply "approve" the result, which copies the content into the *.approved.txt file. Now, the test will pass on subsequent runs as long as the output matches the approved file. If a change in the code causes the output to differ, the test fails, and the diff tool shows you exactly what changed.
Emily Bache, an expert on this topic, gives a fantastic demonstration of this workflow.
How to Test Legacy Code (Emily Bache)
In this video from Tech Excellence, Emily Bache uses the classic Gilded Rose kata to demonstrate the power of approval testing.
First, watch her set up a basic approval test from this starting point. Note how she runs the test, it fails, the diff tool appears, and she approves the result. Also, see how she creates a custom "printer" to control the format of the output string, a key technique for readable tests. Next, watch how she systematically increases test coverage from this segment. This is the most important part of the video. She uses a code coverage report to see which lines of code are not being executed. She then adds more input values to her test setup to hit those lines. Notice how the "combination approvals" feature automatically generates tests for every combination of the inputs, quickly creating a comprehensive safety net.
This combination of using a coverage tool to guide your input selection and an approval testing library to manage the outputs is an incredibly efficient and effective way to build a robust characterization test suite.
3. Practical Application: Plan Your First Characterization Test
Now it's time to apply these concepts to your own work. Your task is to create a plan for writing a characterization test for a piece of code you're familiar with. This will be a "paper trail of competence" you can store in your personal knowledge base.
- Select a Target: Identify a small but non-trivial public method in your current codebase that has no tests. An ideal candidate is a method with several conditional branches (
if/else) that transforms some input data into an output. If you cannot use your work's codebase, use a personal project or find an open-source example. - Create a Test Plan Document: In your Notion, Obsidian, or other knowledge base, create a new note titled "Characterization Test Plan:
[YourClassName.methodName]". - Document the Following:
- Method Signature: Write down the full signature of the method.
- Inputs & Outputs: List the input parameters and the return type.
- Non-Determinism Analysis:
- Inspect the method's body. List any sources of non-determinism (e.g.,
System.currentTimeMillis(),new Random(), calls to external web services, database queries that could return different data). - For each source you find, describe how you would introduce a "seam" to make it deterministic in a test environment. Reference the
protectedmethod technique from the Cloudamite article. For example: "The method callsnew Date()to get the current time. I would extract this toprotected Date getCurrentDate() { return new Date(); }and override it in my test class to return a fixed date."
- Inspect the method's body. List any sources of non-determinism (e.g.,
- Input Space Analysis:
- Analyze the method's conditional logic. List the key values and boundary conditions that control the code's flow.
- Example: "The code checks
if (user.getRole().equals("ADMIN")). My input values for theuserobject must include cases where the role is 'ADMIN' and where it is not." - Example: "The code checks
if (amount > 1000). My input values foramountmust include 999, 1000, and 1001."
- Golden Master Strategy:
- Describe how you would capture the output. Will the object's
toString()method be sufficient? Or would you need to serialize it to JSON? - Write a pseudo-code snippet of what the final approval test would look like, using the "combination approvals" approach demonstrated by Emily Bache. For example:
Approvals.verifyAllCombinations(this::doUpdate, names, sellIns, qualities);
- Describe how you would capture the output. Will the object's
Completing this exercise will solidify your understanding of the process and give you a repeatable blueprint for tackling any piece of legacy code.
Conclusion
This lesson provided you with a powerful strategy for breaking the dangerous cycle of legacy code. By putting a safety net in place before you refactor, you transform a risky endeavor into a controlled, professional engineering task.
Key Takeaways:
- Legacy code is code without tests. The primary problem it poses is the inability to make changes safely.
- Characterization tests lock down current behavior. They capture the system's actual output, including bugs, creating a "golden master" to test against.
- The process is systematic: First, ensure determinism by introducing seams. Then, analyze the code to identify critical inputs. Finally, use an approval testing library to capture the output and systematically expand coverage.
- Approval testing tools are a major force multiplier. They automate the management of golden master files and provide clear diffs when behavior changes, making the entire process far more efficient.
You now have the single most important prerequisite for advanced refactoring. In our next lesson, we will leverage this safety net to learn the Strangler Fig pattern, a strategy for incrementally and safely replacing large parts of a legacy system with modern code.