Recommended resources
The freely available resources this lesson will direct you to.
Hello! Your Python project now has a CLI and pytest tests that check ordinary counts, the zero-count boundary, and invalid negative counts. This final lesson in the foundations module puts that work into a safe development workflow. You’ll make one small change on a Git branch, record it in focused commits, check it, and merge it into your main line of development. Allow about 40–50 minutes, depending on whether your project already has a Git history.
Why work on a branch?
Suppose you want to fix an awkward message from the previous lesson: "Processed 1 files". The intended new result is "Processed 1 file", while "Processed 0 files" and "Processed 125 files" stay as they are. It is a small feature, but changing it directly on your main branch would give you no separate place to inspect the completed change before integrating it.
A branch is that separate line of work. The diagram shows a feature branch accumulating commits before its changes join the main branch. It also shows a pull request and discussion: useful steps when working with a remote repository and reviewers, but not required to practice a safe local merge.
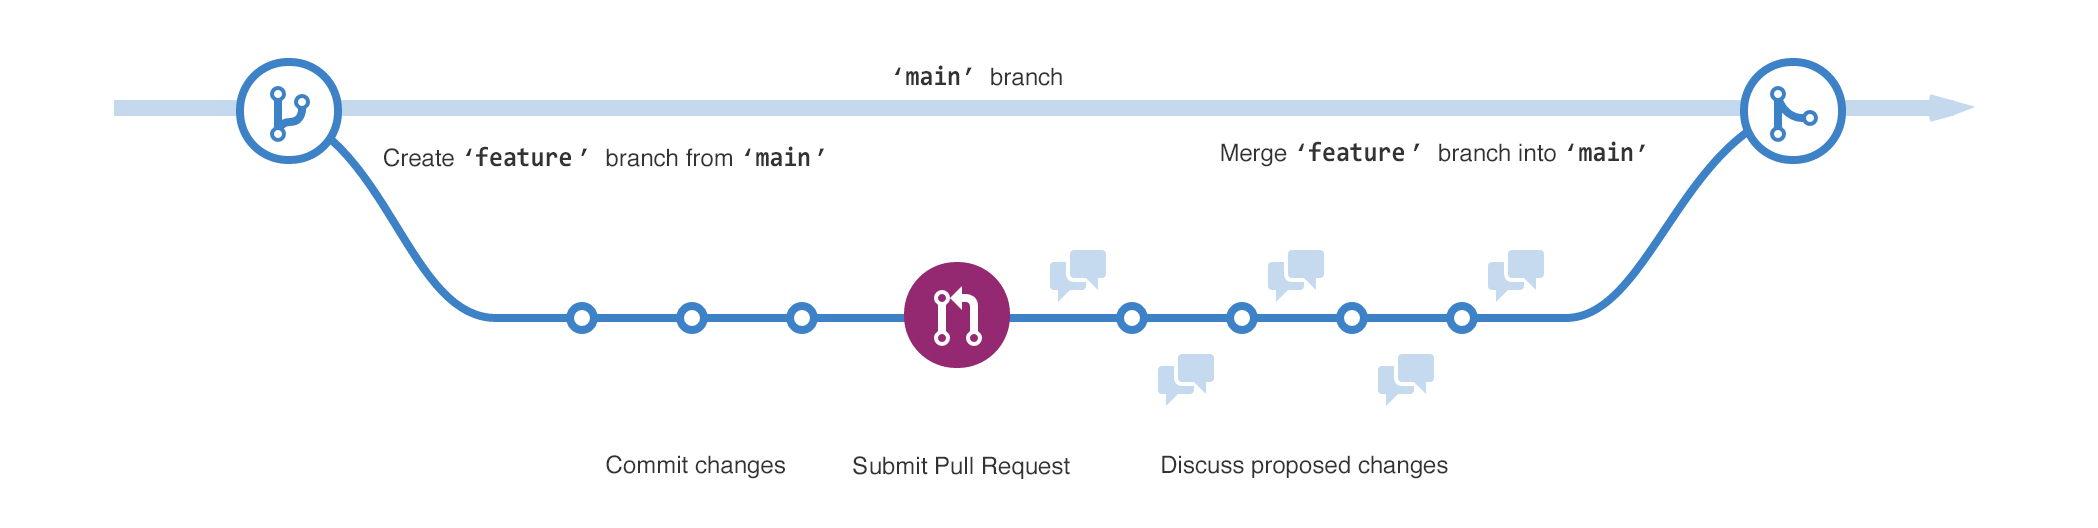
Watch selected parts of Git Branching and Merging – Detailed Tutorial by SuperSimpleDev. The demonstration uses different branch names and files; focus on where a commit goes when a feature branch is checked out, and which branch receives changes during a merge.
Git Branching and Merging - Detailed Tutorial
Watch the branching, feature-commit, and merging demonstrations to build a picture of what the commands below will do.
Start with branching for the reason to separate work. In feature commits, notice that the new commits belong to the checked-out branch. Then watch merging for the idea of bringing that work back into the main line.
Establish a clean starting point
Work from your project root. First check whether it is already a Git repository:
git status
git branch --show-current
If git status says this is not a Git repository, initialize one with git init. Before the first commit, create a .gitignore that excludes at least your virtual environment, Python caches, pytest’s cache, and local environment files:
.venv/
__pycache__/
.pytest_cache/
.env
Inspect git status carefully. Stage the source, tests, dependency manifest, and other project files you intend to keep; do not stage credentials, generated data, or the virtual environment. Review the staged files with git diff --cached --stat, then make an initial project commit. If your Git installation needs an identity configured before it can commit, follow its prompt.
If the repository already has commits, finish or set aside any unrelated, uncommitted work before continuing. The work from earlier lessons should be safely committed on your existing main line; this lesson’s feature should not accidentally include it. Run python -m pytest -q to confirm that your starting point passes.
The commands below call the main line main. If yours is called master or something else, substitute its actual name; there is no need to rename an existing branch.
GitHub’s GitHub flow explains why branches have descriptive names and why commits should contain isolated, understandable changes.
Read GitHub’s explanation of a branch as a workspace and of focused commits. Those ideas apply even when all your work stays on your computer.
Under “Following GitHub flow,” read “Create a branch,” including its explanation that the branch leaves the default branch unaffected. Then, under “Make changes,” read focused commits, from the paragraph about mistakes on a branch through the example of keeping changes separate. Focus on why a commit should represent a coherent change, not merely whatever files happened to be modified at the time.
With the main line checked out and the working tree clean, create your feature branch:
git switch -c feature/singular-file-message
git status
git status should report the new branch. Until you merge, commits made here advance this feature branch, not main.
Make the feature in two focused commits
Your first commit will contain the behavior and its test. In tests/test_cli.py, change the existing parameterized case for a count of 1 to expect "Processed 1 file". Leave the zero, many-files, and negative-count cases intact.
Run the targeted tests:
python -m pytest -q tests/test_cli.py
The one-file case should fail. That is expected: it establishes that the test detects the behavior you intend to change. Now update progress_message in src/repo_assistant/cli.py. Preserve its negative-count guard, and choose the noun based on the count:
def progress_message(file_count: int) -> str:
    if file_count < 0:
        raise ValueError("file_count must be nonnegative")
    noun = "file" if file_count == 1 else "files"
    return f"Processed {file_count} {noun}"
The check is specifically for 1, not for “greater than zero”: 0 and every count above 1 still take the plural form. Run both the targeted file and the full suite:
python -m pytest -q tests/test_cli.py
python -m pytest -q
Before committing, inspect exactly what changed and stage only the behavior and its test:
git diff -- src/repo_assistant/cli.py tests/test_cli.py
git add src/repo_assistant/cli.py tests/test_cli.py
git diff --cached
git diff --cached --check
git commit -m "Use singular file in one-file progress message"
The second commit will document that behavior. Add a short “Progress messages” note to your existing README.md; if you do not have one, create a brief README. State that a count of 1 produces "Processed 1 file", while 0 produces "Processed 0 files". Describe the formatting behavior without claiming you have tested when the CLI displays the message—that is a different question.
git add README.md
git diff --cached
git commit -m "Document progress message wording"
git status
These commits have distinct purposes: one makes and tests the behavior; the other explains it to someone using the project. A passing suite is important, but so is reading the staged diff: tests cannot tell you that you accidentally included an unrelated file.
Review and merge the branch
Before merging, examine the feature as a whole:
git diff main...HEAD --stat
git diff main...HEAD
python -m pytest -q
Check that the comparison contains only the message change, its test, and the documentation. The three-dot comparison presents the feature’s changes relative to where it branched from main.
Now switch to the destination branch and merge the source branch into it:
git switch main
git merge feature/singular-file-message
python -m pytest -q
git status
If main has not gained another commit since you created the feature branch, Git will likely report a fast-forward: it moves main to the feature branch’s latest commit. Your two commits are now on main, even though Git did not need to create an additional merge commit. If the branches have both advanced, Git may instead combine their histories with a merge commit.
Read the relevant parts of Git – Basic Branching and Merging for that distinction and for what to do if Git cannot combine overlapping edits automatically. The book’s examples call the main line master; the merge principle is the same.
Git - Basic Branching and Merging
Use this Git book chapter to interpret your merge result and recognize the safe response to a conflict.
Under “Basic Branching,” read the fast-forward example, beginning just after the hotfix commit and continuing through the explanation of why no divergent work needs combining. Under “Basic Merging,” read the divergent-branch example, from the merge commands through the description of a merge commit. Finally, under “Basic Merge Conflicts,” read conflict resolution, from checking unmerged files through editing out conflict markers and staging the resolved file. You need not use a merge tool for this exercise.
A conflict is possible if main and the feature branch changed the same part of a file. Git pauses rather than guessing which version you meant. Run git status, inspect each marked section, edit it to the correct final content, and remove all conflict markers. Rerun the tests, stage the resolved files with git add, and use git commit if git status says the merge still needs concluding. If you cannot determine the right resolution, git merge --abort returns you to the pre-merge state so you can investigate rather than committing a guess.
Once the merge is complete and the tests pass, check the history and remove the now-unneeded local feature branch:
git log --oneline --decorate -5
git branch -d feature/singular-file-message
A hosted pull request can add review before this integration. If you later use one, GitHub’s GitHub flow describes asking for feedback and merging after approval; for today, the local diff review and test run serve as your checkpoints.
What you can carry forward
You completed a small feature without changing the main line until it was ready: you started clean, worked on a descriptive branch, made focused commits, reviewed the combined diff, ran the tests, and merged into the correct destination. A fast-forward is still a successful merge; a conflict is a pause to resolve and verify changes, not a reason to discard them.
Next, you’ll use these Python and Git foundations while building code that calls an HTTP API. The same habit—small changes, tests, and a reviewable history—will help when network failures add new ways for a feature to go wrong.