Recommended resources
The freely available resources this lesson will direct you to.
- Straight Grain vs Cross Grainwww.youtube.com
- Understanding Fabric Grain - Straight grain, Cross grain & Bias - What is it and why does it matter?www.youtube.com
- Do You Really Have to Cut Fabric on the Grainline?www.seamwork.com
- Go with the Grain - Sewing Woven Fabrics - Threads Magazinewww.threadsmagazine.com
Hello! In the previous lesson, you identified woven fabric by its two interlaced yarn systems. Now you’ll use those yarns as a map. By the end of this lesson, you should be able to point out the lengthwise grain, crosswise grain, and bias on a woven sample—even after someone turns the sample around on the table.
These directions matter in fashion design because a garment piece can hang and give differently depending on how it is positioned on the cloth. We’ll focus on locating the directions today; you’ll work with full pattern layouts later in the course.
Read the fabric, not the table
A woven fabric has two sets of yarns crossing at roughly right angles. The warp yarns run along the fabric’s length, while the weft yarns run across its width. The finished edges made during weaving are called selvages. On a length of fabric, they run in the same direction as the warp.
Look at the teal sample below. The labelled selvage is at the left. The vertical arrow follows the warp, so it shows the lengthwise grain. The horizontal arrow follows the weft, so it shows the crosswise grain. Those arrows would still identify the same yarn directions if you rotated the image: “lengthwise” does not mean “up the page.”
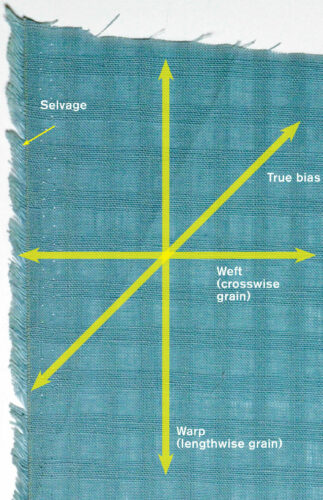
The diagonal arrow shows true bias: a direction at approximately 45 degrees to both yarn systems. There are two possible diagonals at that angle across a square of fabric. More broadly, any direction between the lengthwise and crosswise grains is on the bias, but “true bias” names the 45-degree direction. Bias is not a third set of woven yarns; it is a direction across the warp-and-weft grid.
Watch how a fabric sample makes these directions visible in Straight Grain vs Cross Grain from Nick Verreos. The presenter draws the directions directly onto the cloth, which is easier to follow than memorizing three definitions.
Watch Straight Grain vs Cross Grain from Nick Verreos to see the selvage identified and the three directions drawn on a woven sample.
Watch the demonstration. Notice that the straight-grain line is parallel to the selvage, the cross-grain line is at a right angle to it, and the bias line crosses a square diagonally. The presenter also gently compares how much the cloth gives in each direction.
Find each direction on real cloth
The most dependable starting point on an intact length of woven fabric is a selvage. It is the edge formed during weaving, not an edge cut later with scissors. It may look firmer or be woven differently from the rest of the fabric; it does not have to look perfectly smooth.
Once you have found a selvage, locate the directions in this order:
- Lengthwise grain: follow a line of yarns parallel to the selvage. These are warp yarns.
- Crosswise grain: follow a line of yarns from one selvage toward the other, at roughly a right angle to the lengthwise direction. These are weft yarns.
- True bias: imagine or mark a square whose sides follow the two yarn directions. A diagonal across that square gives you a 45-degree bias direction.
A recently cut edge is not reliable evidence of crosswise grain: whoever cut it may have cut at an angle. Nor does a printed stripe necessarily follow the yarns. Check the fabric structure or selvage rather than assuming that a visible design line is straight grain.
The short reading below reinforces the relationship between selvages, yarns, and the three directions. In Do You Really Have to Cut Fabric on the Grainline?, Seamwork also introduces why a designer might choose a direction deliberately.
Do You Really Have to Cut Fabric on the Grainline?
Read Seamwork’s explanation of the three directions to connect what you saw in the video with the terms used on sewing patterns.
In “What is the grainline?”, begin with the opening explanation. Then read the three labelled paragraphs: lengthwise grain, crossgrain, and bias. Focus on how to locate each direction; the garment examples are illustrations, not cutting rules to memorize.
If you have only a small swatch with no selvage, you can still look closely for the two crossing yarn directions and identify a bias diagonal between them. You cannot always tell which of the two yarn directions was originally lengthwise from that swatch alone. If its selvages were trimmed off and you have no information about how it came from the fabric length, leave that identification uncertain rather than guessing.
A hands-on locating routine
Allow about 15–20 minutes for this part. Use a woven offcut if you have one, ideally with a selvage; a piece of plain woven cotton is easier to inspect than a heavily textured cloth. A ruler, a square piece of paper, and removable tailor’s chalk can help. You can also place paper arrows beside the fabric instead of marking it.
Lay the sample flat without pulling it into shape. Find and indicate the selvage, then trace the yarn direction parallel to it. Indicate a second direction across the first, following the other yarn set. If the yarns are hard to see, try bright light or your phone camera’s zoom. On a suitable scrap, you can gently follow one visible yarn near an edge with the tip of a pin; there is no need to damage a garment.
Next, place your paper square so its sides line up with the two yarn directions—not merely with the cut edges of the swatch. Either diagonal of the square shows true bias. If your square seems to line up with the cut edges but not the yarns, trust the yarns.
Finally, hold a small area and give it a gentle, comparable pull along each of the three directions, releasing it each time. In many ordinary wovens, lengthwise grain is relatively stable, crosswise grain has some give, and true bias has more give because the yarns can shift relative to one another. This is a useful check, not a test that defines grain: weave, finish, and added stretch fibres can change what you feel. Locate the directions from the yarns and selvage first.
Why a designer cares
Picture a simple woven top. If its main pieces are intended to run lengthwise but are placed at an unintended diagonal, the cloth may give and hang differently from the design you planned. Bias can also be chosen on purpose when a design calls for a more yielding drape. The important distinction is between a deliberate choice and an accidental tilt.
You may hear both fabric grain and pattern grainline. Fabric grain describes directions in the cloth; a pattern grainline is the marking on a paper pattern piece used to orient that piece on the cloth. For now, the useful skill is being able to locate the cloth’s directions before you try to match anything to them.
Key takeaways
On woven fabric, lengthwise grain follows the warp and runs parallel to the selvages; crosswise grain follows the weft and runs across them. True bias runs diagonally at 45 degrees to both yarn directions and often has noticeably more give. Use the selvage and actual yarns as your evidence—not the position of the fabric on a table, a printed stripe, or an uneven cut edge.
Next, you’ll look for nap, pile, and one-way prints: surface and design directions that also matter when deciding which way a garment piece should face.